Introduction
Stocky SaaS — Multi-Tenant Inventory Management System with POS, Online Store & Complete SaaS Platform.
Stocky SaaS is a powerful, multi-tenant Software-as-a-Service platform built on top of the Stocky inventory management system. It allows you to run your own SaaS business where multiple tenants (businesses) can sign up, choose a subscription plan, and get their own isolated workspace — each with a full-featured inventory system, POS, online store, and more.
The platform is divided into two main panels:
- Super Admin Panel — The central control hub for platform owners. Manage tenants, subscription plans, payments, landing page CMS, knowledge base, email templates, payment gateways, and all platform-wide settings.
- Tenant Panel — The workspace for each tenant (business). A complete inventory management system with POS, online store, sales, purchases, customers, suppliers, reports, and much more.
SaaS Platform Features
- Multi-Tenant Architecture — Each tenant gets an isolated database and workspace
- Subscription Plans — Create flexible plans with usage limits and feature toggles
- Multiple Payment Gateways — Stripe, PayPal, Paystack, Flutterwave
- Landing Page CMS — Fully customizable public landing page with hero, features, pricing, testimonials, FAQ sections
- SEO Management — Configure meta tags and keywords for your landing page
- Knowledge Base — Self-service help center for tenants
- Email Templates — Customizable notification emails with multi-language support
- Tenant Lifecycle Management — Create, approve, suspend, cancel, and reprovision tenants
- Revenue Dashboard — Track payments, invoices, and monthly revenue trends
- Role-Based Admin Access — Super admin and admin roles with granular permissions
- VPS & Shared Hosting Support — Automatic or manual tenant provisioning
Tenant Features
- Easy POS and Dynamic Dashboard
- Online Store Integration
- Products, Adjustments, Transfers
- Quotations, Sales, Purchases
- Sale Returns & Purchase Returns
- Customers, Suppliers, Users Management
- Accounts, Expenses, Deposits, Transfer Money
- Projects & Tasks Management
- Comprehensive Reports (Sales, Purchases, Inventory, Payments, and more)
- Multilingual — 24+ languages with RTL support
- Dark Mode Included
- Barcode/Label Printing & POS Receipt Printing
- Mail & SMS Notification System
- Role-Based Permissions (110+ permissions)
Tech Stack
- Backend — Laravel 12, PHP 8.2+
- Frontend — Vue.js, Vuex, Vue Router, Bootstrap Vue
- Database — MySQL 5.7+
- Multi-Tenancy — Separate databases per tenant
Installation
Follow this guide to install Stocky SaaS on your local machine or production server.
Server Requirements
Please ensure your server meets the following requirements before proceeding:
- PHP >= 8.2.0
- MySQL 5.7 or higher
- BCMath PHP Extension
- Ctype PHP Extension
- cURL PHP Extension
- Fileinfo PHP Extension
- GD2 PHP Extension
- JSON PHP Extension
- Mbstring PHP Extension
- OpenSSL PHP Extension
- PDO PHP Extension
- Tokenizer PHP Extension
- XML PHP Extension
- ZIP PHP Extension
Installation in Localhost
1) Installation With XAMPP
- Install XAMPP from apachefriends.org
- Step 1: Extract the
stocky_saas.ziptoC:/xampp/htdocs/ - Step 2: Go to
C:\Windows\system32\drivers\etc\and open the hosts file in Administrator mode. Add:127.0.0.1 stocky.local - Step 3: Go to
C:\xampp\apache\conf\extraand open httpd-vhosts.conf. Add the VirtualHost configuration below. - Step 4: Restart your XAMPP
- Setup: Access the URL
http://stocky.local/setup
2) Installation With Laragon
- Download Laragon from laragon.org and install it
- Step 1: Extract the
stocky_saas.ziptoC:/laragon/www/stocky - Step 2: Start your Laragon
- Setup: Access the pretty URL
http://stocky.test
Nginx Configuration
If deploying to a server running Nginx, use the following configuration as a starting point.
Ensure all requests are directed to public/index.php.
Installation on Server (cPanel)
yourdomain.com).
Installing in a subdomain or subfolder is not supported and will cause issues with multi-tenancy.
- Step 1: Login to cPanel and navigate to File Manager
- Step 2: Upload the files to your root domain's public directory (e.g.,
public_html) - Step 3: Upload your
stocky_saas.zipfile and wait for the upload to complete - Step 4: Unzip the uploaded file
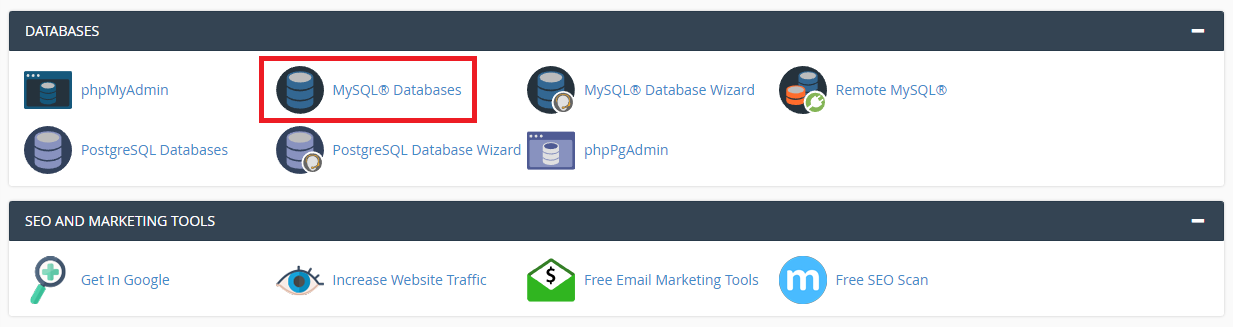
- Step 5: Go back to cPanel and navigate to Databases to create a new database
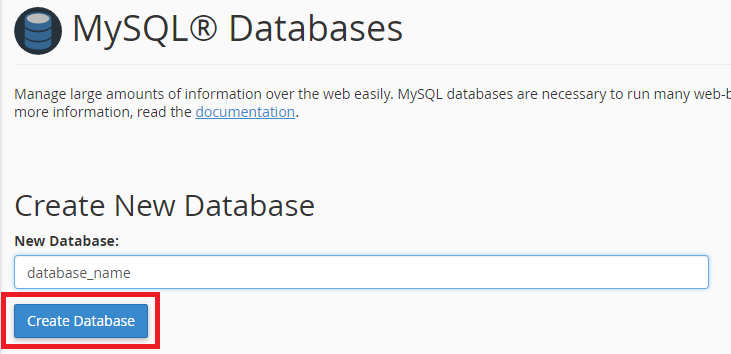
Creating a New Database
Before installing, create a new empty database from your cPanel. You will need the database name, username, and password for the setup wizard.
Create Database
Database Name
Create Database User
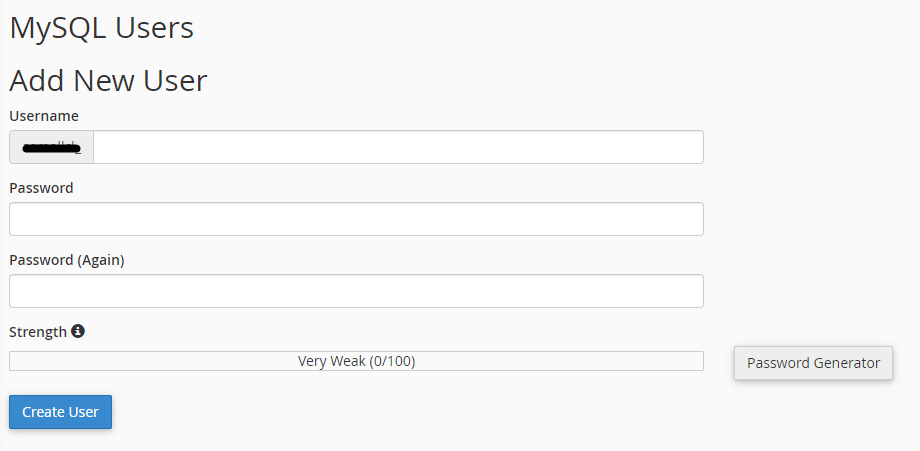
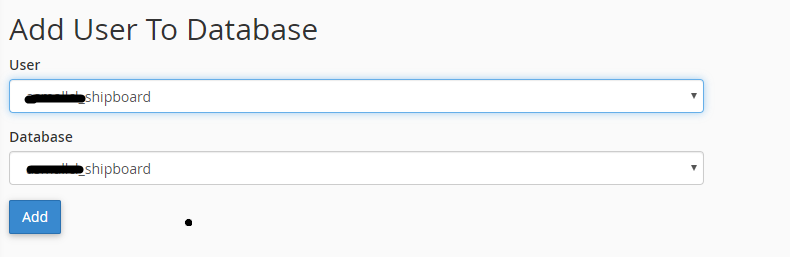
Add User to Database
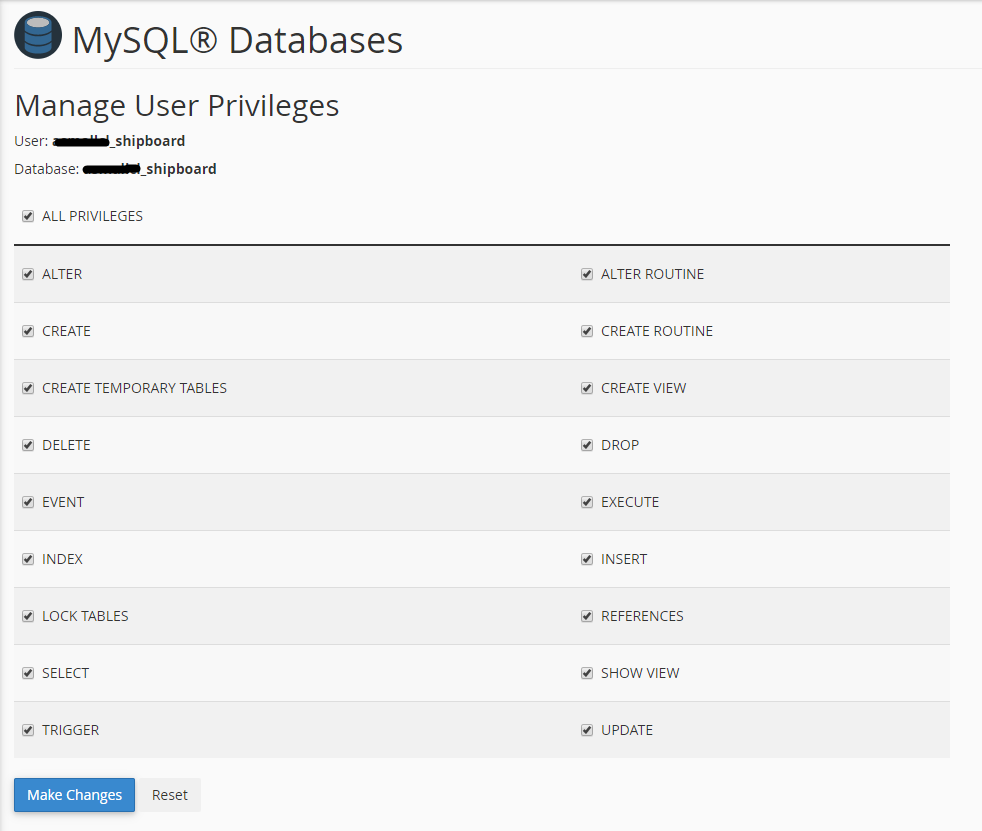
Set Full Permissions
Once the database is ready, access the URL yourdomain.com/setup to start the setup wizard.
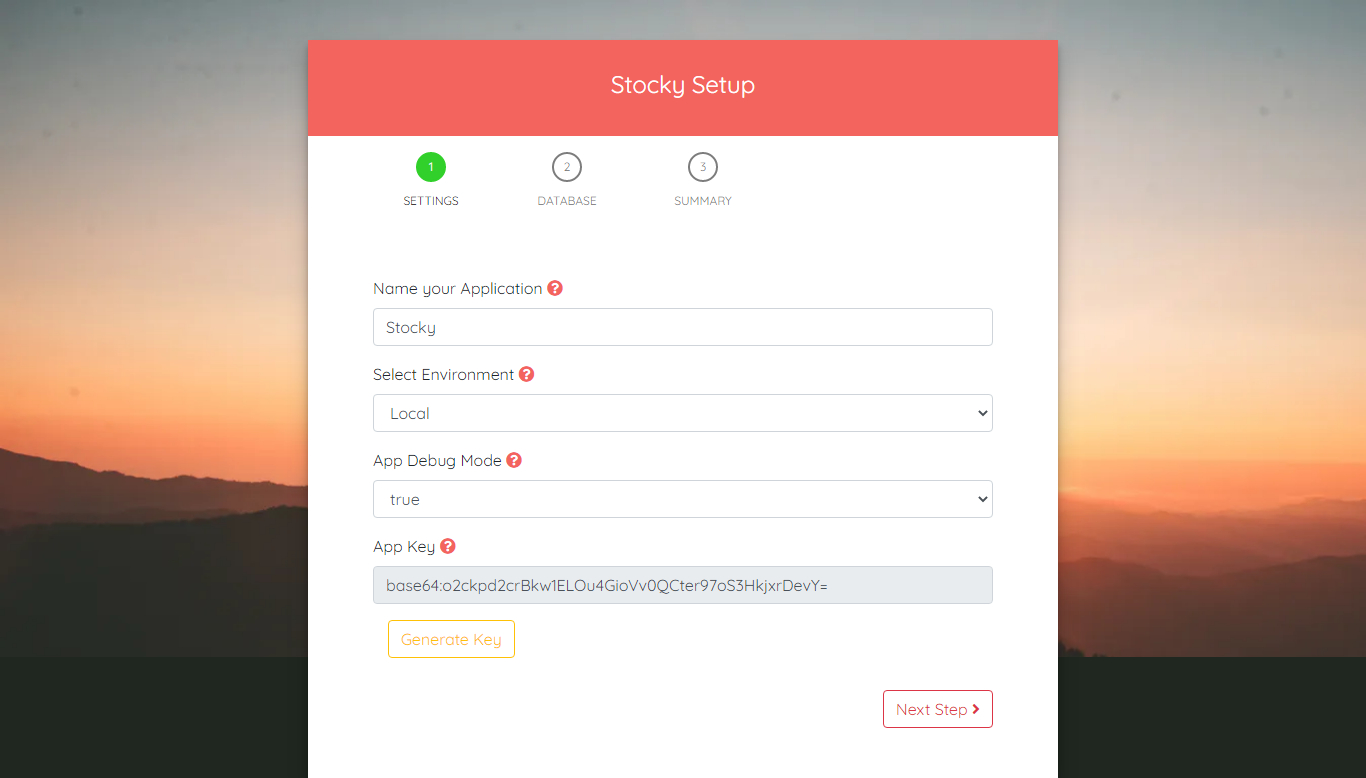
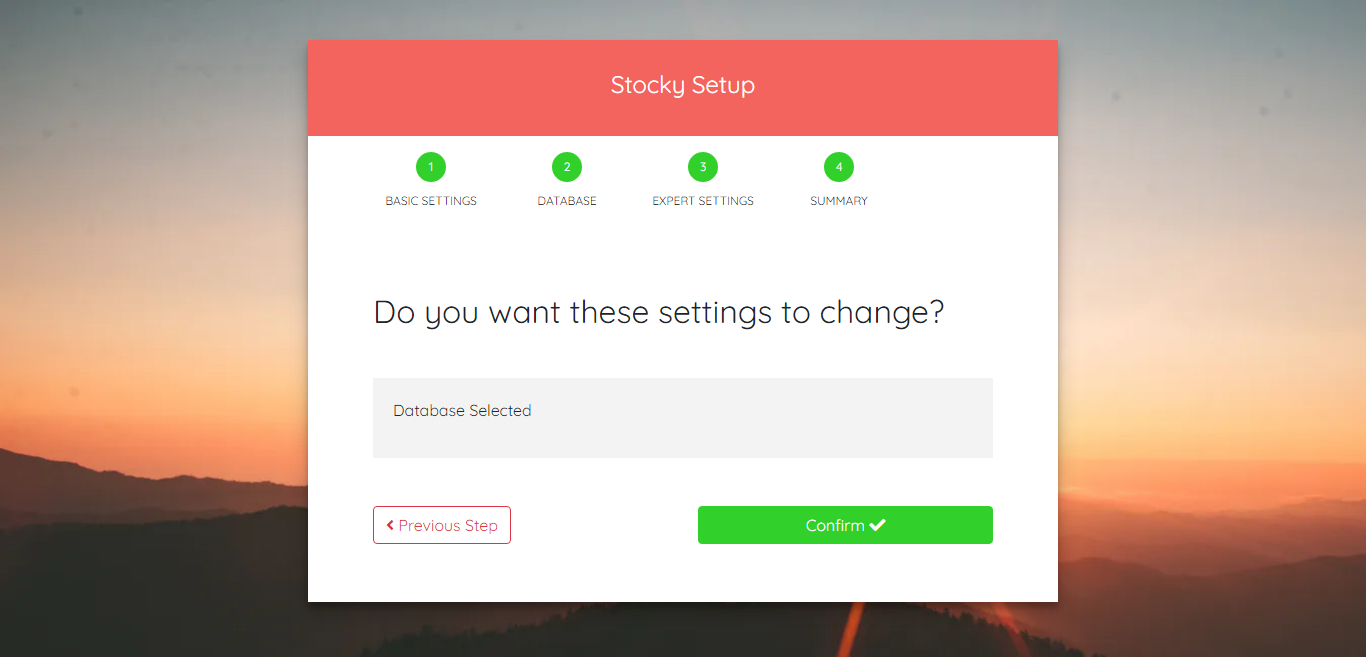
Setup Wizard
The setup wizard guides you through three simple steps to configure your application.
Step 1 — Application Settings
- Name your application
- Select Environment: Local (localhost) or Production (server)
- App Debug: set to false on production servers
Step 1 - Application Settings
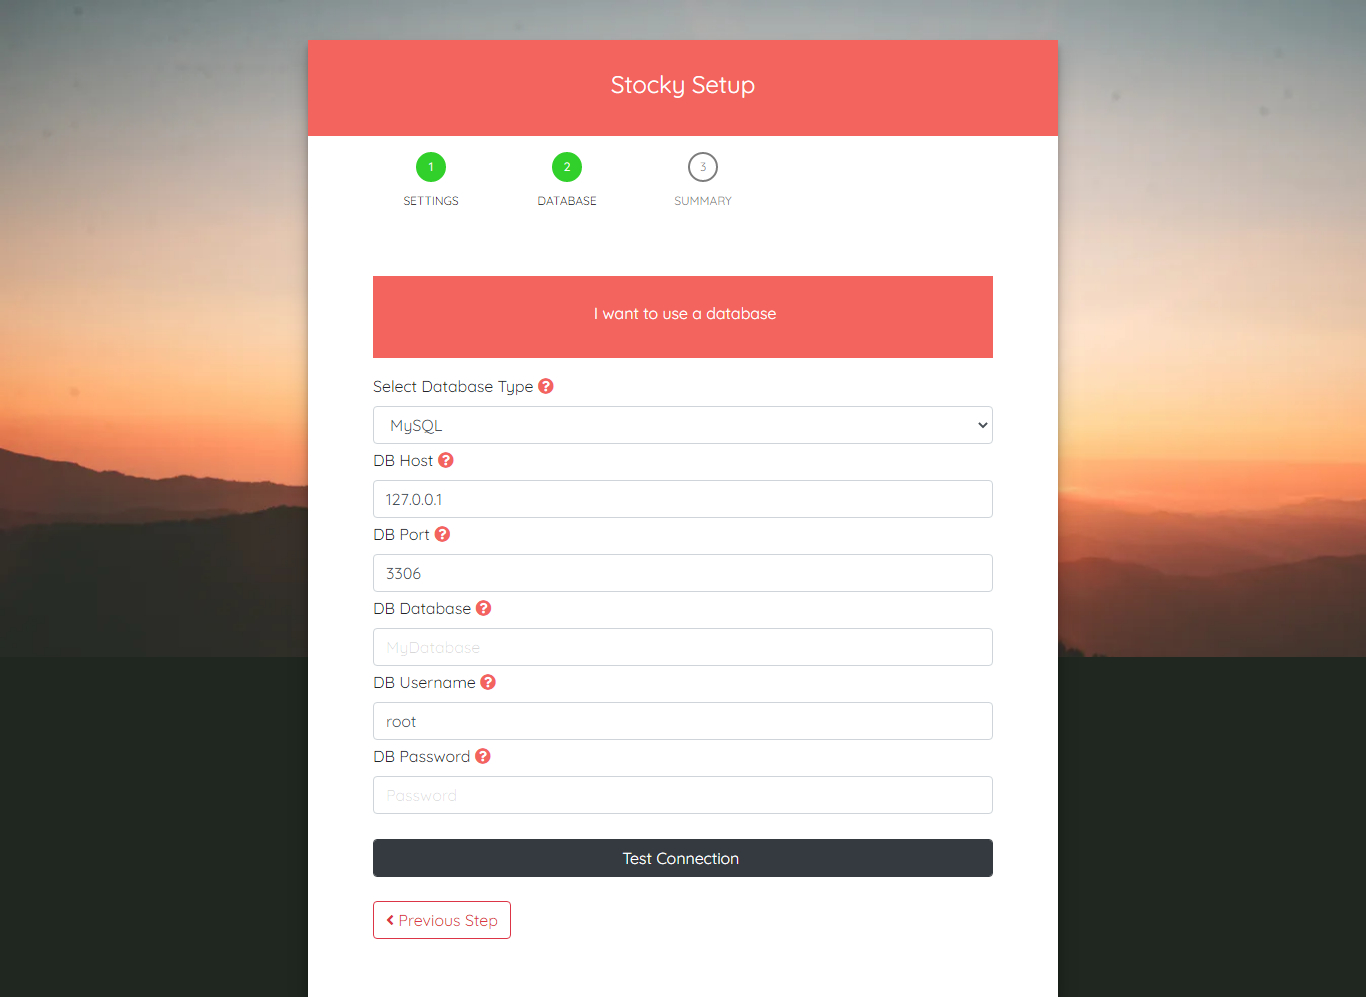
Step 2 — Database Configuration
- DB Host — Database server address (usually
localhostor127.0.0.1) - DB Port — Database port (default
3306) - DB Database — The name of the database you created
- DB Username — The database user
- DB Password — The database user's password
- Use the Test Connection button to verify your database credentials
Step 2 - Database Configuration
Step 3 — Finalize Installation
- Click Confirm and wait for the database to be generated
- Do not close the browser or stop the process during installation
Step 3 - Finalize Installation
installed file is placed in the /storage directory.
If this file is present, the /setup route will return a 404 page to prevent re-installation.
Upgrade
Follow this guide to safely upgrade your Stocky SaaS application to a newer version. The built-in
/update tool handles database migrations for both the central application and every tenant
workspace in one run.
Step 1 — Back Up Your Database
Create a full backup of your central database before replacing any files. You have two options:
Option A — From the Super Admin Panel
- Log in to the Super Admin panel and go to
/super/settings/general#tab=backup. - Click Create Backup Now and wait for the file to generate.
- Click the Download icon next to the new backup and save the
.sqlfile to your computer.
Option B — From PhpMyAdmin / cPanel
- Open PhpMyAdmin (or your hosting panel's database tool).
- Select the central database used by Stocky SaaS.
- Click Export → Quick → Go and save the
.sqlfile to your computer. - If you have existing tenant databases, export each of them in the same way.
Step 2 — Back Up Your Files
- Take a full copy of your current application folder (via FTP, SSH, or your hosting File Manager).
- This gives you a rollback path if anything goes wrong during the upgrade.
Step 3 — Download the Latest Version
- Log in to CodeCanyon and go to your Downloads page.
- Download Stocky SaaS → All files & documentation.
- Extract the archive on your local computer so you have a fresh copy of the new version.
Step 4 — Remove the Old Files
Delete the old application files from your server, except for the items listed below.
.envfile — holds your database credentials and app keystorage/folder — contains logs and the installed markerpublic/images/folder — contains tenant-uploaded images and logos
Step 5 — Upload the New Files
Upload the contents of the extracted new version to your server, except for the same items above.
.envstorage/public/images/
Step 6 — Run the Database Update
Log in to the Super Admin panel, then open the following URL in your browser:
- The page shows a list of update targets — the central database plus every active tenant workspace.
- Click Start Update. The platform immediately enters maintenance mode and all visitors (central & tenants) see a "System Updating" page.
- Migrations run sequentially: central first, then each tenant. Progress bar and per-tenant status update in real time.
- Do not close or refresh the page until the run completes.
- When every target shows a green check, the lock is released automatically and the "Update complete" card appears.
/update. Regular central users and tenant users will receive a 403.
If any tenant fails, the other tenants still complete and the failed ones are reported individually with their error
message — you can fix and re-run without re-migrating already-updated workspaces.
Step 7 — Clear the Browser Cache
- Do a hard refresh in your browser:
Ctrl + Shift + R(Windows / Linux) orCmd + Shift + R(macOS). - If a page appears blank or broken, clear the browser cache entirely, then reload.
- Users on other machines should also hard-refresh the first time they load the app after the upgrade.
Step 8 — Done
- Your application is now running on the new version.
- The maintenance lock has been released — central visitors and tenants can access the app normally.
- Verify the version number in the Super Admin footer and spot-check a few tenant workspaces.
Troubleshooting
- Blank page after upgrade: clear browser cache and delete the contents of
bootstrap/cache/(except.gitignore). - One tenant failed: check
storage/logs/laravel.logfor the exact error, fix the underlying issue (missing column, disk space, credentials), then open/updateagain and re-run. - Stuck in maintenance mode: if the browser closed mid-run, log back in to
/super/loginand re-open/update— a Re-run button appears. As a last resort, deletestorage/app/platform-update.lockfrom the server. - "Class not found" errors: run
composer dump-autoloadon the server (or via your hosting panel's Composer tool).
Local Tenant Setup — Laragon
Get tenant subdomains (tenant1.stocky.test, shop2.stocky.test, …) working on your
local Laragon install so you can test multi-tenant flows before deploying to a VPS.
c:/laragon/www at its own folder.test URL, but by default it does not route wildcards like *.stocky.test to the same app. You need to tell Apache/Nginx to accept the wildcard so Laravel can handle tenant resolution.
Prerequisites
- Laragon Full installed from laragon.org.
- Stocky SaaS extracted to
C:/laragon/www/stocky_saas. - Setup wizard completed at
http://stocky_saas.test/setupwithAPP_URLset tohttp://stocky_saas.test.
1) Make Laragon Serve the public/ Folder
Laragon needs to use Laravel's public/ directory as the document root:
- Right-click the Laragon tray icon → Apache (or Nginx) → sites-enabled → edit
auto.stocky_saas.test.confif it exists. - If the file does not exist yet, open Laragon once with the project in place — Laragon will auto-generate it.
2) Enable Wildcard Subdomains (Apache)
Replace the contents of C:/laragon/etc/apache2/sites-enabled/auto.stocky_saas.test.conf with:
The key line is ServerAlias *.stocky_saas.test — that single directive makes every tenant subdomain route to the same Laravel app.
3) Enable Wildcard Subdomains (Nginx)
If you run Laragon with Nginx instead, edit C:/laragon/etc/nginx/sites-enabled/auto.stocky_saas.test.conf:
4) Hosts File — Two Options
Windows does not support wildcard entries in the hosts file, so you need one of these approaches:
Option A — Let Laragon Add Each Subdomain (easiest)
Laragon can add hosts-file entries on the fly. When you sign up a new tenant in Stocky (e.g. tenant1), add the subdomain manually once:
- Right-click Laragon tray → Quick app → Add a new hosts entry.
- Or run (as Administrator) in a PowerShell window:
Option B — Acrylic DNS Proxy (true wildcard)
For real wildcard resolution (any new tenant just works without editing the hosts file), install Acrylic DNS Proxy:
- Install Acrylic DNS Proxy.
- Edit
C:/Program Files (x86)/Acrylic DNS Proxy/AcrylicHosts.txtand add:127.0.0.1 *.stocky_saas.test - From the Acrylic UI Settings, click Restart Acrylic Service.
- In Windows Settings → Network → IPv4 Properties, set the preferred DNS to
127.0.0.1.
5) Reload Laragon
6) Verify
- Open
http://stocky_saas.test— the landing page should load. - Sign up a tenant with subdomain
demofrom the landing page. - Open
http://demo.stocky_saas.test/login— the tenant login should load. - If it says
ERR_NAME_NOT_RESOLVED, the hosts file / Acrylic step is missing. - If Apache returns 404 or the landing page, the
ServerAlias *.stocky_saas.testline is missing or Laragon was not reloaded.
Shared Hosting and manually configure each tenant, or switch it to VPS to test automatic provisioning end-to-end. Either works on Laragon because MySQL runs as root locally and has full CREATE DATABASE rights.
Local Tenant Setup — XAMPP
Configure XAMPP so that *.stocky.local routes to your Stocky SaaS app, letting you test tenant subdomains on Windows / macOS / Linux.
Prerequisites
- XAMPP installed with Apache & MySQL running.
- Stocky SaaS extracted to
C:/xampp/htdocs/stocky(Linux/macOS:/opt/lampp/htdocs/stocky). - Setup wizard completed at
http://stocky.local/setupwithAPP_URLset tohttp://stocky.local.
1) Enable Virtual Hosts in Apache
XAMPP ships with vhosts disabled by default. Uncomment the include:
- Open
C:/xampp/apache/conf/httpd.conf. - Find the line
# Include conf/extra/httpd-vhosts.confand remove the leading#.
2) Add a Wildcard VirtualHost
Open C:/xampp/apache/conf/extra/httpd-vhosts.conf and append:
The critical line is ServerAlias *.stocky.local. Every subdomain — existing or new — is sent to Laravel, which routes to the correct tenant based on the subdomain.
3) Hosts File Entries
Windows does not support wildcard lines in the hosts file. Pick one of these approaches:
Option A — Add each subdomain manually (simple)
Open Notepad as Administrator, then edit C:\Windows\System32\drivers\etc\hosts:
macOS / Linux users: edit /etc/hosts with sudo.
Option B — Acrylic DNS Proxy (true wildcard, Windows only)
- Install Acrylic DNS Proxy.
- Edit
C:/Program Files (x86)/Acrylic DNS Proxy/AcrylicHosts.txtand add:127.0.0.1 *.stocky.local - From the Acrylic UI, restart the Acrylic service.
- In Windows IPv4 settings, set the preferred DNS server to
127.0.0.1.
Option C — dnsmasq (macOS / Linux)
4) Restart Apache
From the XAMPP Control Panel, click Stop and then Start next to Apache. If Apache fails to start, click Logs → Apache (error.log) — usually a typo in the vhost file.
5) Verify
http://stocky.localloads the landing page.- Sign up a tenant with subdomain
demo. http://demo.stocky.localredirects to the tenant login.http://whatever.stocky.localhits Laravel and returns a 404 tenant page (not a white screen).
<VirtualHost> blocks in httpd-vhosts.conf is wrong.
Apache serves the first VirtualHost on *:80 for any host that does not match. Keep the localhost block first, then stocky.local with its wildcard alias.
MySQL User for VPS-Mode Testing
XAMPP's default root user has no password and full privileges — enough for local testing of VPS-mode auto-provisioning. If you want a dedicated user, create one from phpMyAdmin (http://localhost/phpmyadmin) with ALL PRIVILEGES on *.* and GRANT OPTION, then re-run the Stocky setup wizard using those credentials.
VPS Configuration — Overview
This chapter explains how to prepare a VPS (or dedicated server) so that Stocky SaaS can automatically create a database and activate a new tenant subdomain every time a user signs up — with no admin intervention required.
In
Shared Hosting mode the admin has to create the subdomain and the database by hand in cPanel/Plesk before approving each tenant.
In VPS mode the application itself issues CREATE DATABASE, runs migrations, seeds default data and the tenant subdomain is already served by the wildcard vhost — so the user is logged in immediately after registration or payment.
What the VPS Must Provide
To enable fully automatic tenant provisioning, the server must satisfy four requirements:
-
Wildcard DNS — a DNS record
*.yourdomain.compointing to the VPS IP, so that everytenant1.yourdomain.com,tenant2.yourdomain.com, etc. resolves without creating records one by one. -
Wildcard Web Server Configuration — a single Apache/Nginx virtual host that responds to
yourdomain.comand*.yourdomain.comand serves the same Laravelpublic/directory. -
Wildcard SSL Certificate — a certificate that covers
yourdomain.comand*.yourdomain.com(Let's Encrypt DNS-01 wildcard, or a commercial wildcard certificate). -
A MySQL user with
CREATE,DROPandGRANTprivileges — Stocky uses this user (the one inDB_USERNAME) to create a new database per tenant and run migrations inside it.
Software Requirements
- A Linux VPS (Ubuntu 22.04 / 24.04, Debian 12, AlmaLinux 9, Rocky 9 or CloudLinux) with at least 2 GB RAM and root/sudo access.
- A registered domain name with access to its DNS zone (Cloudflare, Route 53, Namecheap, OVH, etc.).
- PHP 8.2+ with the extensions listed in the Installation chapter (BCMath, cURL, GD, Mbstring, OpenSSL, PDO, Tokenizer, XML, Zip, Fileinfo, Ctype, JSON).
- MySQL 5.7+ / MariaDB 10.4+.
- Composer, Node.js 18+ (only for building assets if you need to), and Git.
- One of the supported stacks: plain Nginx/Apache, cPanel/WHM, Plesk, Webmin/Virtualmin, CyberPanel or DirectAdmin.
High-Level Setup Path
Whichever control panel you use, the steps are always the same:
- Point
yourdomain.comand*.yourdomain.comto the server IP (A records). - Create one vhost (or website) whose document root is
/path/to/stocky_saas/publicand that acceptsServerAlias *.yourdomain.com(Apache) /server_name yourdomain.com *.yourdomain.com(Nginx). - Issue a wildcard SSL certificate via DNS-01 challenge and bind it to that vhost.
- Create a dedicated MySQL user and grant it the privileges required to create tenant databases.
- Edit
.envwith yourAPP_URL,CENTRAL_DOMAINSandDB_*values. - Open the Super Admin → General Settings and switch Hosting Mode to
VPS. - Configure the queue worker and Laravel scheduler as system services / cron jobs.
yourdomain.com, not app.yourdomain.com/stocky).
Tenants are served as subdomains of the same base domain that you configure as APP_URL.
Wildcard DNS Records
Stocky creates tenants as subdomains of your base domain: acme.yourdomain.com, shop23.yourdomain.com, etc.
Because tenants are created dynamically, you must not create one A record per tenant —
instead, create a single wildcard record that catches them all.
Records to Create
In the DNS zone of yourdomain.com, add the following two records:
- Replace
203.0.113.10with your VPS public IPv4 address. - If your server has an IPv6 address, add matching
AAAArecords for@and*. - Do not use a
CNAMEat the apex (@) — most registrars refuse it. - Keep TTL low (300–600 seconds) during setup, then raise it once you verify everything works.
Cloudflare Users
- Enabling the orange cloud (proxy) on the wildcard record is fine, but a wildcard DNS record is only proxied on paid plans (Pro or higher). On the free plan, set the wildcard to DNS only (grey cloud).
- If you use Cloudflare proxy, set SSL/TLS mode to Full (strict) after installing the wildcard certificate on your origin.
Verifying the DNS Record
Before continuing, verify that both the apex and a random subdomain resolve to the same IP:
Wildcard SSL Certificate
A standard Let's Encrypt certificate issued via HTTP-01 can only cover names you list explicitly. To cover
*.yourdomain.com you need a certificate issued via the DNS-01 challenge, which
requires your DNS provider's API so Certbot can add the required _acme-challenge TXT record automatically.
Option A — Certbot with DNS Plugin (recommended)
Example using Cloudflare; the same approach works for Route 53, DigitalOcean, OVH, Google Cloud DNS, etc.
The certificate files will be placed under /etc/letsencrypt/live/yourdomain.com/:
fullchain.pem— certificate + chain (use this asssl_certificate)privkey.pem— private key (use this asssl_certificate_key)
Option B — acme.sh (no apt dependencies)
Auto-Renewal
Certbot installs a systemd timer that renews automatically. Verify it:
*.yourdomain.com is covered.
MySQL User & Privileges
In VPS mode, Stocky executes CREATE DATABASE IF NOT EXISTS tenant{uuid} and then runs the tenant migrations
using the same credentials you configured in .env. That user therefore needs privileges that a normal
application user would not have.
Required Privileges
CREATEandDROPon all databases (so new tenant databases can be created and removed).ALTER,INDEX,REFERENCES,CREATE ROUTINE,ALTER ROUTINE,EXECUTE,TRIGGER(so tenant migrations can run).- Standard
SELECT,INSERT,UPDATE,DELETE,LOCK TABLES. GRANT OPTION— optional, only needed if you want the app to create a dedicated DB user per tenant (not required by default; Stocky reuses the same user).
Creating the User (pure MySQL)
'stocky_admin'@'localhost' (or 'stocky_admin'@'127.0.0.1') so it cannot connect from the outside.
Do not expose port 3306 to the public internet — bind MySQL to 127.0.0.1 in /etc/mysql/mysql.conf.d/mysqld.cnf.
Stricter Alternative (pattern-matched DBs)
If you want to scope privileges tightly, grant full power on tenant% databases only and minimal access on the central database:
CREATE DATABASE tenant_test_123; DROP DATABASE tenant_test_123;. If both succeed, Stocky will be able to provision tenants.
Option 1 — No Panel (Ubuntu + Nginx or Apache)
This is the lightest setup and the one we recommend for a dedicated Stocky VPS. You get full control over the stack with no per-panel quirks.
1) Install the Stack
2) Deploy the Application
3) Nginx Wildcard Virtual Host
Create /etc/nginx/sites-available/stocky_saas.conf:
4) Apache Wildcard Virtual Host (alternative)
If you prefer Apache, create /etc/apache2/sites-available/stocky_saas.conf:
ServerAlias *.yourdomain.com (Apache) or server_name yourdomain.com *.yourdomain.com (Nginx). This single directive is what makes every new tenant subdomain reach Laravel without any manual vhost work.
Option 2 — cPanel / WHM
cPanel/WHM is the most common shared-hosting panel. On a cPanel VPS you configure VPS mode for Stocky as a combination of WHM (the server-wide admin) and cPanel (the per-account view).
1) Create the cPanel Account
- In WHM → Account Functions → Create a New Account, create an account for
yourdomain.com. - Give it a package with enough quota for the central DB and all future tenant databases (or unlimited).
- Upload and extract
stocky_saas.zipinto/home/cpuser/public_html/.
2) Enable Wildcard Subdomains
This is the critical step — cPanel does not create a wildcard vhost by default.
- Log into cPanel → Domains → Subdomains (or Subdomains in older themes).
- Create a new subdomain with the name
*onyourdomain.com. - Set the Document Root to
/home/cpuser/public_html(the same folder as the main domain).
This creates an Apache ServerAlias *.yourdomain.com entry pointing to the same DocumentRoot as the main domain. cPanel rebuilds httpd.conf automatically.
3) Wildcard DNS in WHM
- In WHM → DNS Functions → Edit DNS Zone, open the zone for
yourdomain.com. - Add an A record: name
*, typeA, value = the server's IP. - Save. Wildcard DNS is now live.
4) Wildcard SSL via AutoSSL or Let's Encrypt
- cPanel's AutoSSL cannot issue wildcards with the default Let's Encrypt HTTP-01 provider. You must either:
- Install the Let's Encrypt provider for AutoSSL (
/scripts/install_lets_encrypt_autossl_provider) and switch to DNS-01 validation, or - Generate a wildcard certificate off-box (certbot/acme.sh) and import it under cPanel → SSL/TLS → Install and Manage SSL for your site (HTTPS), pasting the certificate, key and chain.
- Install the Let's Encrypt provider for AutoSSL (
- Make sure to install the wildcard on both
yourdomain.comand the wildcard alias — cPanel should do this automatically once the wildcard subdomain exists.
5) Database User with CREATE Privileges
CREATE DATABASE from their scripts because cPanel prefixes every database with cpuser_.
To use VPS mode on cPanel you must create a MySQL user at the server level (via WHM/SSH) that is not bound to the cPanel prefix.
- Open a root SSH session and run the SQL from the Database Privileges section to create
stocky_adminwithALL PRIVILEGES. - In WHM, go to SQL Services → Manage MySQL Profiles and confirm you are running a local MySQL (not an external managed instance that restricts
CREATE). - Optionally, disable the Restrict MySQL commands to cPanel-prefixed databases tweak under WHM → Tweak Settings if your version enforces it.
6) PHP Version & Extensions
In WHM → MultiPHP Manager, set yourdomain.com to PHP 8.2 or newer. In EasyApache 4, ensure these PHP extensions are installed:
bcmath, curl, gd, mbstring, mysqlnd, mysqli, pdo, pdo_mysql, xml, zip, intl, opcache.
Option 3 — Plesk
Plesk has first-class support for wildcard aliases, which makes VPS mode especially easy.
1) Create the Website
- In Plesk, click Websites & Domains → Add Domain and register
yourdomain.com. - Upload your
stocky_saas.ziptohttpdocs/, extract it, then change the document root tohttpdocs/publicunder Hosting Settings. - Set PHP 8.2 (or later) as the active PHP version.
2) Wildcard Domain Alias
- Open Websites & Domains → yourdomain.com → Hosting & DNS → Domain Aliases.
- Click Add Domain Alias.
- In Domain alias name, type
*.yourdomain.com. - Check Synchronize DNS zone with the primary domain and Web service. Leave Mail service unchecked.
- Save. Plesk will generate the
*.yourdomain.comvhost pointing to the same document root asyourdomain.com.
3) Wildcard DNS
Plesk creates the wildcard DNS record automatically when you add the *.yourdomain.com alias (if the domain is using Plesk as its DNS server). Verify in DNS Settings that you see:
If Plesk does not manage your DNS, add the record in your external provider manually.
4) Wildcard SSL via Plesk Let's Encrypt Extension
- Install the free Let's Encrypt extension from Extensions if it is not already present.
- Open Websites & Domains → yourdomain.com → SSL/TLS Certificates → Install.
- Check Issue a wildcard certificate, Include www and Assign certificate to mail domain (optional).
- Plesk will use the DNS-01 challenge. If your DNS is managed outside of Plesk, it will prompt you to add a
_acme-challengeTXT record manually — add it and click Reload. - Once issued, the certificate is automatically bound to both
yourdomain.comand*.yourdomain.comand auto-renews.
5) Database User
Plesk restricts per-domain DB users to that domain's databases. For VPS mode, connect directly to MySQL with a server-level admin:
Then create a dedicated user as shown in Database Privileges. Do not reuse the admin account in .env — it is reserved for Plesk itself.
6) Nginx in front of Apache
Plesk runs Nginx as a reverse proxy by default. Open Apache & nginx Settings for the domain and confirm:
- Proxy mode is
On(Nginx forwards PHP to Apache), or - Disable proxy mode if you prefer pure Nginx + PHP-FPM (Plesk 18.0.30+).
- Do not set additional
locationoverrides — Stocky relies on the default Laraveltry_filesrule.
Option 4 — Webmin / Virtualmin
Virtualmin (the virtual-host companion to Webmin) is a strong open-source alternative to cPanel and Plesk. VPS mode works cleanly on Virtualmin because a Virtualmin account already owns a MySQL user with CREATE privileges on its own databases.
1) Create the Virtual Server
- In Virtualmin, click Create Virtual Server.
- Domain name:
yourdomain.com. Choose an administrator password. - In the Enabled features block, make sure
Apache SSL website enabled?andMySQL database enabled?are checked. - Click Create Server. Upload
stocky_saas.zipto/home/yourdomain/public_htmland extract it. - Change Server Configuration → Website Options → Website documents sub-directory to
public_html/publicso Apache serves Laravel'spublic/folder.
2) Wildcard Subdomain via Server Alias
Virtualmin calls wildcard hosts Server aliases:
- Open Server Configuration → Edit Virtual Server → Configurable settings.
- In the Server alias field, add
*.yourdomain.com. - Save — Virtualmin rewrites
httpd.confwithServerAlias *.yourdomain.comand reloads Apache.
3) Wildcard DNS in Webmin
- Open Webmin → Servers → BIND DNS Server.
- Select the
yourdomain.comzone and click Address (A) record. - Create a new record: Name
*, Address = your server IP. - Click Apply Configuration. If DNS is external, add the same record in your registrar's control panel.
4) Wildcard SSL
Virtualmin integrates with Let's Encrypt but HTTP-01 won't issue wildcards. Choose one of:
- Option A: Issue the wildcard from the command line with
certbot --dns-<provider>(see Wildcard SSL), then in Virtualmin Server Configuration → Manage SSL Certificate → Update Certificate, upload thefullchain.pemandprivkey.pem. - Option B: If you have configured Virtualmin to call a DNS hook (Cloudflare/Route53) for DNS-01, the Let's Encrypt tab can request a wildcard directly.
5) MySQL User
Each Virtualmin server has its own MySQL user, but that user can only create databases matching the domain's prefix.
For VPS mode, create a server-wide MySQL user (as in Database Privileges) and
use it in .env. In Webmin → Servers → MySQL Database Server → User Permissions, verify
the user exists with ALL privileges on *.* and GRANT OPTION.
Option 5 — CyberPanel (OpenLiteSpeed / LiteSpeed)
CyberPanel is a free control panel built on OpenLiteSpeed. It ships native wildcard-domain and wildcard-SSL support, which makes VPS mode particularly smooth.
1) Create the Website
- In CyberPanel, go to Websites → Create Website.
- Pick a package, an owner, domain
yourdomain.com, and PHP 8.2 or newer. - Check SSL, DKIM Support and Open Basedir Protection.
- Upload
stocky_saas.zipto/home/yourdomain.com/public_htmland extract it. - Change the vhost document root to
/home/yourdomain.com/public_html/public(edit the vhost from Websites → List Websites → Manage → vHost Conf).
2) Create the Wildcard "Child" Domain
- From the website's Manage page, click Create Child Domain.
- Child domain name:
*.yourdomain.com. - Path: leave blank to use the parent's document root (Laravel serves everything).
- Click Create. CyberPanel produces an OpenLiteSpeed vhost entry for the wildcard that reuses the same document root.
3) Wildcard DNS
- Go to DNS → Add/Delete Records and pick
yourdomain.com. - Add an A record with name
*pointing to your VPS IP. - If you use an external DNS provider, replicate the same record there.
4) Wildcard SSL
- Open SSL → Hostname SSL (for the apex) and SSL → Mail Server SSL if needed.
- For the wildcard, use SSL → Manage SSL → Issue SSL — CyberPanel's Wildcard SSL mode uses
acme.shwith DNS-01. Provide your Cloudflare/Route53 API credentials in the fields shown. - Alternatively, run
acme.shmanually on the server and import the certificate via SSL → Manage SSL → Add Custom SSL.
5) MySQL User
CyberPanel uses MariaDB with a root-level root user. Retrieve the password via:
Log in and create stocky_admin as shown in Database Privileges. Do not reuse the CyberPanel root account in .env.
Option 6 — DirectAdmin
DirectAdmin supports wildcards out of the box via its Domain Pointers feature. The flow is very similar to cPanel.
1) Create the User & Domain
- In DirectAdmin → Admin Level → Create User, add an account for
yourdomain.comwith a package that allows wildcard subdomains and enough MySQL databases for your tenants. - Switch to the user and upload/extract
stocky_saas.zipunder/home/diuser/domains/yourdomain.com/public_html. - From Account Manager → Domain Setup → yourdomain.com, set the Custom DocumentRoot to
public_html/public.
2) Enable Wildcard Subdomain
- Open Account Manager → Subdomains.
- Create a subdomain called
*. - DirectAdmin will add
ServerAlias *.yourdomain.comto the vhost pointing to the same DocumentRoot.
3) Wildcard DNS
- Open Account Manager → DNS Management for
yourdomain.com. - Add an A record: name
*, value = VPS IP.
4) Wildcard SSL
- In Account Manager → SSL Certificates, choose Free & automatic certificate from Let's Encrypt.
- Check Wildcard. DirectAdmin will require DNS-01; if DNS is on the same server it performs the challenge automatically, otherwise it prints the required TXT record.
- Once issued, the certificate is bound to
yourdomain.comand*.yourdomain.comand renews automatically.
5) MySQL User
DirectAdmin's per-user MySQL passwords are saved in /usr/local/directadmin/conf/mysql.conf. That admin account has ALL PRIVILEGES and can be used to create stocky_admin as described in Database Privileges.
Avoid using the DirectAdmin da_admin user directly in .env.
Switching to VPS Mode
Once DNS, SSL, the vhost and the database user are in place, the last step is to tell the application to run in VPS mode.
You do not need to edit .env by hand — the installation wizard (Step 1 & Step 2)
already wrote your APP_NAME, APP_URL, APP_ENV, APP_DEBUG and all the
DB_* credentials for you.
- In Step 1, set the App URL to your apex domain (
https://yourdomain.com) — not a subdomain. Tenant subdomains are derived from this value. - In Step 2, use the server-level MySQL user you created in the Database Privileges section (e.g.
stocky_admin), not a cPanel/Plesk per-domain user — otherwiseCREATE DATABASEwill be denied.
Switch Hosting Mode to VPS
After the wizard finishes, the app boots in Shared Hosting mode by default. Flip it to VPS from the Super Admin UI:
- Log in to
https://yourdomain.com/super/loginas a super-admin. - Open General Settings.
- Change Hosting Mode from
Shared HostingtoVPS. - Save. New signups will now auto-provision (database created, migrations run, admin user seeded, workspace activated).
When You Do Need to Touch .env
The wizard covers the common case. There are only a few situations where editing .env is still useful:
- Moving to a different domain after installation — update
APP_URL(and clear caches below). - Multiple central/admin domains (e.g.
app.example.comandadmin.example.com) — setCENTRAL_DOMAINS=app.example.com,admin.example.com. If this key is absent, the host ofAPP_URLis used automatically. - Switching the queue to Redis for higher throughput — change
QUEUE_CONNECTION=redisand configureREDIS_*. - Turning debug off if it was left on after setup — set
APP_DEBUG=false.
Clear & Rebuild Caches (after any .env change)
If you did edit .env manually, rebuild Laravel's caches so the changes take effect:
General Settings — Hosting Mode

Queue Worker & Laravel Scheduler
Tenant provisioning, subscription expiry checks, inactive-tenant cleanup and database backups all run through Laravel's queue and scheduler. If the queue is not running, tenants will be stuck in provisioning forever.
1) Laravel Scheduler (cron)
Add a single cron entry that runs every minute. This one entry is enough — Laravel dispatches everything internally.
- cPanel: use cPanel → Advanced → Cron Jobs and add the command with the path to the account's PHP binary (for example
/usr/local/bin/ea-php82). - Plesk: use Websites & Domains → Scheduled Tasks → Add Task.
- Virtualmin: use Webmin → System → Scheduled Cron Jobs.
- CyberPanel: use Server Settings → Cron Jobs (or
crontab -eas root). - DirectAdmin: use Account Manager → Cron Jobs.
2) Queue Worker as a systemd Service (recommended)
Create /etc/systemd/system/stocky-worker.service:
3) Alternative — Supervisor
On hosts where systemd is not available (many shared-style panels), use Supervisor:
--timeout=1200? The default Stocky queue retry window is 1200 seconds (20 minutes) because tenant migrations can take a while on the first run. Keep these two values in sync so a long migration is not killed mid-run and retried on top of itself.
Testing & Troubleshooting
Follow these checks in order; each one isolates a different layer.
1) DNS Check
All three commands must return the same IP. If the wildcard does not resolve, re-check your DNS zone for the * A record.
2) HTTPS on an Arbitrary Subdomain
The certificate subject should read CN=yourdomain.com and the SAN list should include *.yourdomain.com.
3) Database Privileges
If CREATE is denied, re-read Database Privileges.
4) Queue & Scheduler Are Alive
5) End-to-End Signup Test
- From the landing page, sign up for the Free or Trial plan with subdomain
probe1. - Within a few seconds you should be redirected to
https://probe1.yourdomain.com/login. - In MySQL:
SHOW DATABASES LIKE 'tenant%';— a new database should appear. - In the Super Admin → Tenants list, the new tenant should be marked
Active.
Common Problems
- Tenant stuck on
Provisioning: the queue worker is not running, or the DB user lacksCREATE. Inspectstorage/logs/laravel.logand the worker log. - HTTPS works on apex but fails on subdomains with
ERR_CERT_COMMON_NAME_INVALID: the certificate is not a wildcard. Re-issue with-d "*.yourdomain.com". - 403 Forbidden on subdomain: the vhost is not serving the wildcard. Double-check
ServerAlias *.yourdomain.com/server_name *.yourdomain.com. - Tenant loads but 500 errors everywhere:
php artisan storage:linkwas not run, orstorage/andbootstrap/cache/are not writable by the web user. - Signup succeeds but landing page 404s on subdomains: Check
APP_URL. It must be the apex domain (not a subdomain). - cPanel rejects
CREATE DATABASE: you are using the account's per-cPanel MySQL user. Switch to the server-levelstocky_adminuser you created in SSH.
SaaS Super Admin - Overview
The Super Admin panel is the central control hub for managing your entire Stocky SaaS platform. From here you can manage tenants, subscription plans, payments, landing page content, and all platform-wide settings.
Access the Super Admin panel by navigating to /super/login on your central domain.
Only users with super_admin or admin roles can access this panel.
Super Admin Features
- Dashboard — Real-time analytics on tenants, subscriptions, and revenue
- Tenant Management — Create, suspend, approve, and manage all tenant workspaces
- Plans — Configure subscription plans with feature limits and pricing
- Subscriptions — Monitor and manage all tenant subscriptions
- Payments & Billing — Track revenue, transactions, invoices, and refunds
- Admin Users — Manage super admin accounts with role-based permissions
- CMS – Landing Page — Customize your public landing page (hero, features, pricing, testimonials, FAQ)
- SEO Settings — Configure meta tags, keywords, and SEO for your landing page
- Knowledge Base — Create help articles and categories for your tenants
- Email Templates — Customize notification emails (subscription expired, payment success, etc.)
- Payment Gateways — Configure Stripe, PayPal, Paystack, and Flutterwave
- Mail Settings — Set up SMTP, Mailgun, Amazon SES, or Sendmail
- General Settings — Configure branding, currency, logo, and company info
Permission Matrix
Super Admin accounts support two roles:
- super_admin — Full unrestricted access to all features
- admin — Restricted access based on assigned permissions (Dashboard, Tenants, Plans, Subscriptions, Admins, Payments, Knowledge Base, CMS, Email Templates, Settings)
Super Admin — How It Works
This section explains how tenant provisioning works depending on your hosting mode. Stocky SaaS supports two hosting modes: VPS/Dedicated Server (fully automatic) and Shared Hosting (manual approval). You can change your hosting mode from General Settings.
Hosting Modes
VPS / Dedicated Server
Fully automatic provisioning. When a new tenant signs up, the system automatically creates the database, runs migrations, seeds data, and activates the workspace — no admin intervention required.
Shared Hosting
Manual approval with database configuration. When a new tenant signs up, the admin must manually create the subdomain, configure the database, and approve the tenant before their workspace is activated.
VPS Mode — Automatic Provisioning
Free & Trial Plan Signup
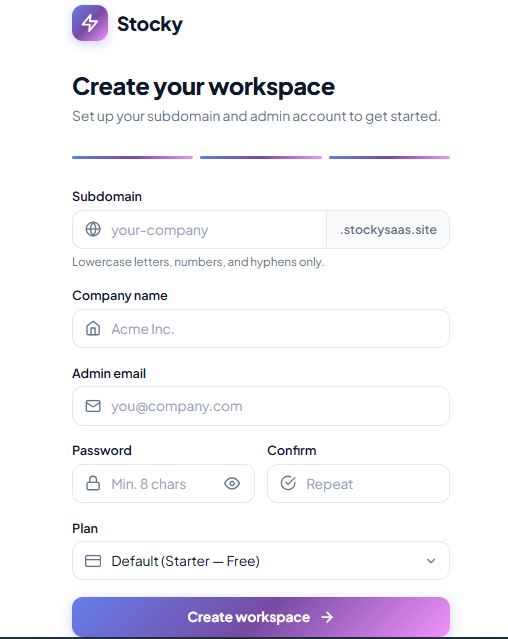
- Step 1 — User Registers: The user fills in company name, subdomain, email, and password on the signup page.
- Step 2 — Tenant Created: A new tenant record is created with
provisioningstatus. - Step 3 — Auto Database Setup: The system automatically creates a MySQL database (
tenant_{uuid}), runs all migrations, seeds default data, creates the admin user, and installs Passport keys. - Step 4 — Workspace Activated: The tenant status changes to
activeand the user can log in immediately.
Paid Plan Signup
- Step 1 — User Registers & Pays: The user selects a paid plan, fills in their details, and completes payment via the configured payment gateway.
- Step 2 — Payment Verified: The payment gateway sends a webhook to confirm the payment was successful.
- Step 3 — Auto Provisioning: The system automatically provisions the workspace (same as free/trial: creates database, runs migrations, seeds data, creates admin).
- Step 4 — Workspace Activated: The tenant is activated and the user can access their workspace.
Shared Hosting — Manual Approval
Free & Trial Plan Signup
- Step 1 — User Registers: The user fills in company name, subdomain, email, and password.
- Step 2 — Tenant Created as Pending: A new tenant record is created with
pendingstatus. No database is created yet. - Step 3 — Emails Sent: The admin receives a notification email, and the user receives an "Under Review" email.
- Step 4 — User Sees Under Review Page: The user is shown a page indicating their application is being reviewed.
- Step 5 — Admin Creates Subdomain: The admin manually creates a subdomain in the hosting panel (cPanel/Plesk) for the tenant.
- Step 6 — Admin Creates Database & Configures Credentials: The admin creates a new database in the hosting panel and enters the credentials in the tenant management page.
- Step 7 — Connection Tested & Provisioned: The admin tests the database connection and triggers provisioning (migrations, seeding, admin creation).
- Step 8 — Tenant Activated & Email Sent: The tenant status changes to
activeand the user receives an approval email.
Paid Plan Signup
- Step 1 — User Registers & Pays: The user selects a paid plan and completes payment.
- Step 2 — Payment Verified: The payment gateway confirms the payment, but no provisioning happens yet.
- Step 3 — Tenant Created as Pending: The tenant is saved with
pendingstatus. - Step 4 — User Redirected to Under Review Page: The user sees a page indicating their workspace is being set up.
- Step 5 — Admin Creates Subdomain & Database: The admin manually creates the subdomain and database in the hosting panel.
- Step 6 — Admin Configures & Approves: The admin enters database credentials, tests the connection, and triggers provisioning.
- Step 7 — Tenant Activated: The workspace is provisioned and the user receives a confirmation email.
Database Security
- AES-256 Encrypted Passwords — All tenant database passwords are encrypted using Laravel's APP_KEY with AES-256 encryption
- Isolated Tenant Databases — Each tenant gets their own separate database, ensuring complete data isolation
- Test Connection — Use the "Test Connection" button in the tenant management page to verify database credentials before provisioning
- Re-run Migrations — If needed, use the "Re-run Migrations" button to update a tenant's database schema
Tenant Status Lifecycle
Every tenant goes through a lifecycle of statuses:
Pending → Provisioning → Active
- Pending — Awaiting admin approval (shared hosting only)
- Provisioning — Database is being set up and migrations are running
- Active — Fully provisioned and accessible by the tenant
- Suspended — Temporarily disabled by the admin
- Cancelled — Subscription has been cancelled
- Failed — Provisioning failed (check logs and retry)
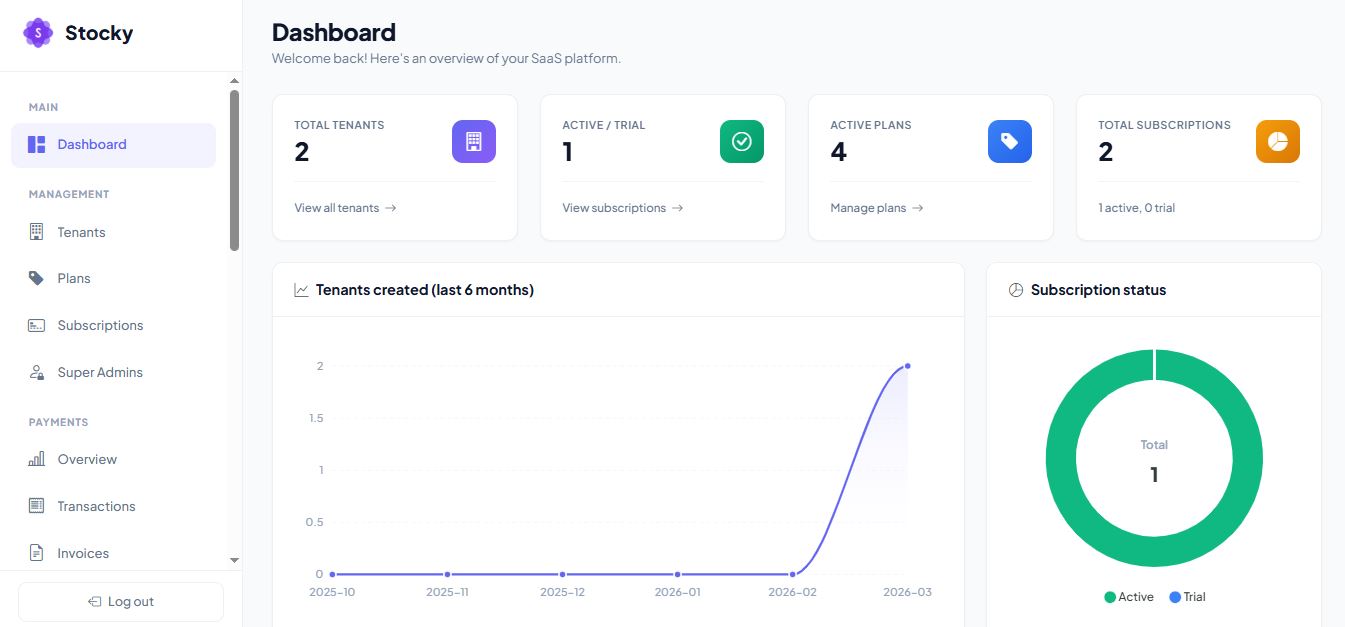
Super Admin — Dashboard
The Super Admin Dashboard gives you a bird's-eye view of your entire SaaS platform. It displays key metrics and charts to help you monitor the health and growth of your business at a glance.
Key Metrics
- Total Tenants — The total number of registered tenant workspaces
- Active Subscriptions — The number of currently active subscriptions
- Active Plans — The number of subscription plans currently available
Charts & Analytics
- Subscription Status Breakdown — Donut chart showing active, trial, cancelled, and suspended subscriptions
- Tenants Created Per Month — 6-month area chart tracking new tenant registrations
- Top 5 Subscriptions by Plan — Bar chart showing the most popular plans
If you are using shared hosting mode, the dashboard will also display a list of pending tenants that require manual approval.
Super Admin Dashboard
Super Admin — Tenants Management
The Tenants section allows you to manage all tenant workspaces on your platform. Each tenant represents a separate business/organization with its own database, users, and data.
Tenant List
The tenant list displays all registered tenants with their current status. You can search and filter tenants by status.
Tenants List
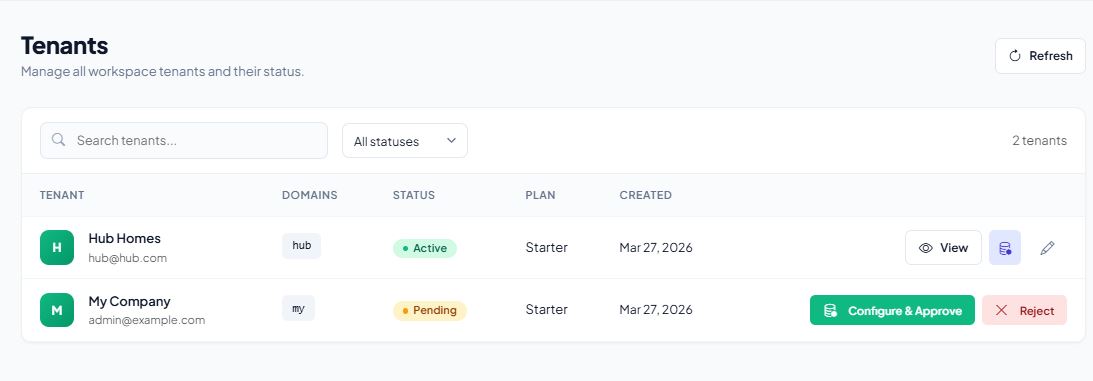
Tenant Statuses
- Pending — Awaiting approval (shared hosting mode)
- Provisioning — Database and workspace are being set up
- Active — Fully operational tenant
- Suspended — Temporarily disabled by admin
- Cancelled — Tenant has been cancelled
- Failed — Provisioning failed (requires troubleshooting)
Create a New Tenant
To create a new tenant manually, click the "Create Tenant" button and fill in the following details:
- Subdomain — The unique subdomain for the tenant (e.g.,
company.yourdomain.com) - Company Name — The name of the tenant's business
- Admin Email — Email address for the tenant's admin account
- Admin Password — Password for the tenant's admin account
- Plan — Select the subscription plan to assign
Create Tenant
Tenant Actions
For each tenant, the following actions are available:
- Edit — Update tenant information
- Suspend / Reactivate — Temporarily disable or re-enable a tenant
- Cancel — Permanently cancel a tenant
- Approve / Reject — Approve or reject pending tenants (shared hosting)
- Manage Domains — Add or remove custom subdomains for a tenant
- Manage Users — View, block, or unblock individual users within a tenant
- Database Tools — Test connection, rerun migrations, reseed data, or reset database
- Reprovision — Re-create the tenant workspace if provisioning failed
Super Admin — Plans Management
Subscription plans define what features and usage limits each tenant gets. You can create multiple plans with different pricing tiers to suit various business sizes.
Plan List
View all available plans with their pricing, status, and active subscriber count.
Plans List
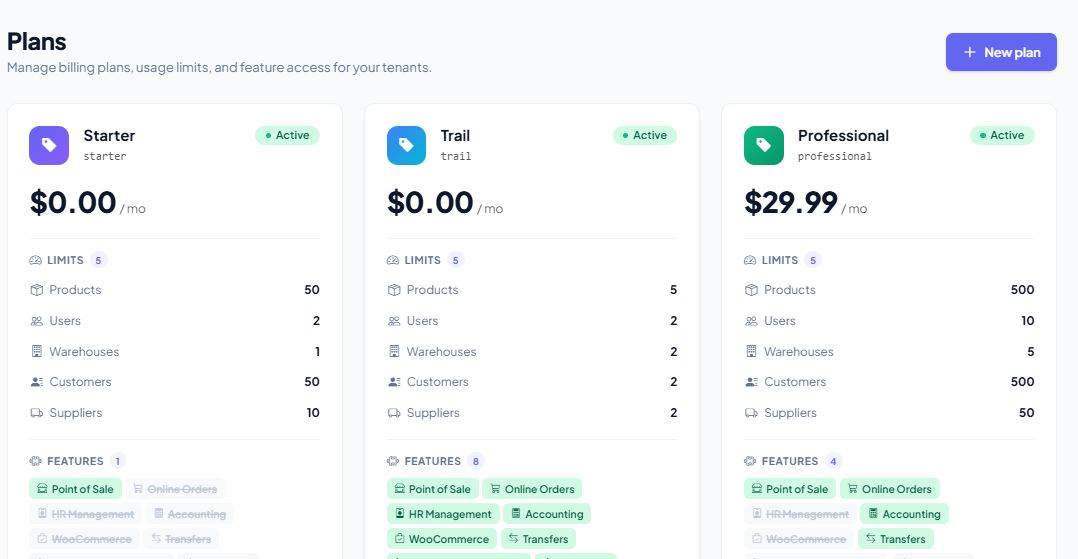
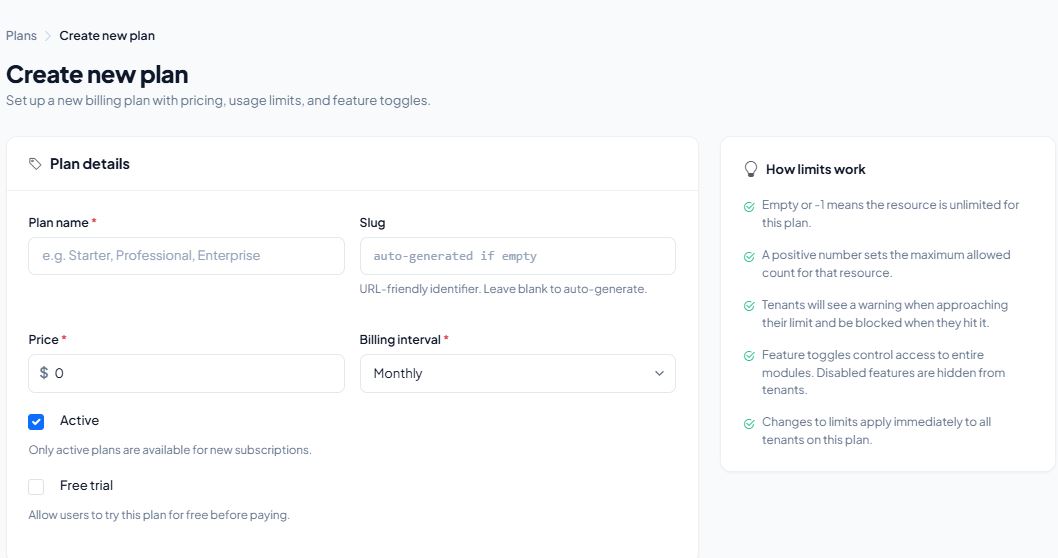
Create a Plan
When creating a new plan, you can configure the following:
- Name & Slug — Display name and URL-friendly identifier
- Monthly Price — The monthly subscription cost
- Yearly Price — The annual subscription cost (discounted)
- Usage Limits — Set limits for: Products, Users, Warehouses, Customers, Suppliers
- Features — Toggle available features:
- POS (Point of Sale)
- Online Orders
- HRM (Human Resource Management)
- Accounting
- WooCommerce Integration
- Transfers
- Service & Maintenance
- AI Reports
- Trial Period — Enable/disable trial and set the number of trial days
- Active / Private — Active plans are available for signup; private plans are hidden from the public pricing page
Create Plan
Super Admin — Subscriptions
The Subscriptions section lets you view and manage all tenant subscriptions across the platform. You can see which plan each tenant is on, their subscription status, and make changes as needed.
Subscription List
The list displays all subscriptions with the following information:
- Tenant name and ID
- Assigned plan
- Subscription status (Active, Trial, Suspended, Cancelled)
- Trial end date (if applicable)
- Subscription end date
You can search subscriptions by tenant ID or company name and filter by status.
Subscriptions List
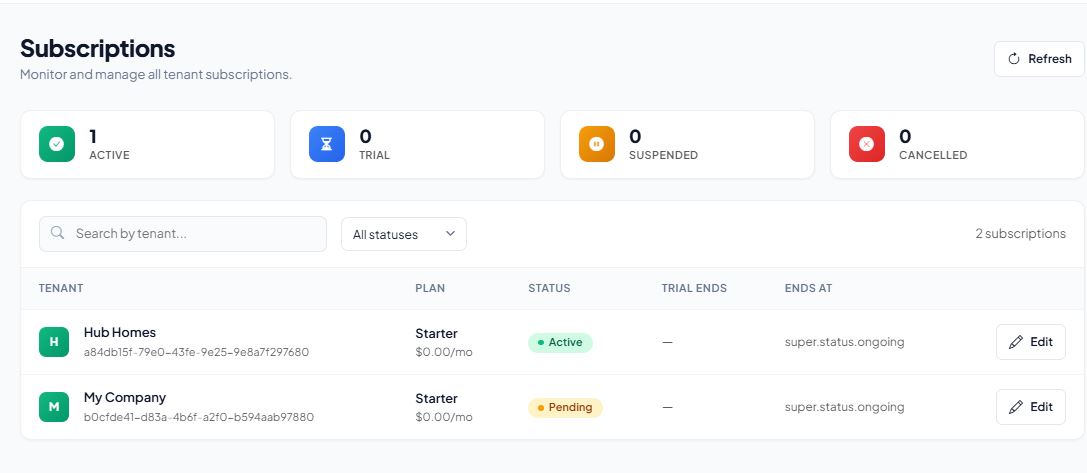
Edit a Subscription
For each subscription, you can:
- Change Plan — Upgrade or downgrade the tenant to a different plan
- Change Status — Switch between active, suspended, cancelled, or trial
- Update Trial End Date — Extend or shorten the trial period
- Update Subscription End Date — Modify when the subscription expires
Super Admin — Payments & Billing
The Payments section provides a comprehensive view of all financial transactions on your platform, including revenue tracking, payment management, and invoice generation.
Payment Dashboard
- Total Revenue — Sum of all successful payments
- Total Tax — Total tax collected
- Total Transactions — Number of payment transactions
- Status Breakdown — Paid, failed, refunded, and pending payment counts
- Monthly Revenue Chart — 12-month revenue trend with transaction count per month
- Payment Gateway Breakdown — Revenue distribution across gateways
- Recent Transactions — Quick view of the last 10 transactions
Payments Dashboard
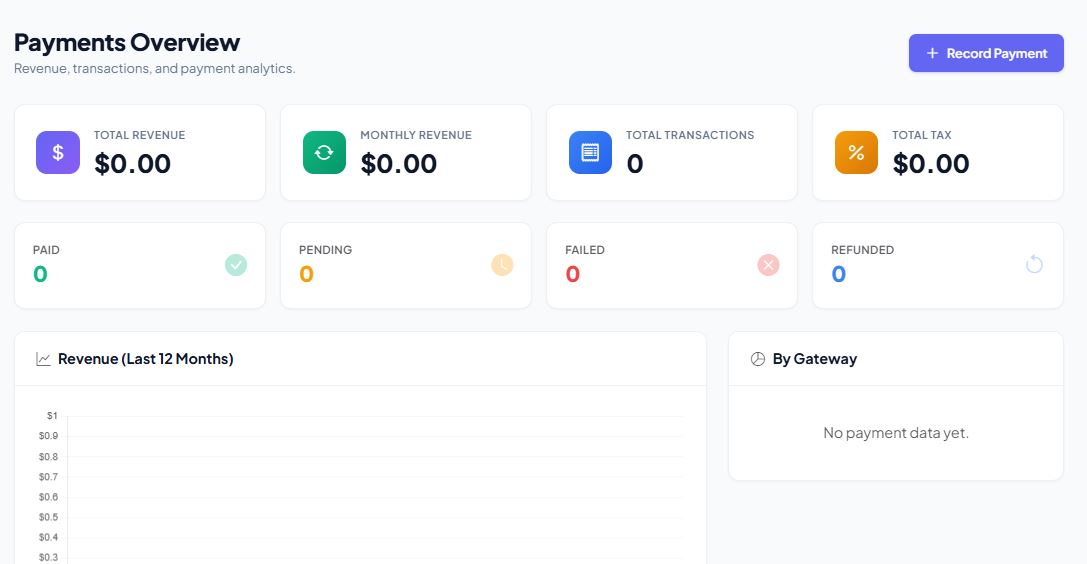
Transaction Management
For each payment transaction, you can:
- View Details — See full payment information (tenant, amount, gateway, date)
- Create Manual Payment — Record an offline or manual payment
- Mark as Paid / Failed / Refunded — Update payment status
- Download Invoice — Generate and download an invoice PDF
Super Admin — Admin Users
Manage all Super Admin accounts that have access to the central admin panel. You can create multiple admin accounts with different permission levels.
Creating an Admin
When creating a new admin account, configure the following:
- Name, Email & Password — Basic account credentials
- Role:
- super_admin — Full unrestricted access to everything
- admin — Access restricted to selected permissions only
- Permissions (for admin role) — Select which sections the admin can access:
- Dashboard
- Tenants
- Plans
- Subscriptions
- Admins
- Payments
- Knowledge Base
- CMS
- Email Templates
- Settings
Managing Admins
The admin list displays all accounts with their role and status. You can edit an admin's details and permissions, or delete an admin account.
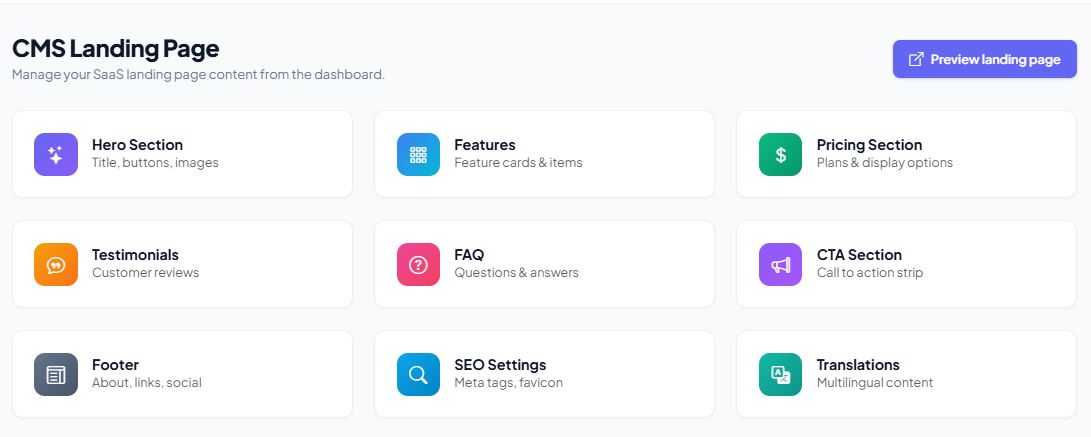
Super Admin — CMS – Landing Page
The CMS module allows you to fully customize the public landing page of your SaaS platform without touching any code. Manage all sections from the admin panel with multi-language support.
Landing Page Overview
CMS - Landing Page Builder
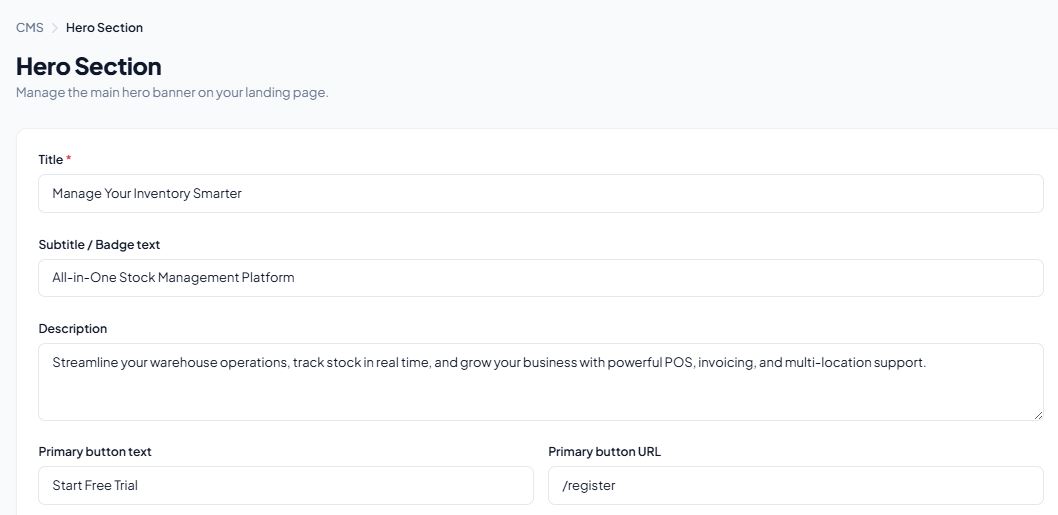
Hero Section
The hero section is the first thing visitors see. You can customize:
- Title and subtitle text
- Description paragraph
- Primary and secondary call-to-action buttons with custom URLs
- Hero image upload
Hero Section
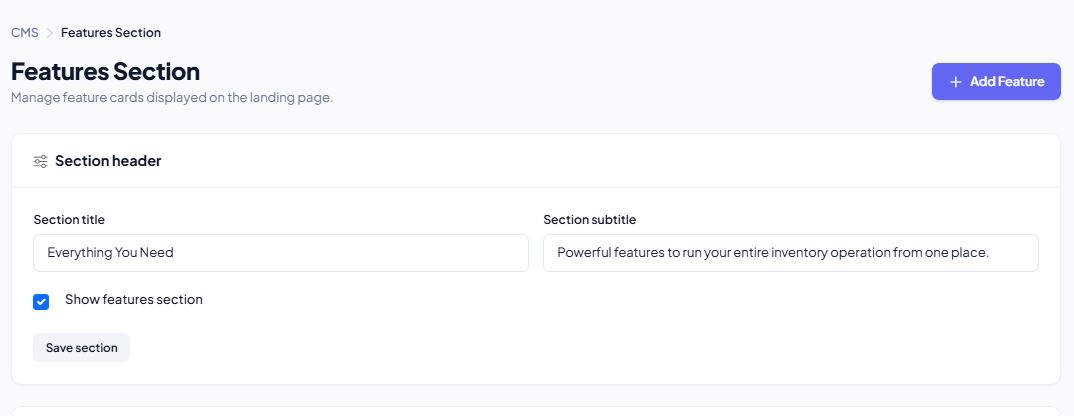
Features Section
Showcase the key features of your platform. For each feature you can set:
- Feature title and description
- Icon selection
- Feature image upload
- Drag-and-drop reordering
Features Section
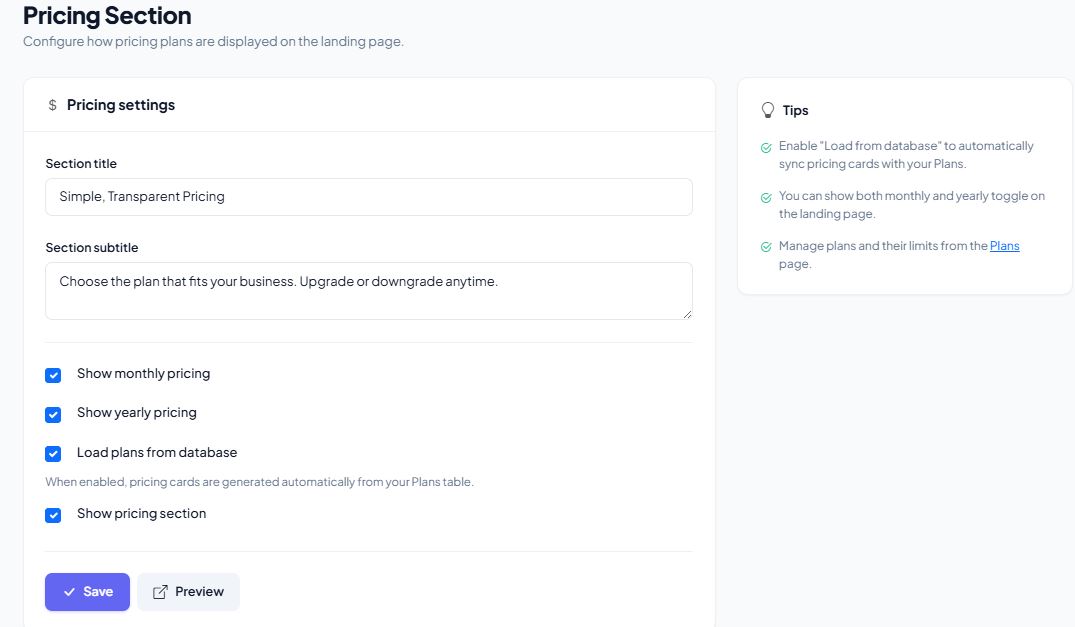
Pricing Section
Configure the headline and description for the pricing section. The pricing cards are automatically generated from your active subscription plans.
Pricing Section
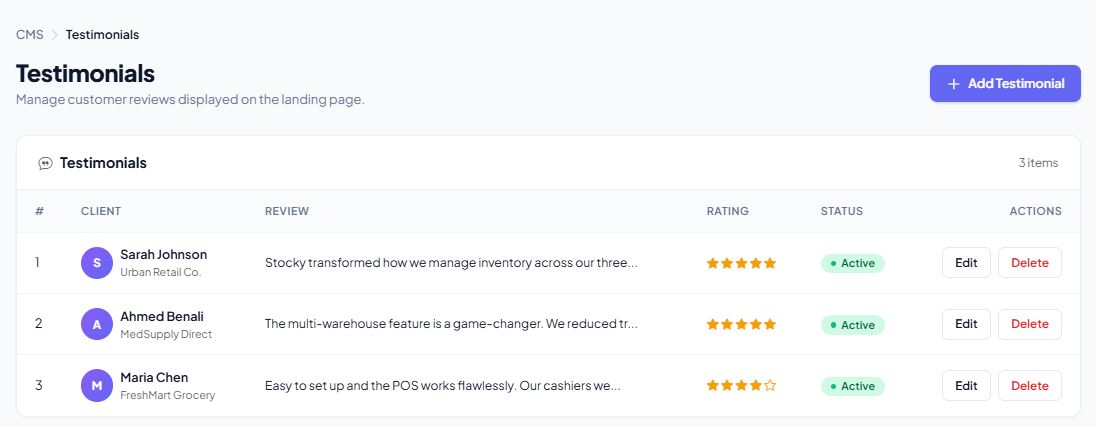
Testimonials
Add customer testimonials to build trust. Each testimonial includes:
- Author name and image
- Testimonial content
- Star rating
Testimonials
Additional CMS Sections
- FAQ Section — Create and manage frequently asked questions with expandable answers
- CTA (Call to Action) — Configure headline, description, and button with custom URL
- Footer — Set footer text, links, and copyright information
- Multi-language Support — All CMS content can be translated into multiple languages (English, French, Hindi, Bengali, and more)
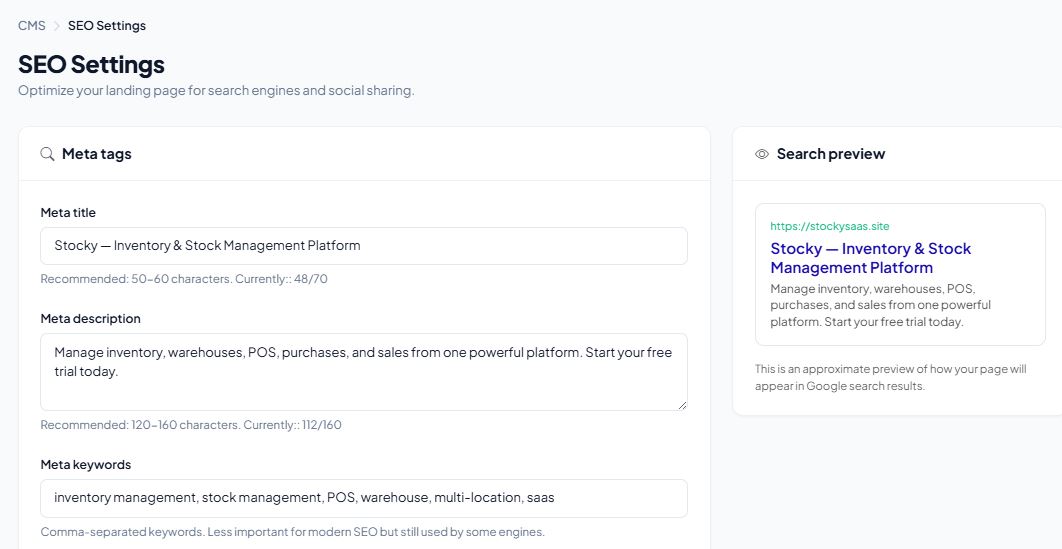
Super Admin — SEO Settings
Configure the search engine optimization settings for your landing page to improve visibility in search results.
Available Settings
- Meta Title — The page title that appears in search engine results and browser tabs
- Meta Description — A brief summary of your page for search engine results
- Meta Keywords — Keywords associated with your platform for search indexing
SEO Settings
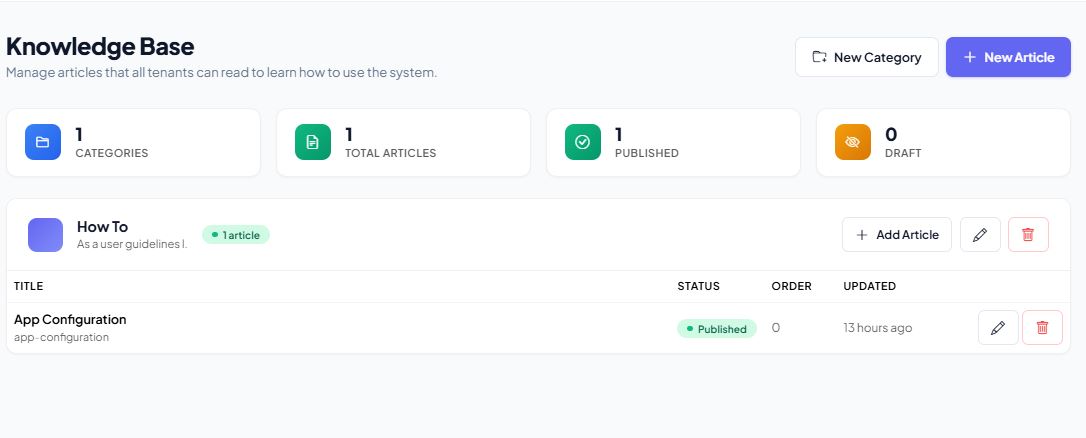
Super Admin — Knowledge Base
The Knowledge Base allows you to create a self-service help center for your tenants. Organize articles into categories so users can quickly find answers to common questions.
Categories
Create and manage knowledge base categories with:
- Category name and slug
- Description
- Icon selection
- Sort order (drag to reorder)
Articles
Create help articles within categories:
- Article title and slug
- Rich text content editor
- Publish / Unpublish toggle
- Sort order within category
Knowledge Base
Super Admin — Email Templates
Customize the automated email notifications sent to tenants throughout their lifecycle. All templates support multi-language translations.
Available Templates
- Subscription Expired — Sent when a tenant's subscription has ended
- Expiring Soon — Renewal reminder sent before expiration
- Payment Success — Confirmation after a successful payment
- Payment Failed — Notification when a payment attempt fails
- Plan Ended — Sent when the plan period is fully over
- Tenant Pending — Notification that the tenant is awaiting approval
- Tenant Under Review — Sent while the tenant application is being reviewed
- Tenant Approved — Confirmation that the tenant has been approved
- Tenant Rejected — Notification that the tenant application was rejected
Template Editing
For each template, you can:
- Edit the email subject line
- Customize the HTML email body with a rich editor
- Add translations for multiple languages
- Preview the email before saving
- Send a test email to verify the template
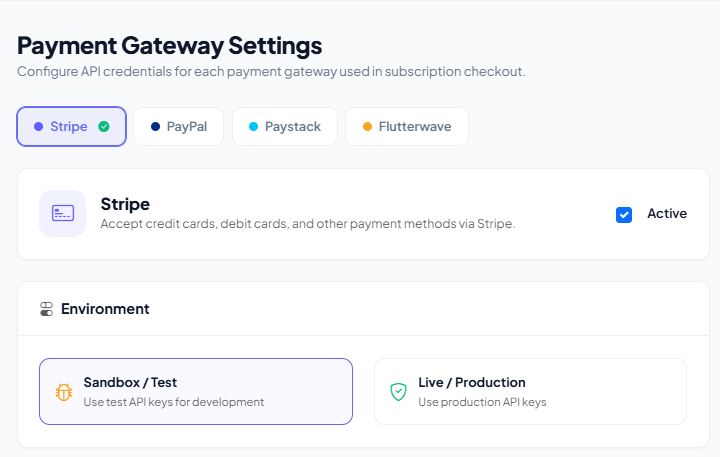
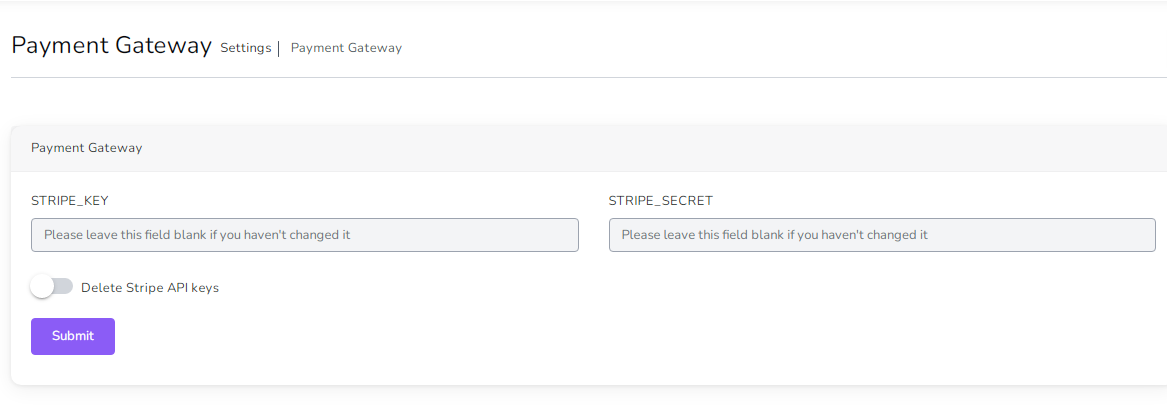
Super Admin — Payment Gateway Settings
Configure the payment gateways your platform accepts for subscription payments. Multiple gateways can be enabled simultaneously, giving tenants flexibility in how they pay.
Supported Gateways
- Stripe — Credit/debit card payments worldwide
- PayPal — PayPal account and card payments
- Paystack — Popular payment gateway for Africa
- Flutterwave — Payment gateway for African businesses
Gateway Configuration
For each gateway, you can configure:
- Enable / Disable — Toggle the gateway on or off
- Test / Live Mode — Switch between sandbox (testing) and production mode
- API Credentials — Enter your API keys and secret keys (stored encrypted)
- Supported Currencies — Set which currencies the gateway accepts
- Default Currency — Set the default currency for the gateway
Payment Gateway Settings
Super Admin — Mail Settings
Configure how your platform sends emails to tenants. This is required for email notifications, password resets, and subscription-related communications.
Supported Mailers
- SMTP — Standard mail protocol (Gmail, Outlook, custom SMTP servers)
- Mailgun — Mailgun transactional email service
- Amazon SES — Amazon Simple Email Service
- Sendmail — Local server sendmail
SMTP Configuration
If using SMTP, configure the following:
- SMTP Host — Mail server address (e.g.,
smtp.gmail.com) - SMTP Port — Port number (typically
587for TLS or465for SSL) - SMTP Username — Your email account username
- SMTP Password — Your email account password
- Encryption — TLS or SSL
- From Address — The sender email address
- From Name — The sender display name
After configuring, use the "Send Test Email" button to verify your settings are working correctly.
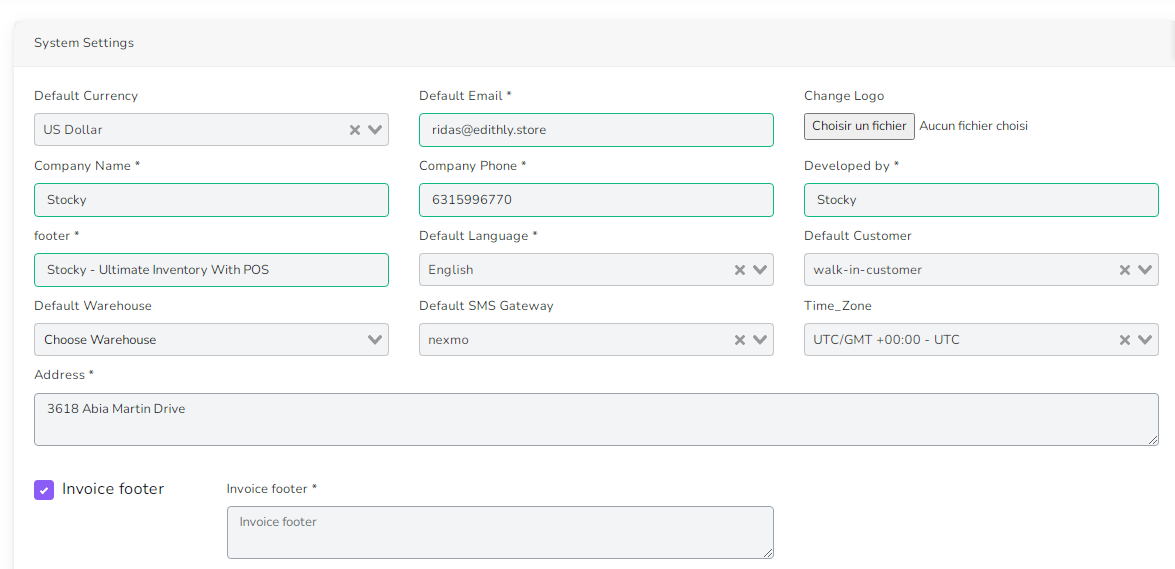
Super Admin — General Settings
Configure the core platform settings that affect the entire SaaS application.
Available Settings
- App Name — The name of your SaaS platform
- Currency Code & Symbol — Default currency for the platform (e.g., USD, $)
- Company Name — Your company's legal name
- Phone — Company contact phone number
- Email — Company contact email
- Address — Company physical address
- Website — Company website URL
- Logo — Upload your platform logo (PNG, JPG, JPEG, SVG, WebP)
- Favicon — Upload your browser tab icon (PNG, ICO, JPG, JPEG, SVG)
- Hosting Mode — Select VPS (automatic provisioning) or Shared Hosting (manual approval required)
Cache Management
Use the "Clear Cache" button to clear the application cache. This is useful after making configuration changes or when troubleshooting issues.
POS Printer Settings
Guide to Setting Up Receipt Printer to work with POS Small Receipts
To set up receipt printer do the following:
- 1) If printer is not already installed, follow manufacturer instructions to set up the printer and install the software.
- 2) Go to settings for your printer in your operating system.
Note: The next instructions are for Windows 10 printer settings.
- Go to your Start Menu and click the Settings icon.
- Go to Devices, then Printers and Scanners. This is your printer settings.
- Once in your printer settings, find the receipt printer. Click the printer icon.
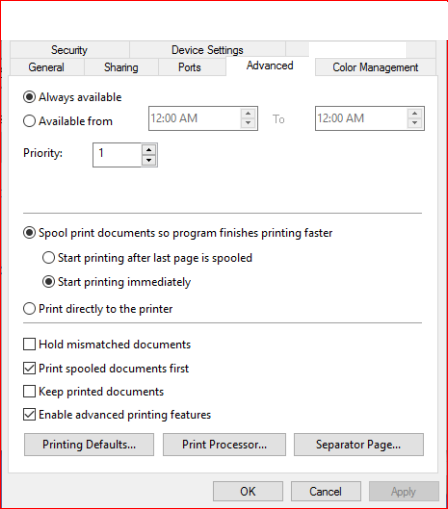
- Next click Manage, then click Printer Properties.
- Click the Advanced Tab.
- Click Printing Defaults.
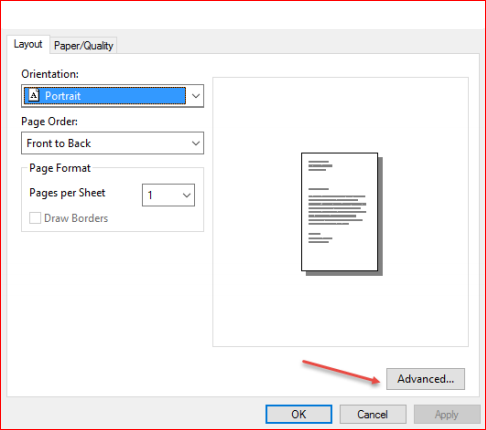
- In the lower right corner of the Printing Defaults screen, click Advanced
- In Advanced Options > Advanced Document Settings, under Paper/Output the Paper Size needs to be 72mm X 200mm. If this is different change it and click OK.
- The setup of the receipt printer is complete. It should properly print small receipts.
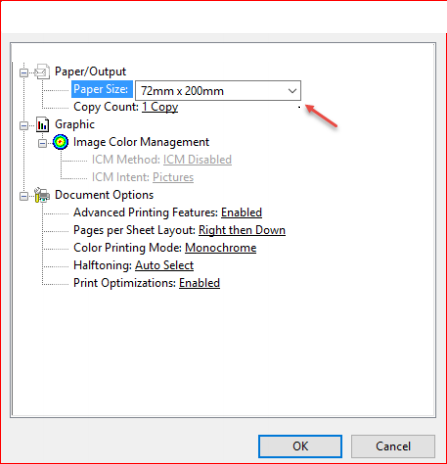
Note: These instructions are for Windows 10. If you are using an earlier version of Windows the
                  settings should be similar. If you are using another operating system, find your printer size, find where
                  to set the paper size and set it to 72mm x 200mm.
code>
How to use Cash drawer
- Install and run QZ Tray on each POS machine: https://qz.io/download/
- Connect the cash drawer to the receipt printer’s RJ11/RJ12 port.
- In the app: Settings → POS Receipt → enable “Open cash drawer on cash payment” and, if needed, set the Receipt printer name (as in QZ Tray / Windows).
- Complete a sale with Cash as (at least) one payment method → the drawer should open automatically after payment success.
Note: QZ Tray 2.x can require signed messages. If you see security/signing errors, you’ll need to configure certificate/signing (see QZ signing). The integration is written so that if QZ is not available or signing fails, the POS still completes the sale and only the drawer open is skipped.
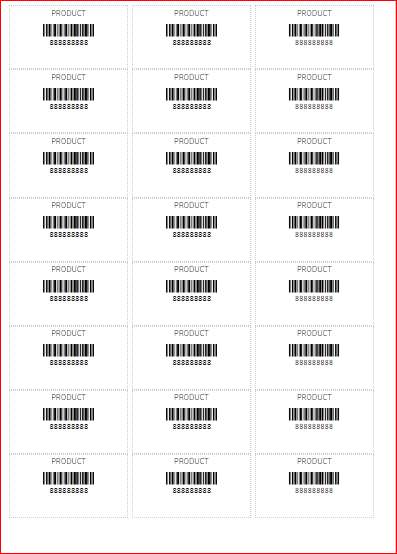
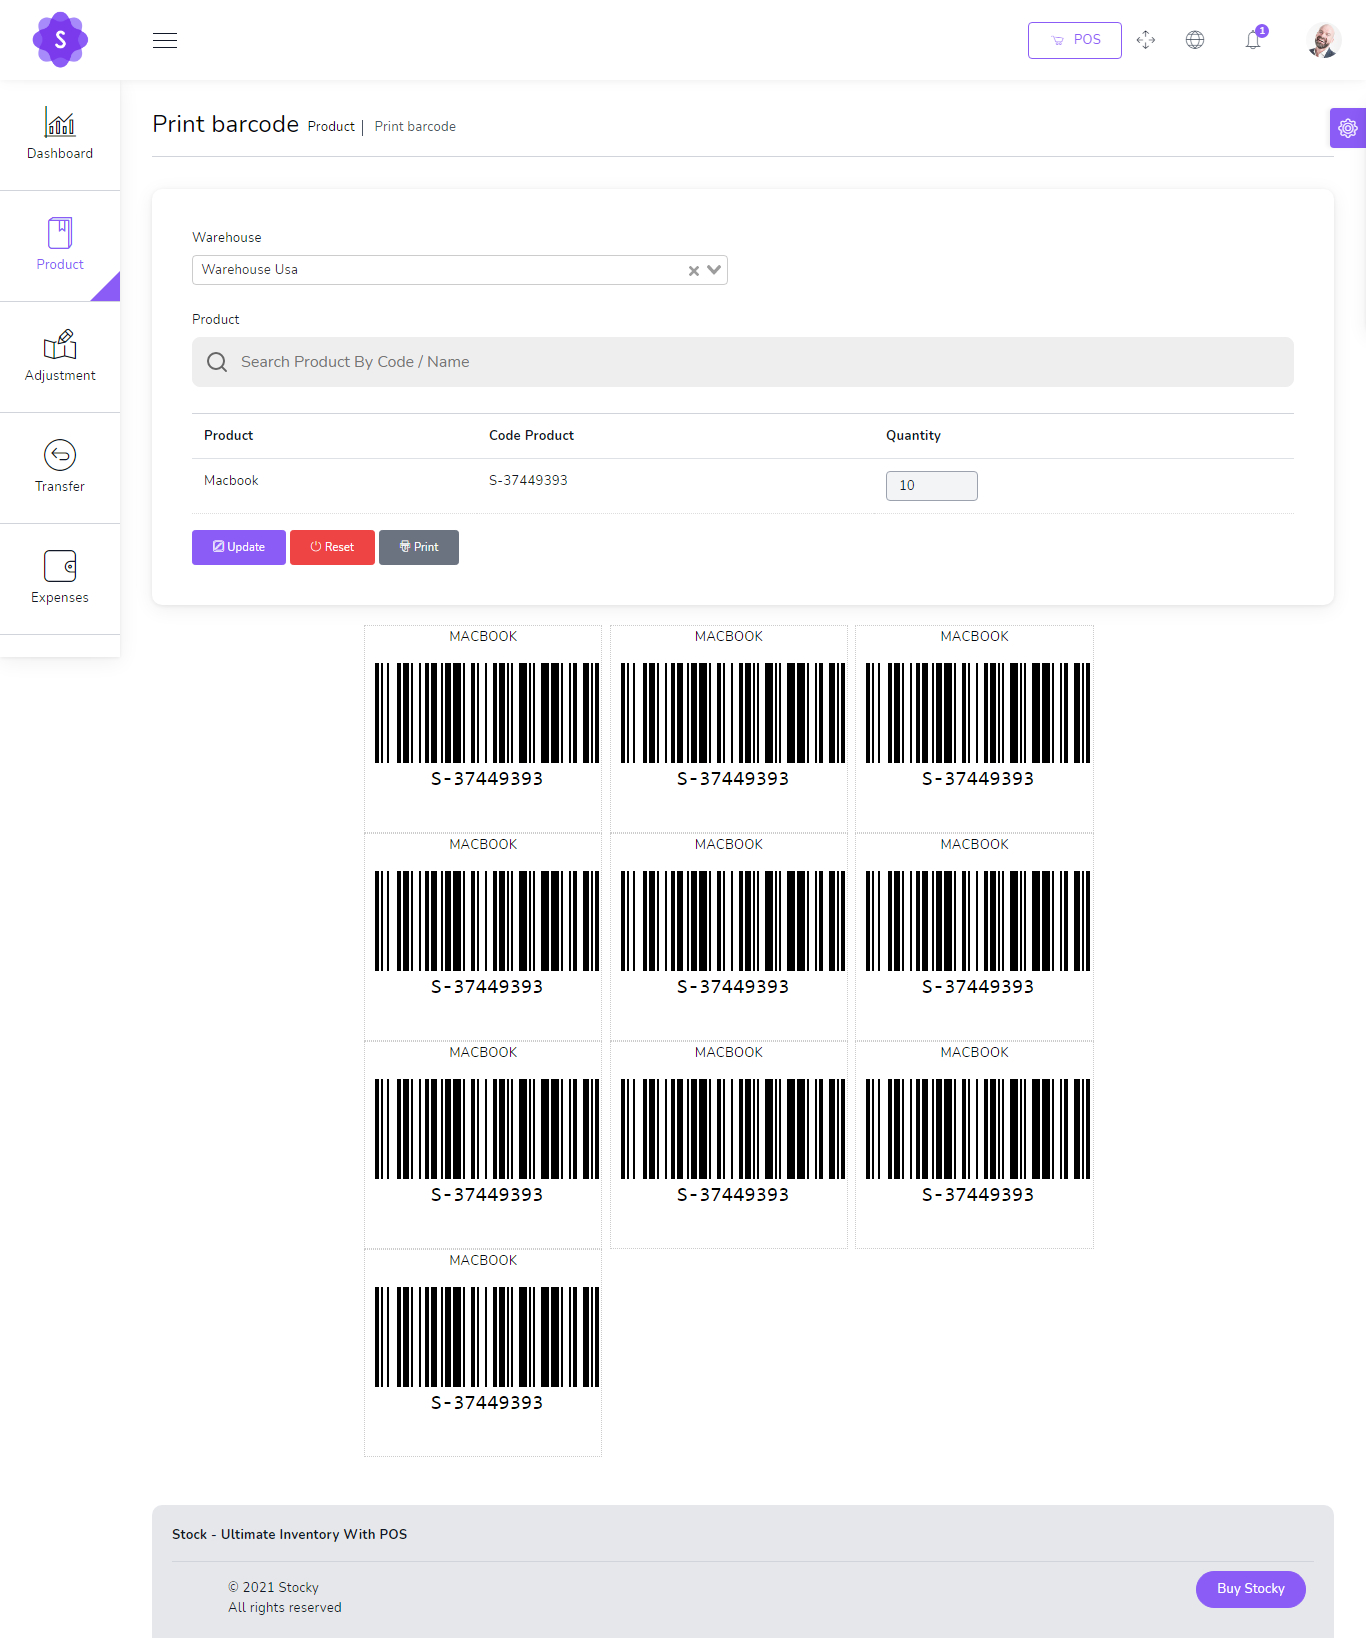
📦 Print Barcode / Labels
Navigate to /app/products/barcode to start printing your barcodes and labels.
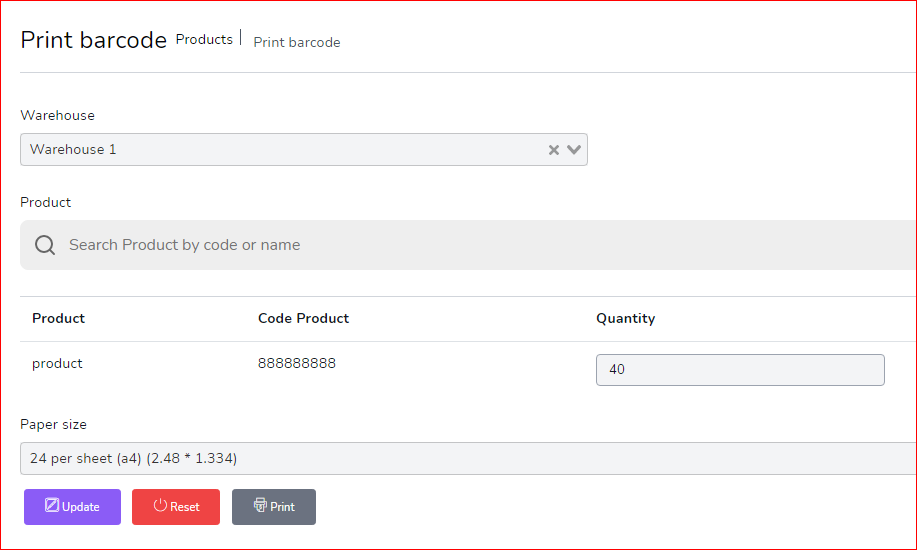
🔧 Steps to Print:
- Select Warehouse
- Select Product
- Set Quantity
- Choose Paper Size
- Click on Update
- Click on Print
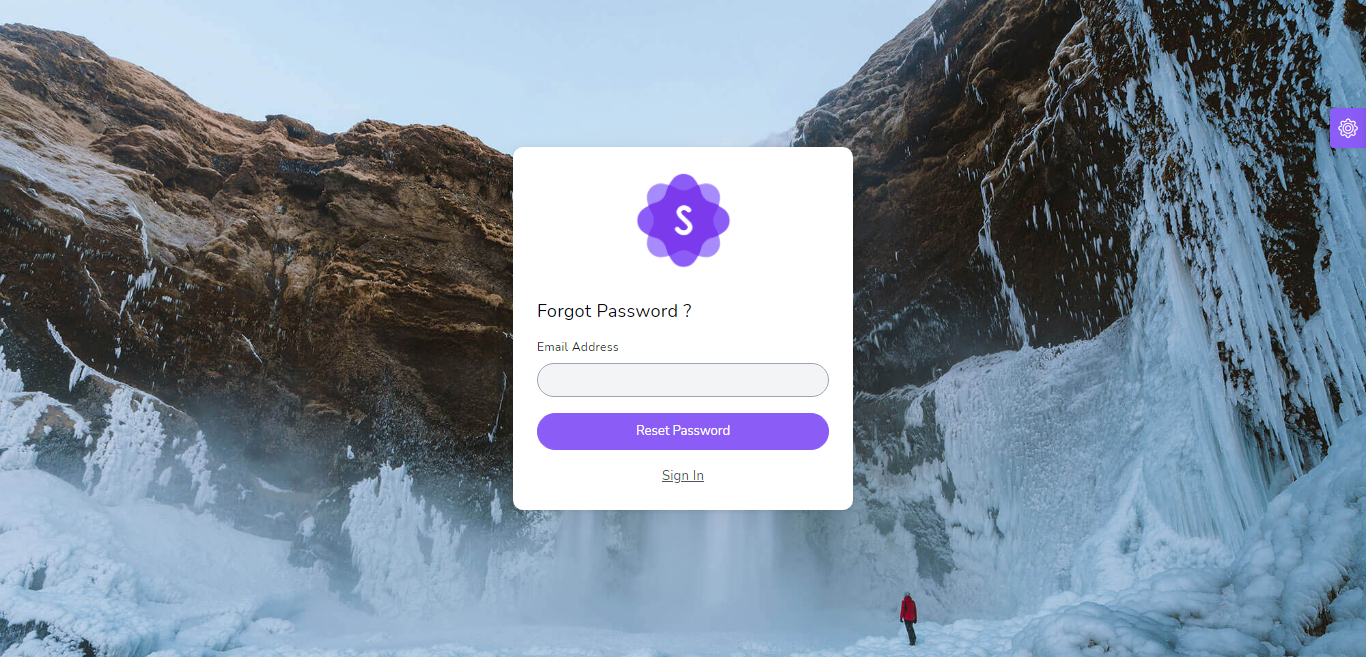
🔐 Login
Login by default
- Email:
admin@example.com - Password:
123456
⚠️ You can change the password for security purposes.
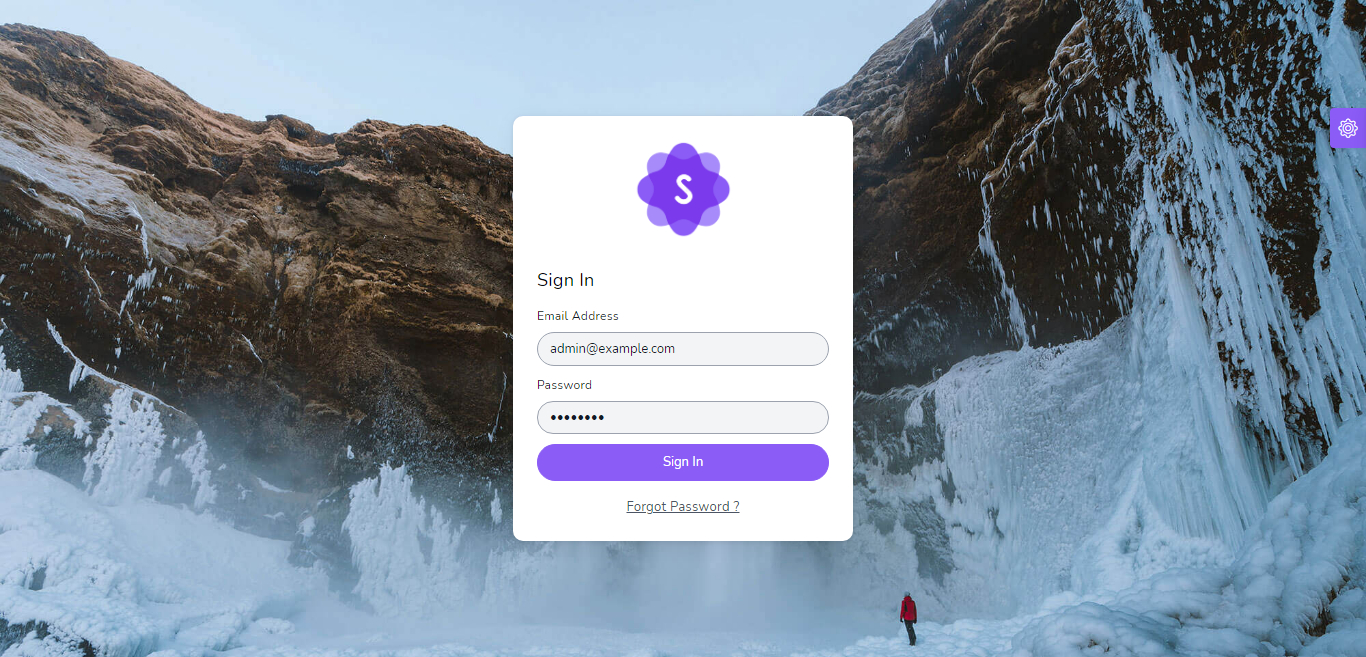
If you forgot your password, enter your email and click the reset button. Then check your email for the reset link.
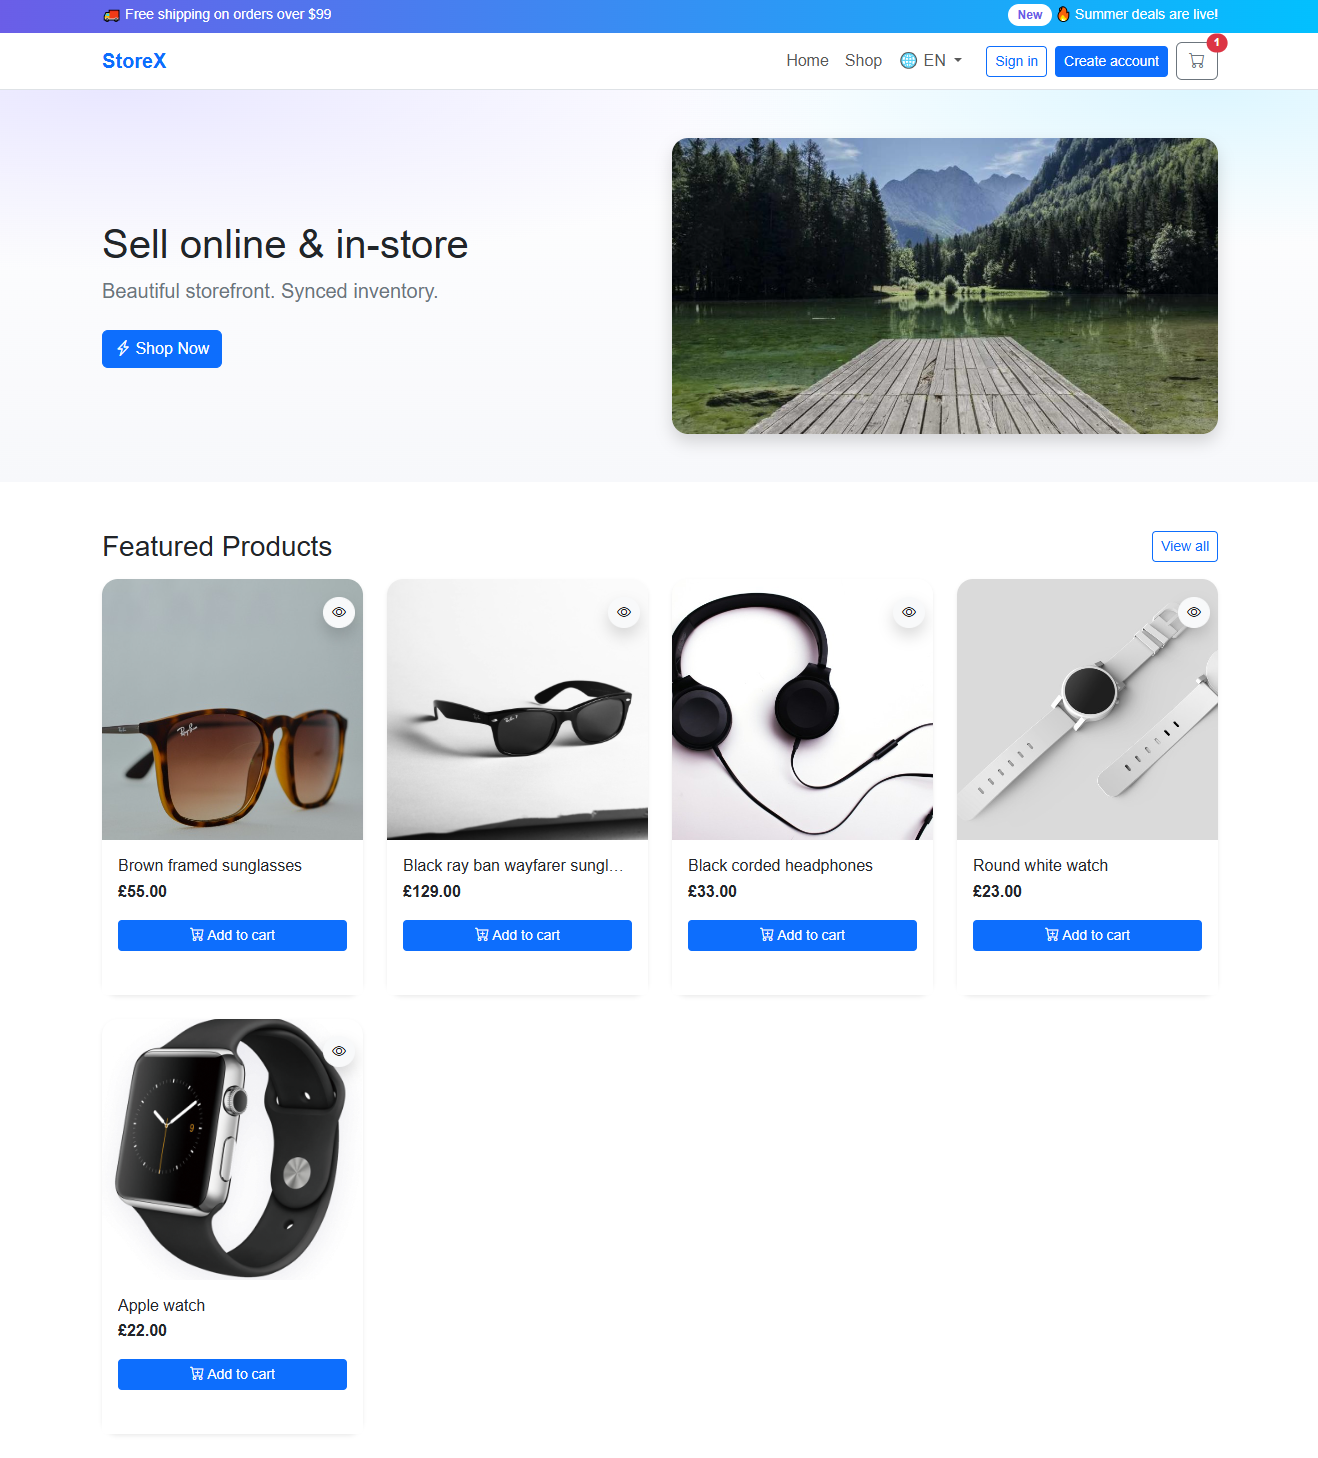
🛍️ Online Store
Overview
Sell online and in-store with a synced inventory. Customers can register, login, browse products, add items to the cart, and place orders. From the admin panel you can accept or cancel orders—if accepted, the order is automatically converted to a Sale (invoice) with stock updates.
Storefront
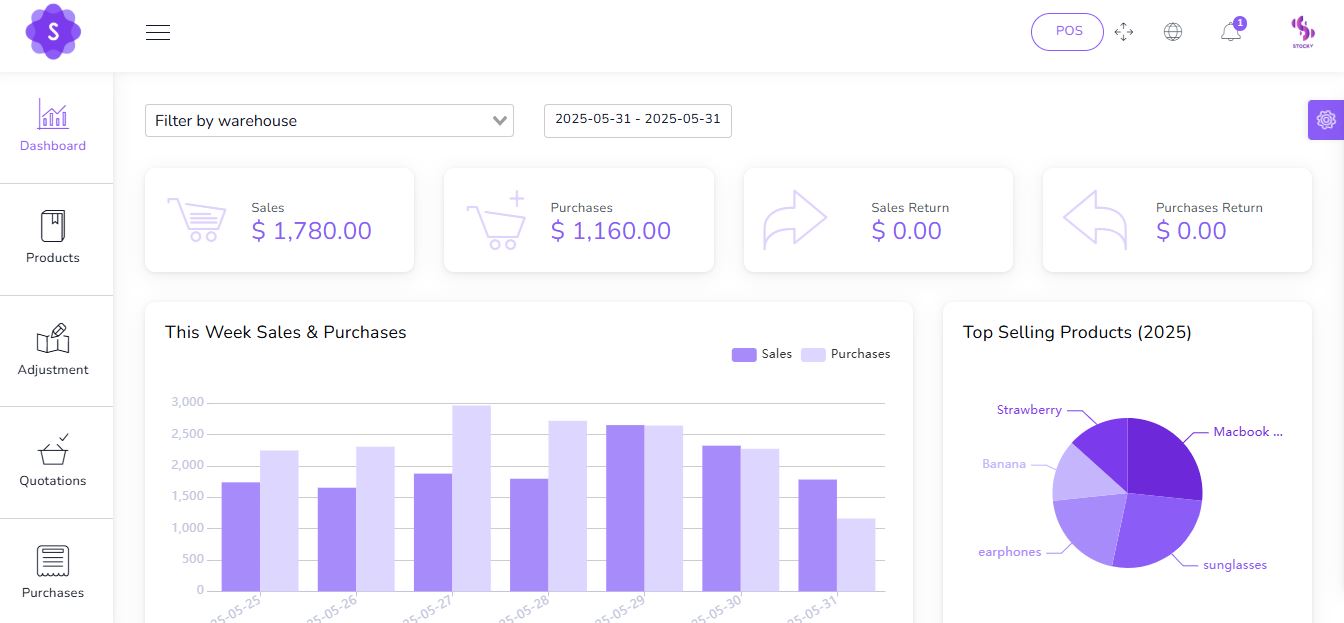
📊 Dashboard
Dynamic dashboard
📌 Key Metrics & Insights:
- Today Sales
- Today Purchases
- Today Sales Return
- Today Purchases Return
- This Week Sales & Purchases
- Top Selling Products This Month
- Payment Sent & Received This Week
- Top 5 Customers This Month
- Recent Sales
🌐 Languages Management
This section allows you to manage all languages, define default ones, and control their status.

Form Fields to Add Language:
- Name: Name of the language (e.g., English, Français, العربية).
- Locale: Locale code (e.g.,
en,fr,ar). - Flag: Upload the flag icon for visual identification.
Language Table Columns:
- Flag: Display the uploaded country flag.
- Name: Language name.
- Locale: Language locale key.
- Is Active: Indicates if this language is currently available in the system.
- Is Default: Marks the language as the system's default fallback.
- Actions: Edit, Delete, or Open Translations.
🈺 Translations Manager
Translate UI texts into any active language. Each key represents a word or phrase used in the system.

Translation Management Features:
- 🔍 Search Bar: Filter translation keys by value or key name.
- ➕ Add New: Insert a new translation key/value manually.
- 💾 Save: Save changes for each translation key independently.
- 📥 Save All Changes: Bulk save after editing multiple fields.
- 🔄 Reload Reminder: Prompts user to reload the page after saving to apply changes immediately.
✅ Use this interface to manage your Translations
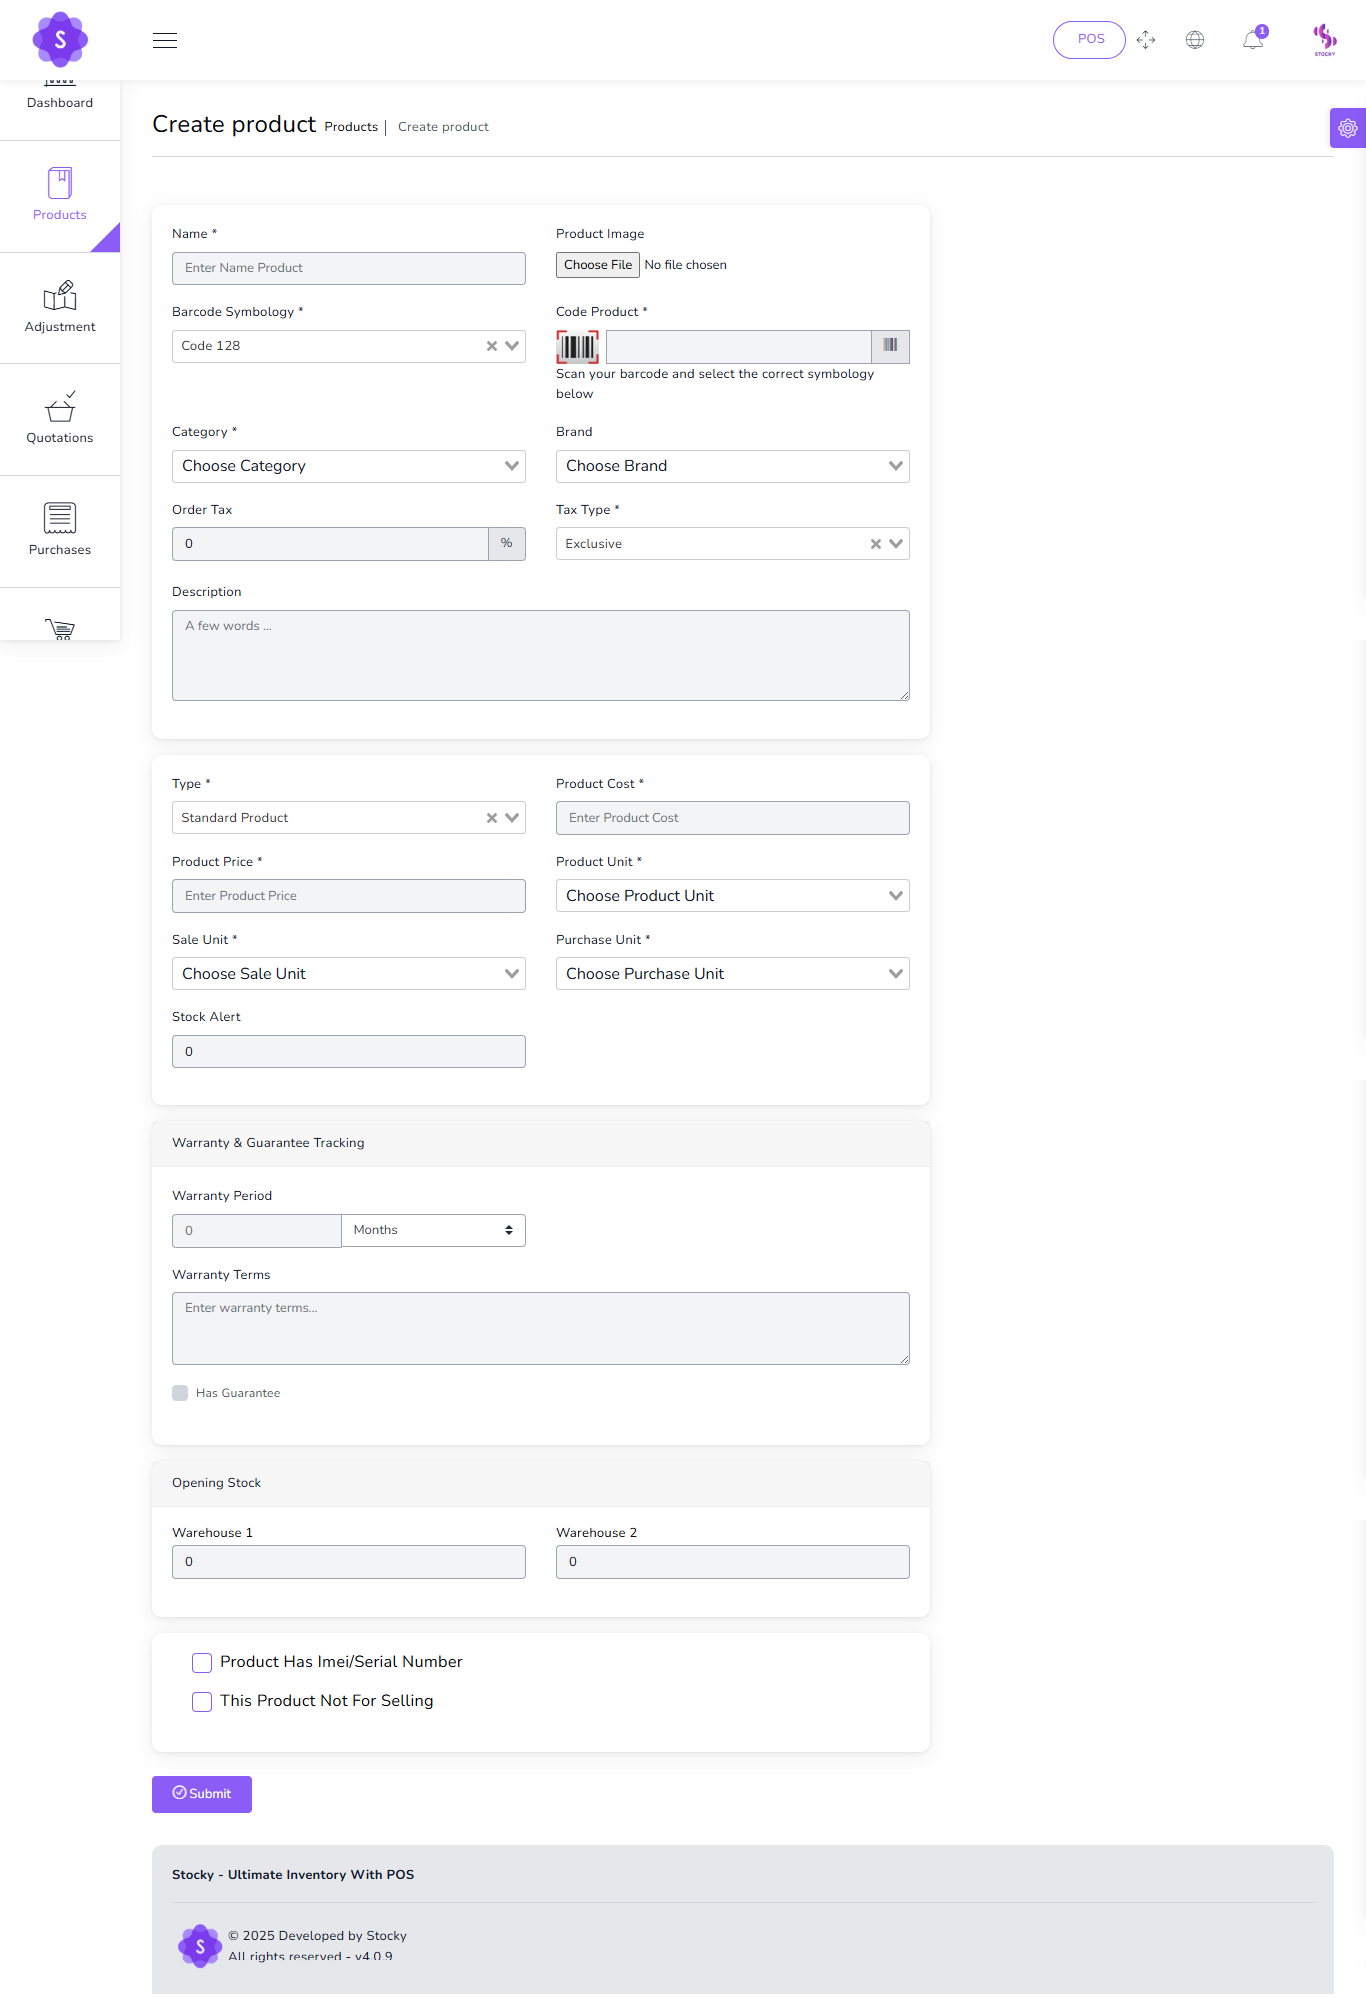
🛒 Products
To create a new product it's very easy
📌 Product Creation Fields:
- Product Name
(required) - Product Code
(required) - Category
(required) - Brand
(optional) - Barcode Symbology
(required) - Product Cost
(required) - Product Price
(required) - Product Unit
(required) - Sale Unit
(required) - Purchase Unit
(required) - Stock Alert
(optional) - Order Tax
(optional) - Tax Method
(optional) - Note
(optional) - You can add multiple variants of a product
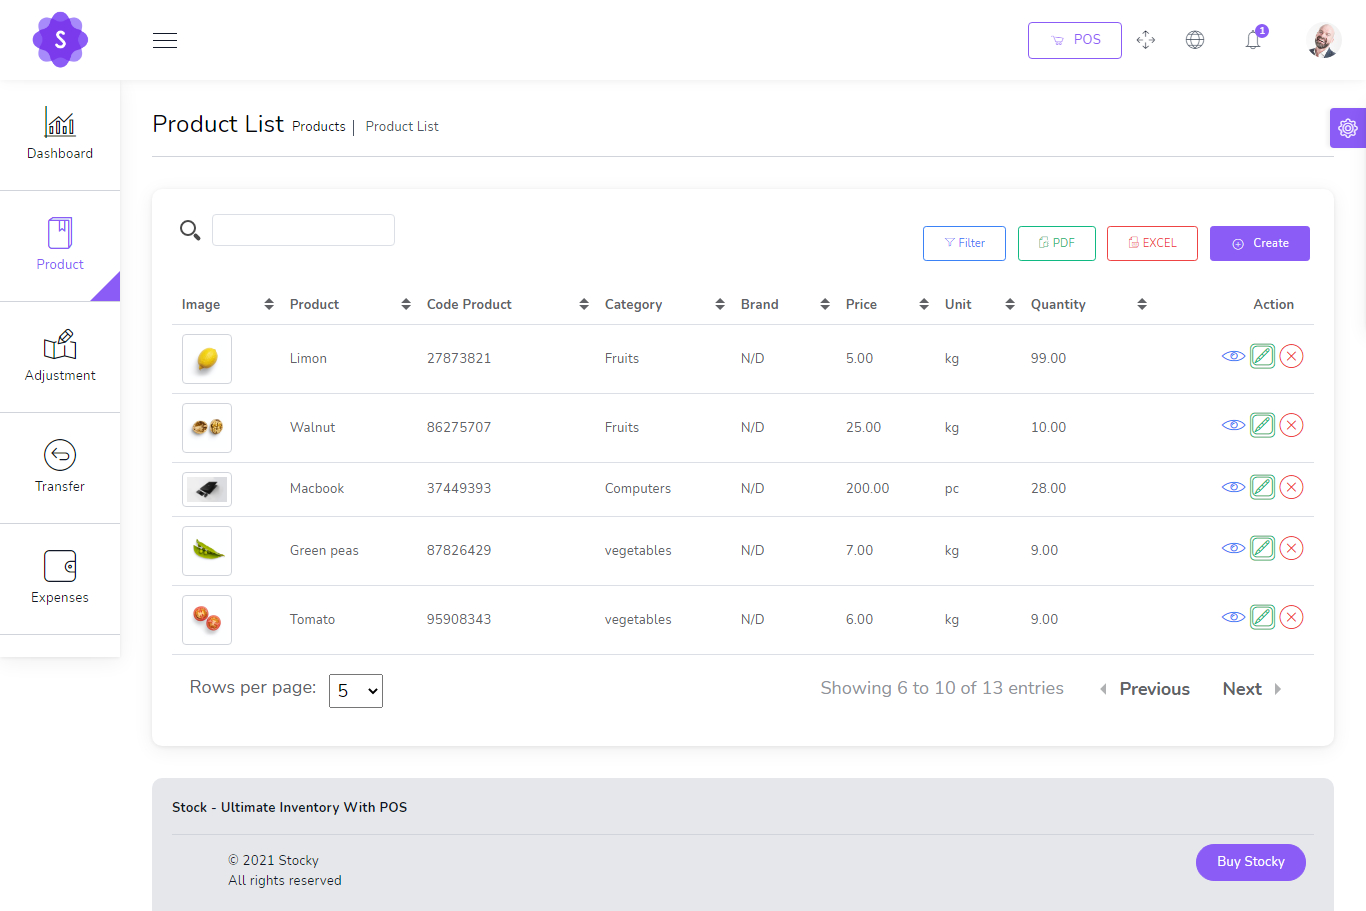
You can manage product list
⚙️ Product Management Features:
- Edit Product
- View Product Details
- Delete Product
- Generate Product List in PDF
- Generate Product List in Excel
- Filter products by code, name, or category
Print Barcode
Opening Stock Import
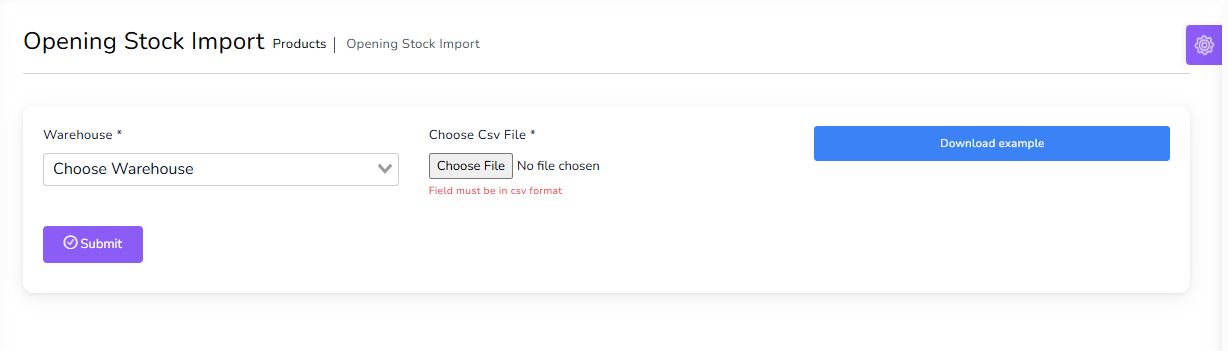
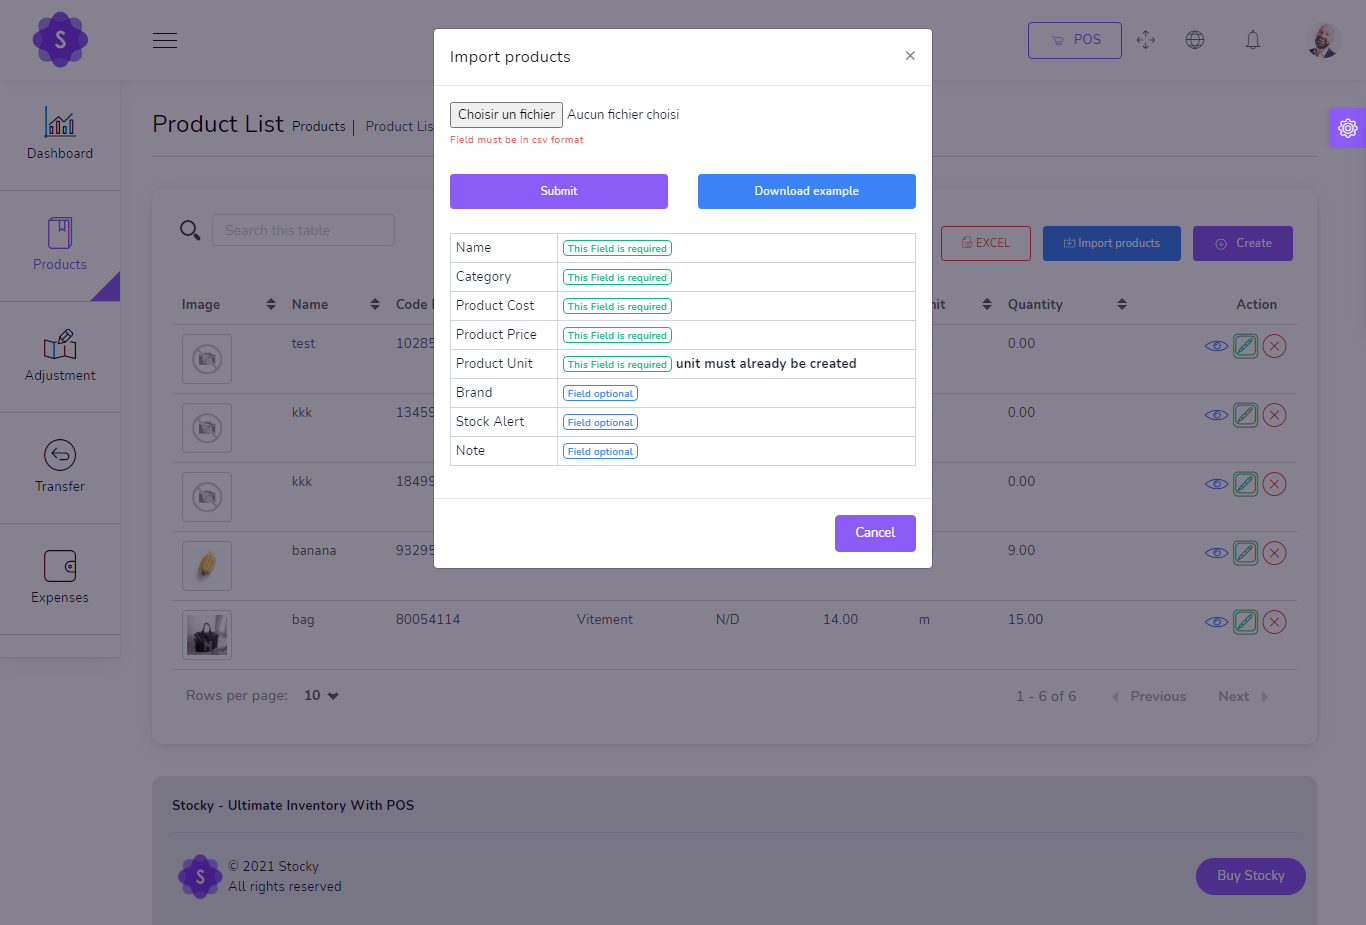
Import Products by CSV
Transfers
to create a new Transfer it's very easy
- From Warehouse
(required) - To Warehouse
(required) - Status
(required)
You can manage Transfer list
- Edit Transfer
- View Details Transfer
- Delete Transfer
- Generate Transfer list in PDF
- Generate Transfer list in Excel
- Filter Transfer by Reference , To warehouse , From Warehouse , Status
Adjustments
to create a new Adjustment it's very easy
- Warehouse
(required) - Select Product
(required)
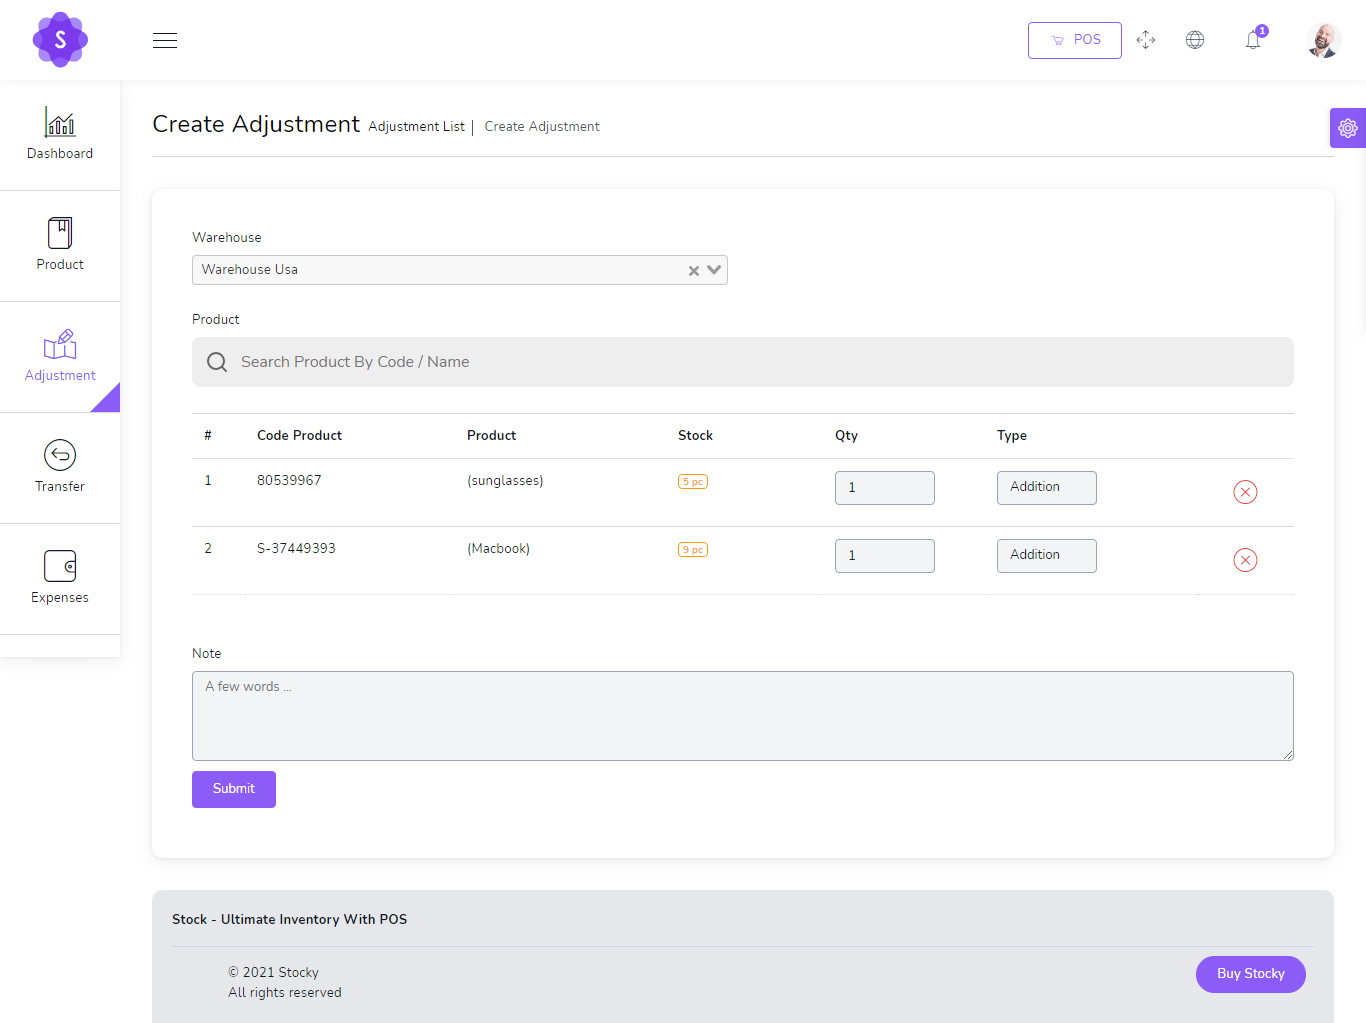
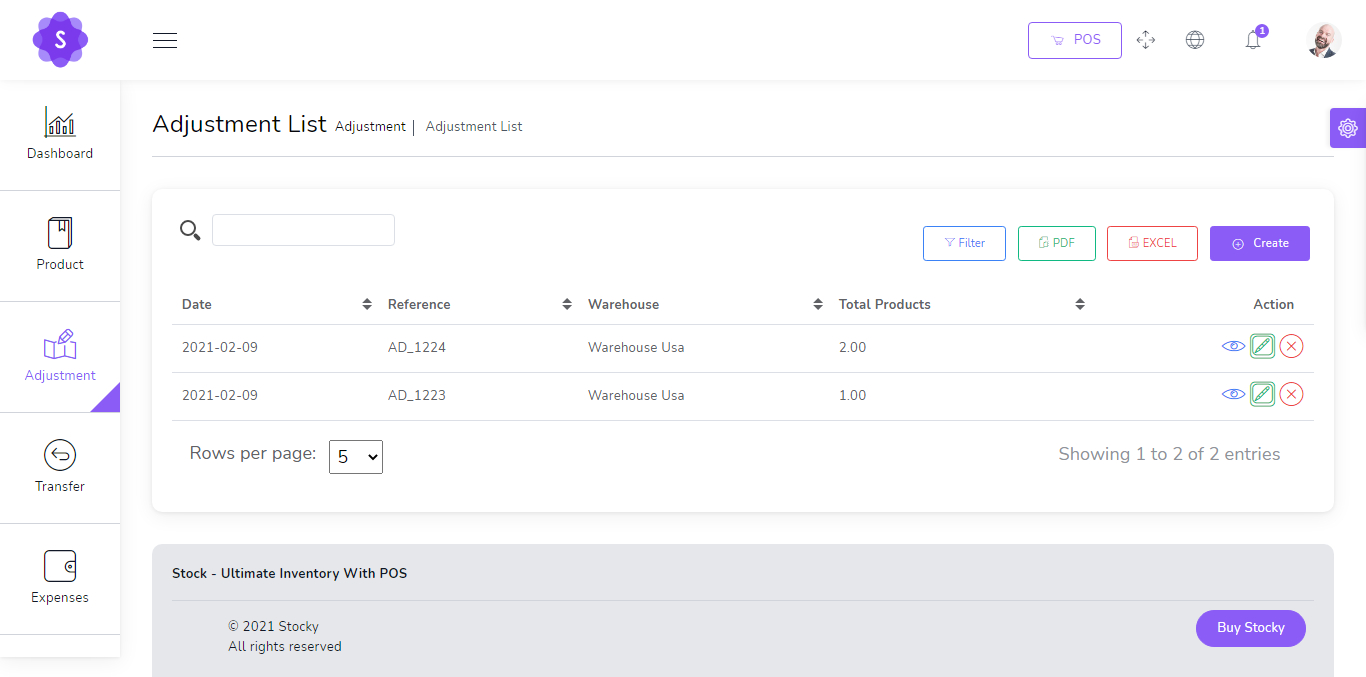
You can manage Adjustment list
- Edit Adjustment
- View Details Adjustment
- Delete Adjustment
- Generate Adjustment list in PDF
- Generate Adjustment list in Excel
- Filter Adjustment by Dtae , Reference , warehouse
Accounts
to create a new Account it's very easy
- Account num
(required) - Account Name
(required) - Initial Balance
(required) - Details
(optional)

You can manage Account list
- Edit Account
- Delete Account
- Generate Account list in PDF
- Generate Account list in Excel

Transfer Money
to Transfer Money between Your Accounts it's very easy
- Date
(required) - Amount
(required) - From Account
(required) - To Account
(required)
You can manage Transfer Money
- Edit Transfer Money
- Delete Transfer Money
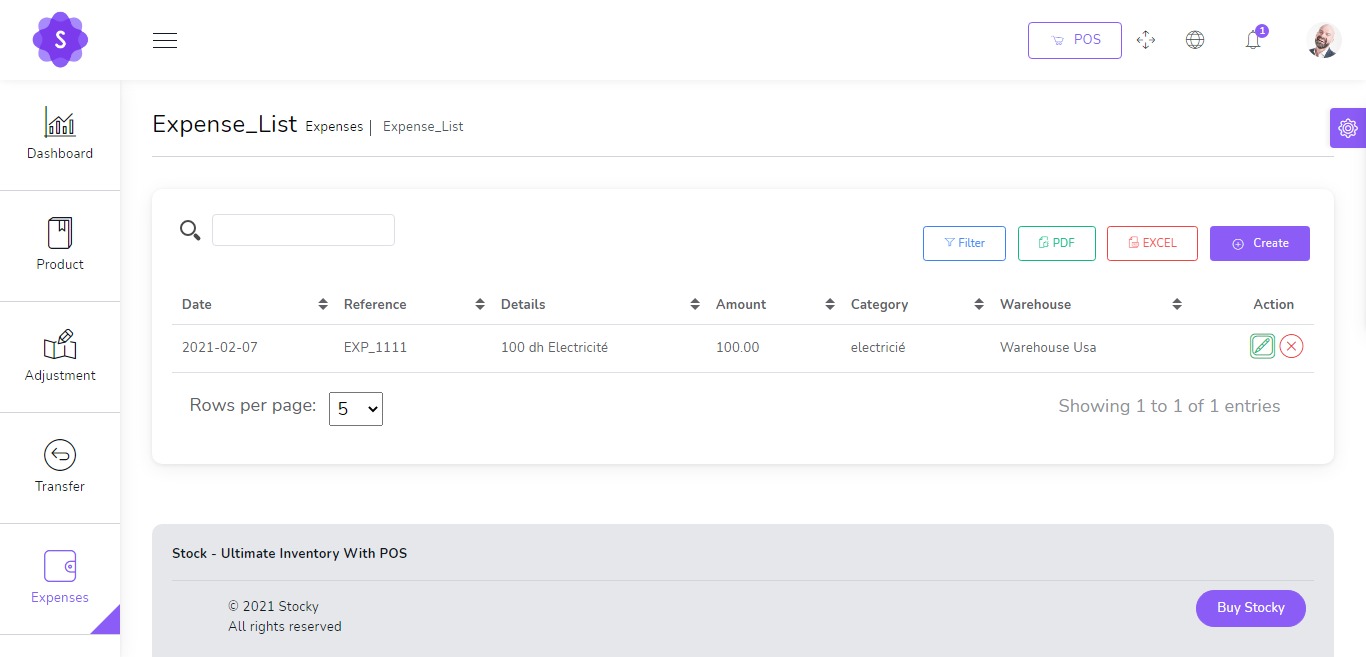
Expenses
to create a new Expense it's very easy
- Date
(required) - Warehouse
(required) - Account
(Optionnal) - Expense category
(required) - Amount
(required) - Details
(optional)
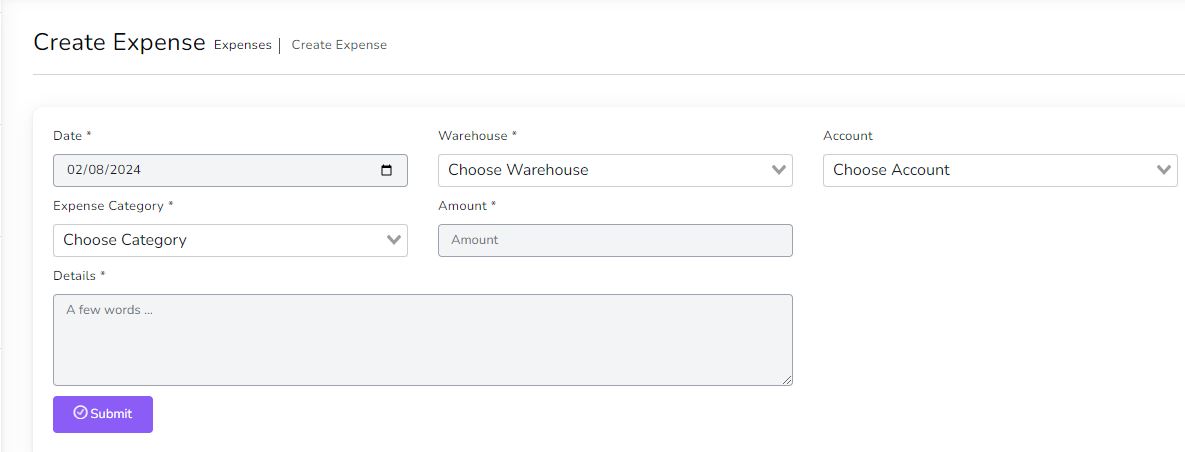
You can manage Expense list
- Edit Expense
- Delete Expense
- Generate Expense list in PDF
- Generate Expense list in Excel
- Filter Expense by Date , Reference , warehouse , Expense category, Account
Deposits
to create a new Deposit it's very easy
- Date
(required) - Account
(Optionnal) - Deposit category
(required) - Amount
(required) - Details
(optional)

You can manage Deposit list
- Edit Deposit
- Delete Deposit
- Generate Deposit list in PDF
- Generate Deposit list in Excel
- Filter Deposit by Date , Reference , Deposit category, Account

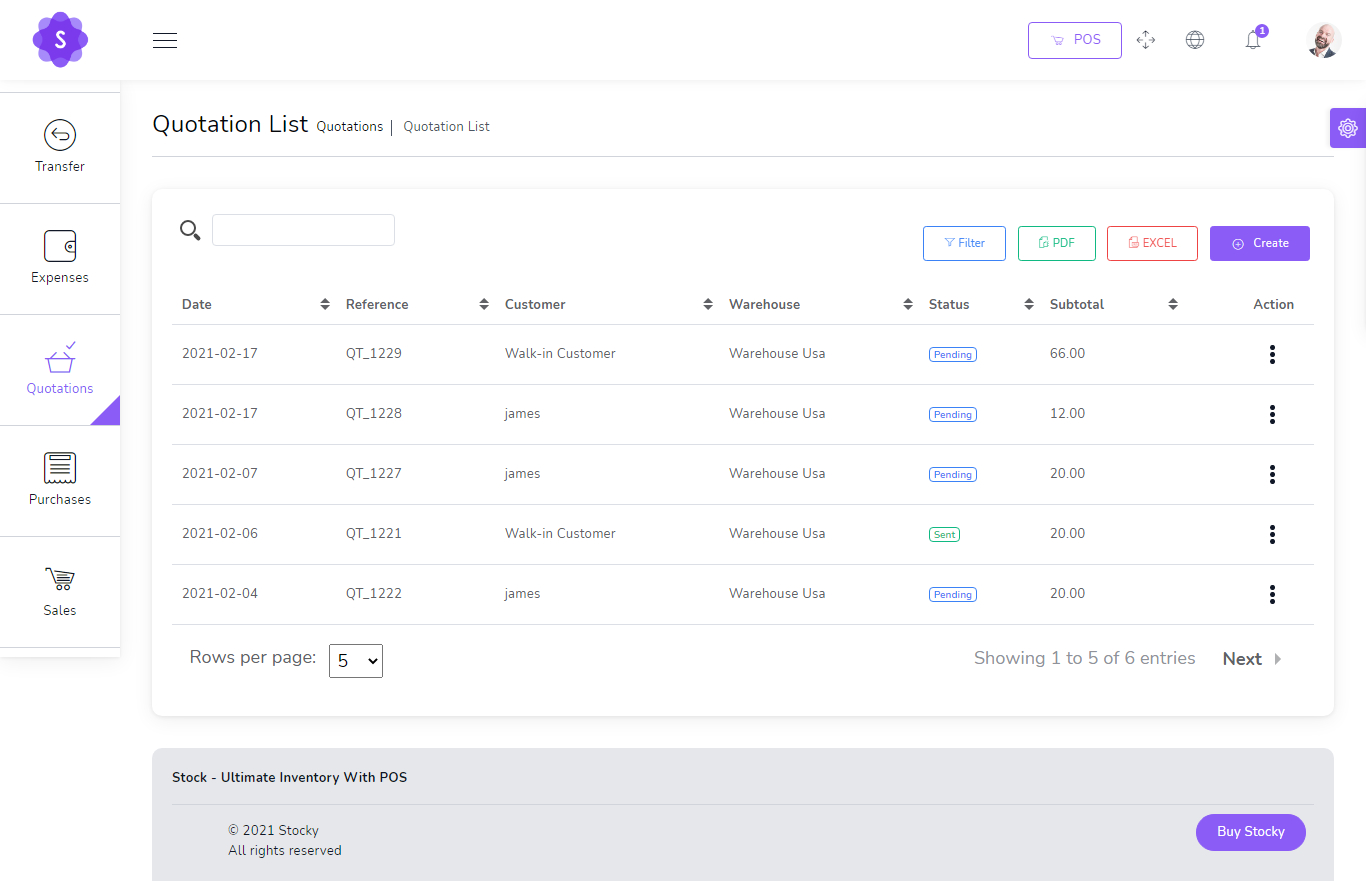
Quotations
to create a new quotation it's very easy
- Customer
(required) - Warehouse
(required) - Status
(required)

You can manage quotation list
- Edit quotation
- View Details quotation
- Delete quotation
- Change to Sale
- Send quotation on email
- Generate quotation list in PDF
- Generate quotation list in Excel
- Filter quotation by Date, Reference , Customer , Warehouse , Status
Sales
to create a new sale it's very easy
- Customer
(required) - Warehouse
(required) - Status
(required)
You can manage sale list
- Edit sale
- View Details sale
- Delete sale
- Change to Sale
- Send sale on email
- Generate sale list in PDF
- Generate sale list in Excel
- Filter sale by Date, Reference , Customer , Warehouse , Status , Payment status
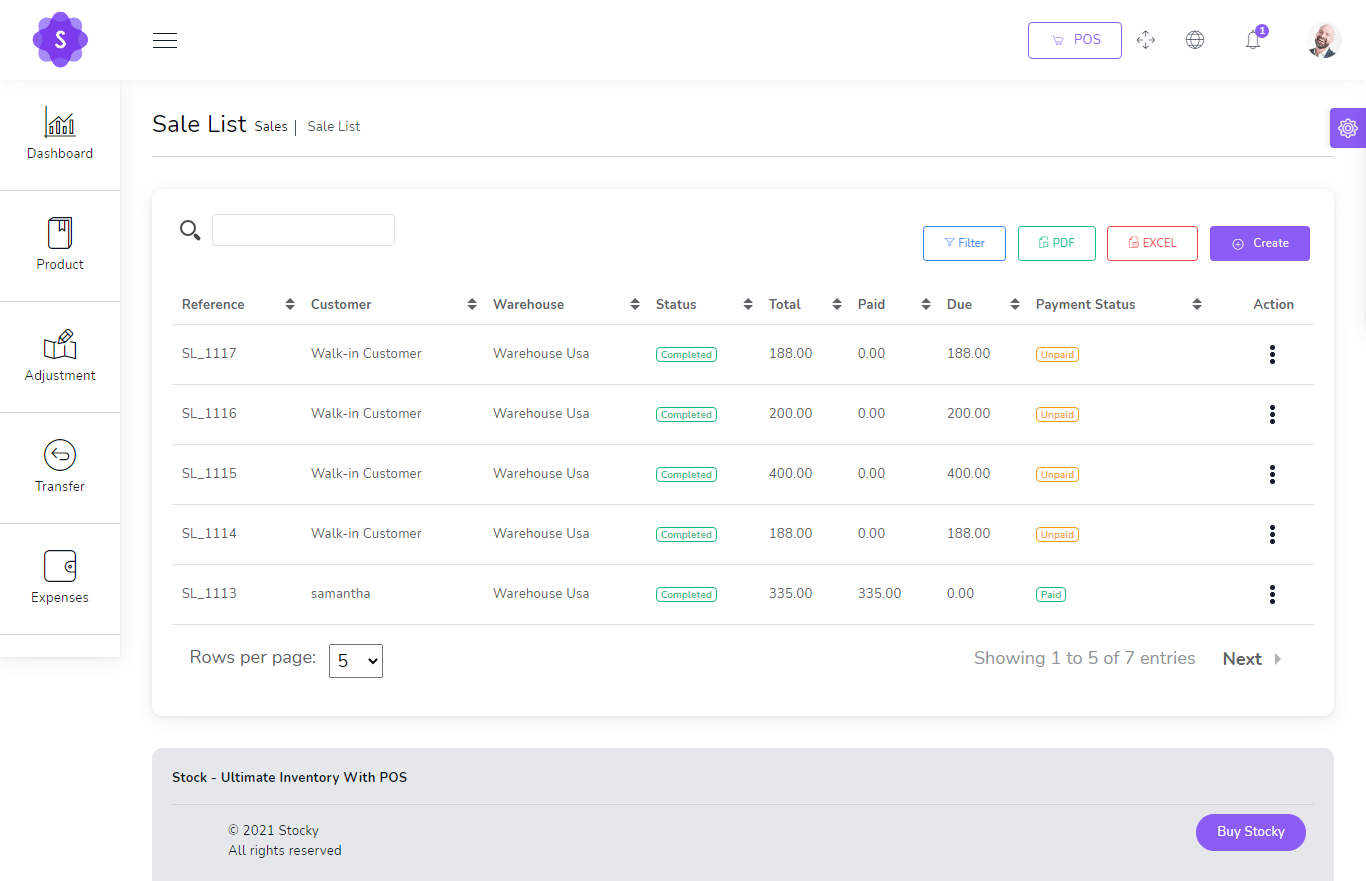
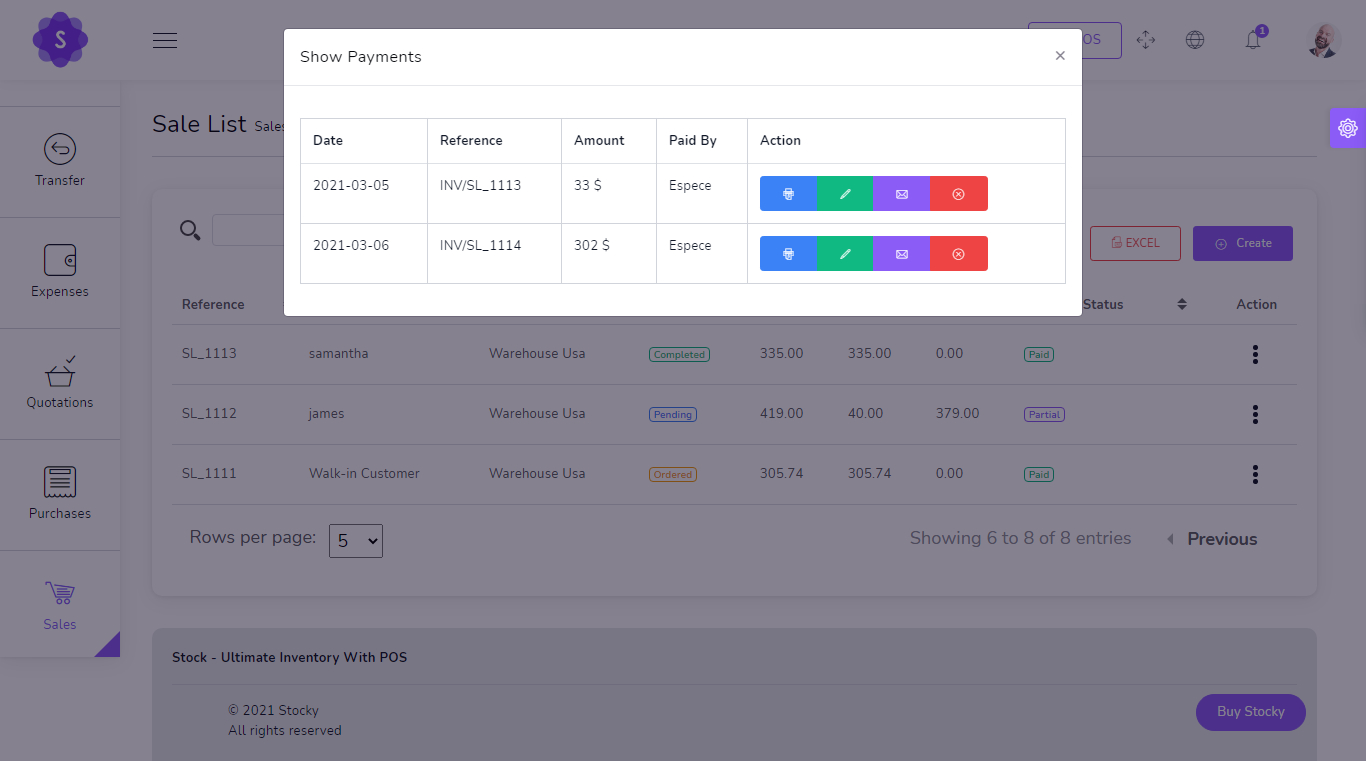
Show Payment
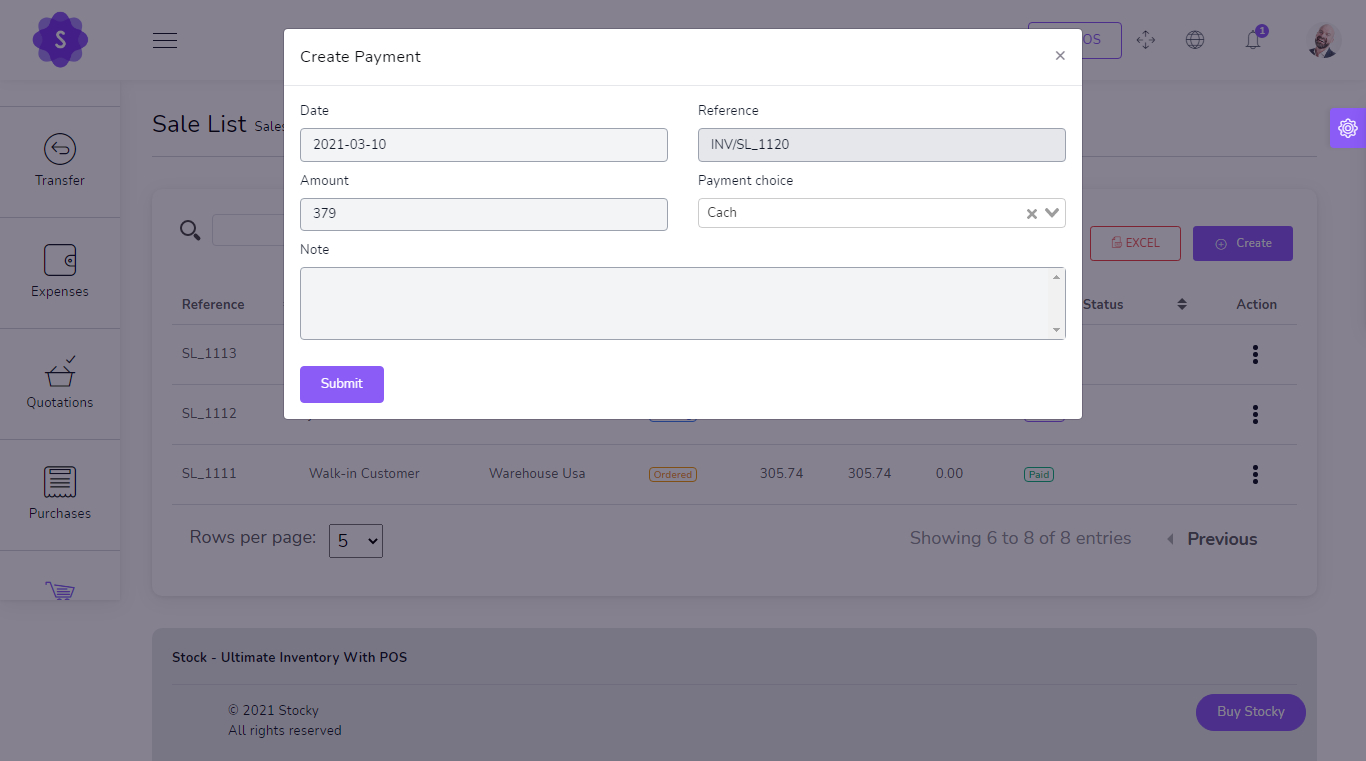
Add Payment
Sales POS
Easy POS
- Barcode Scanner
- you can search for product by name or code
- Filter Product by Brand , Category
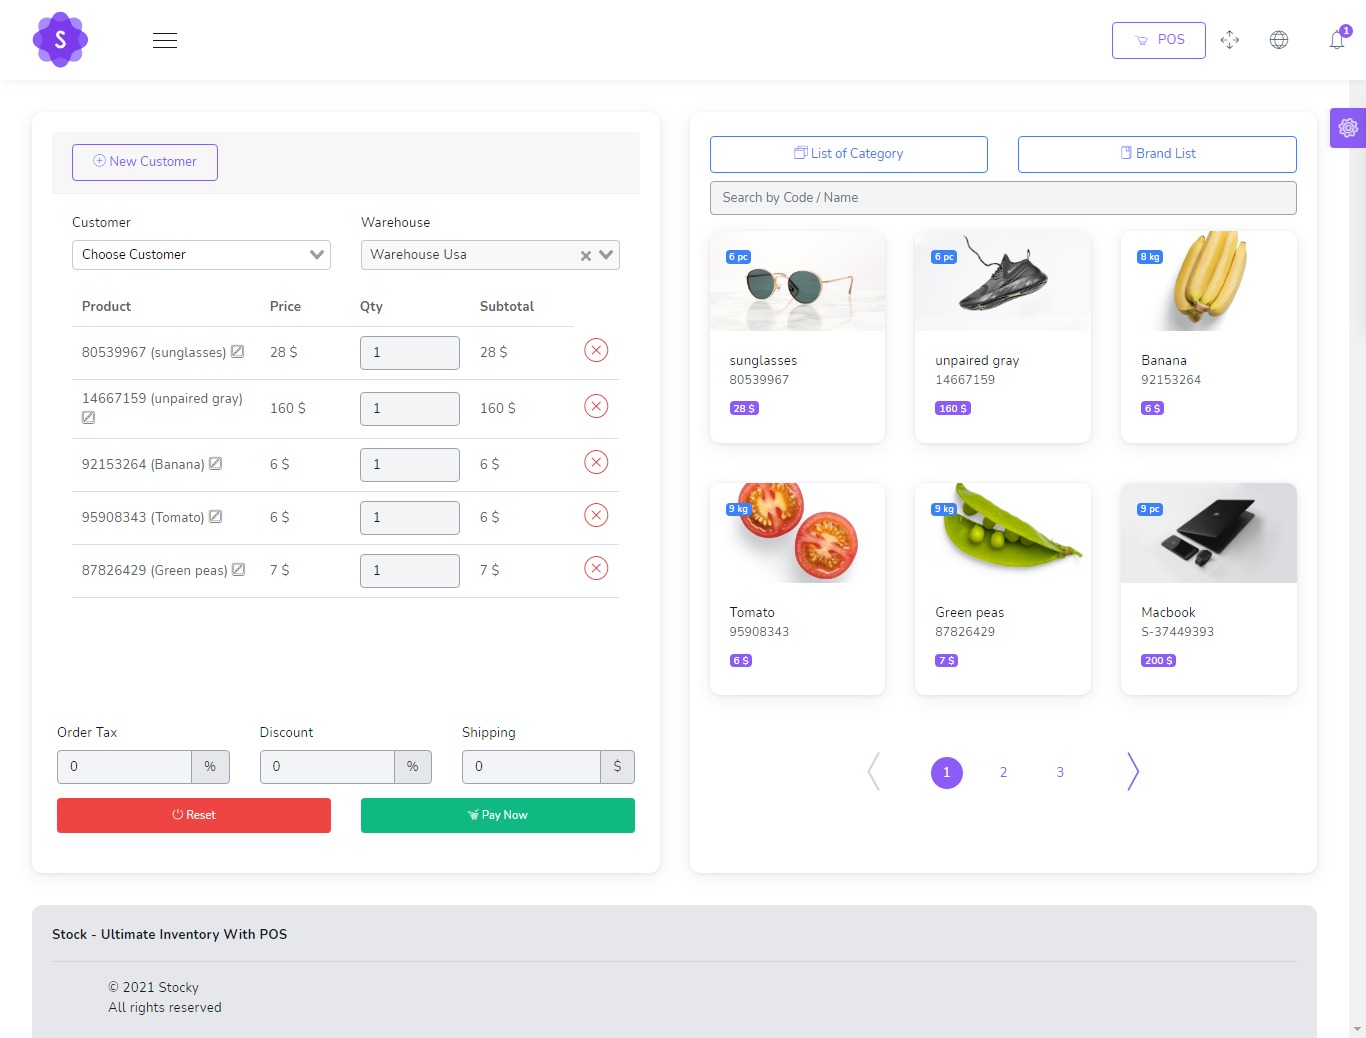
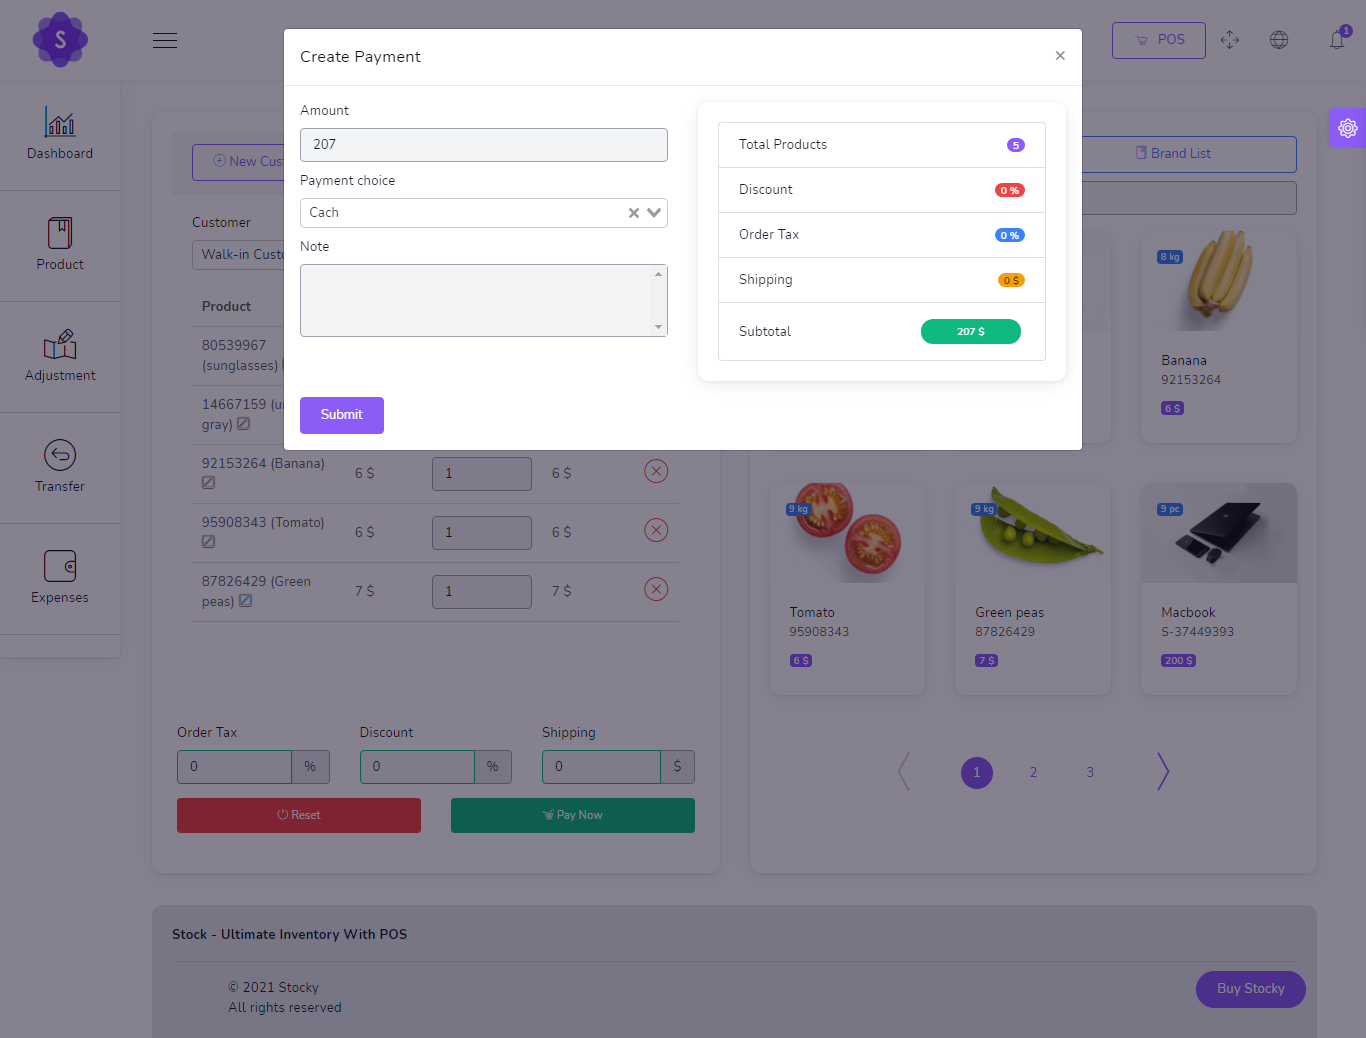
POS Payment
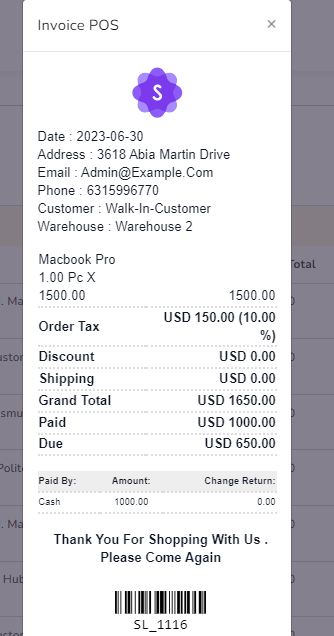
POS Invoice
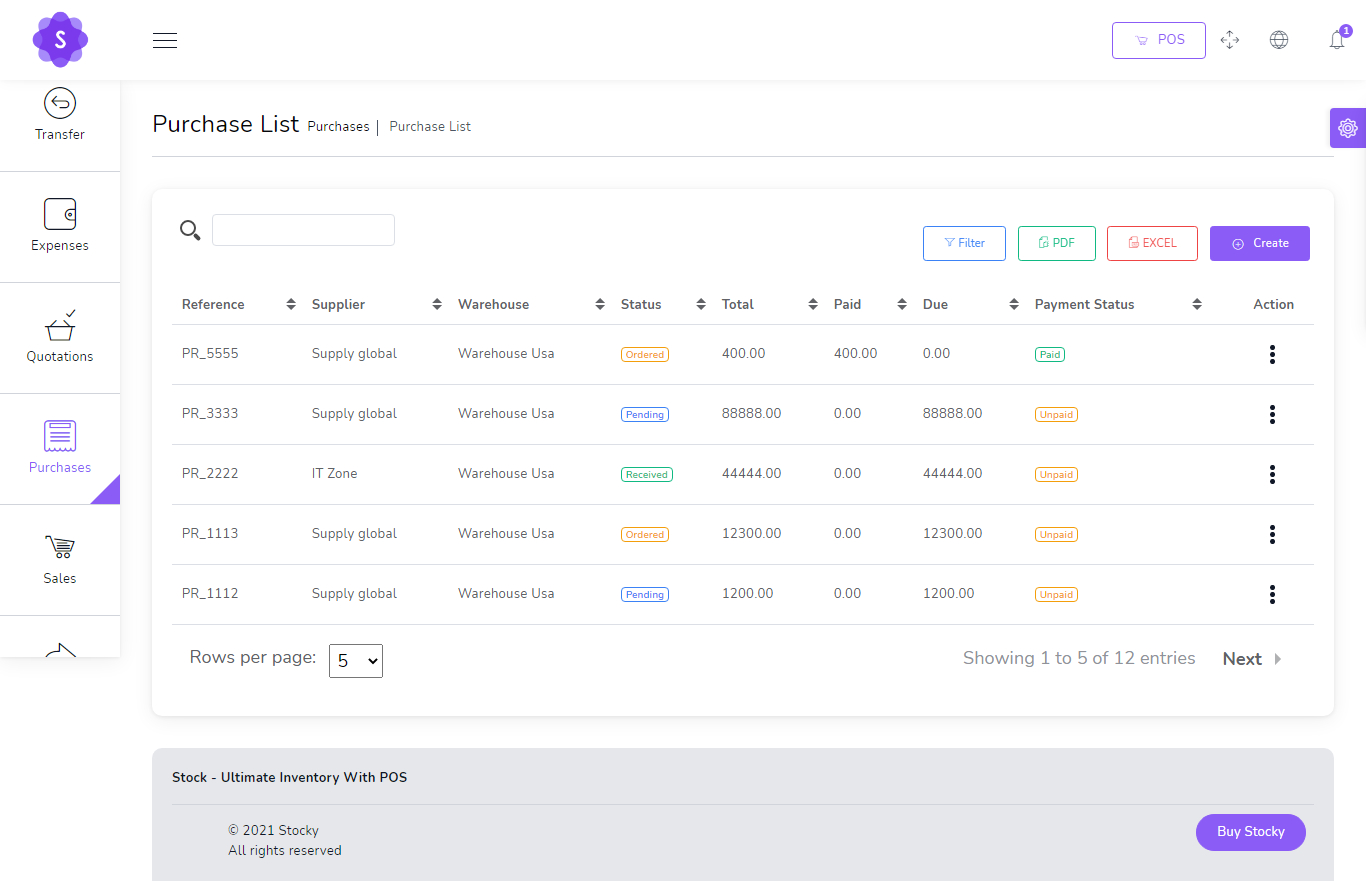
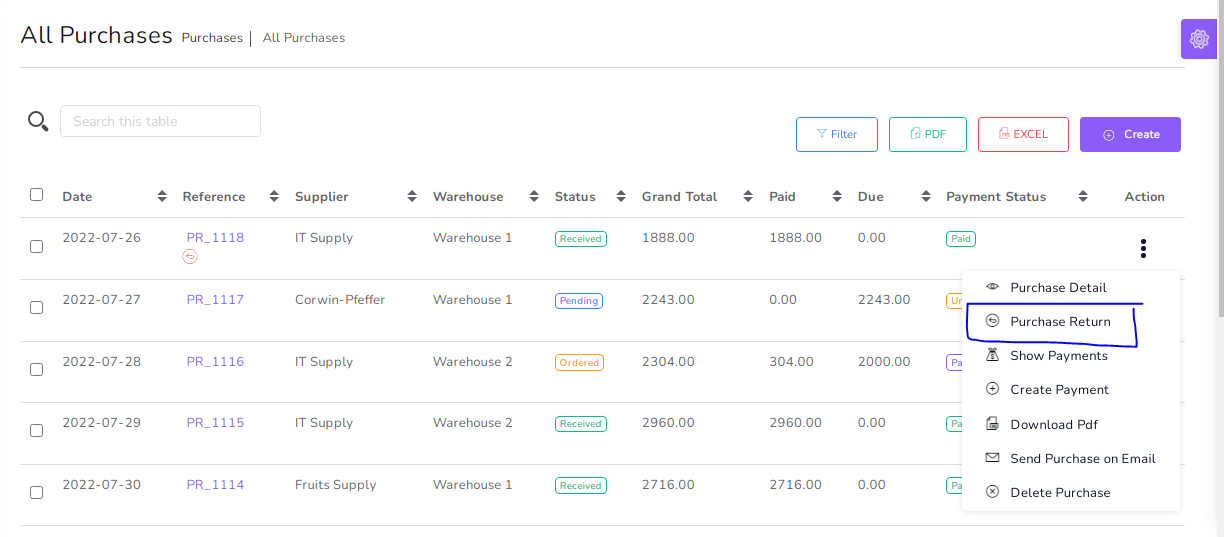
Purchases
to create a new purchase it's very easy
- Supplier
(required) - Warehouse
(required) - Status
(required)
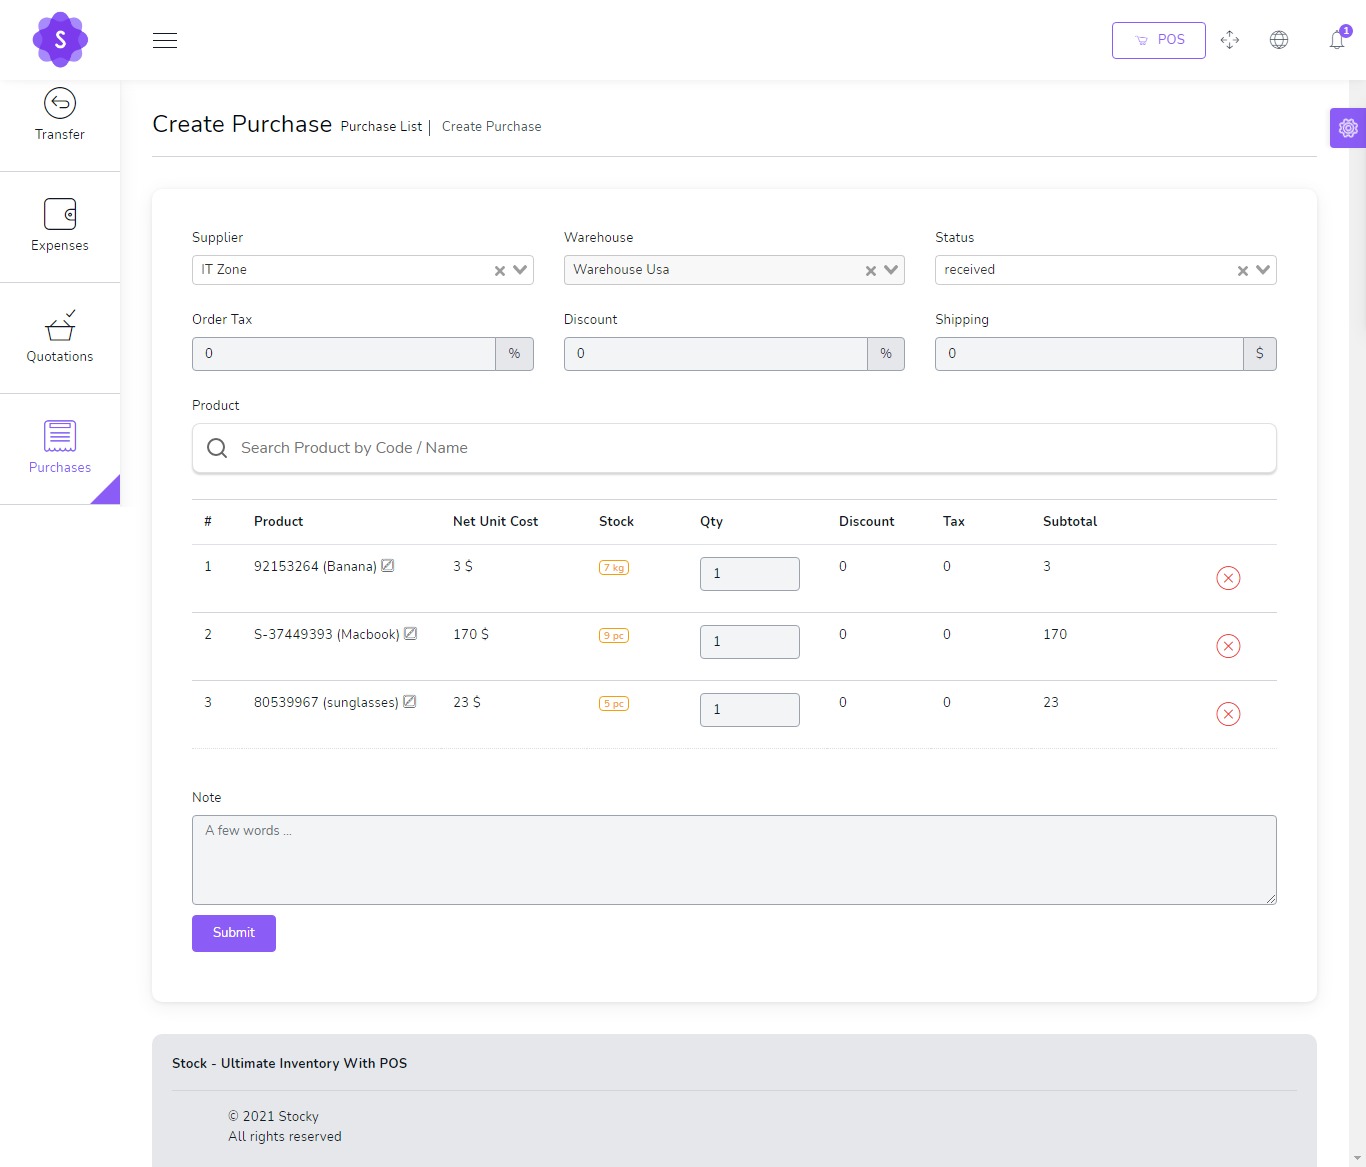
You can manage purchase list
- Edit purchase
- View Details purchase
- Delete purchase
- Send purchase on email
- Generate purchase list in PDF
- Generate purchase list in Excel
- Filter purchase by Date, Reference , Supplier , Warehouse , Status , Payment status
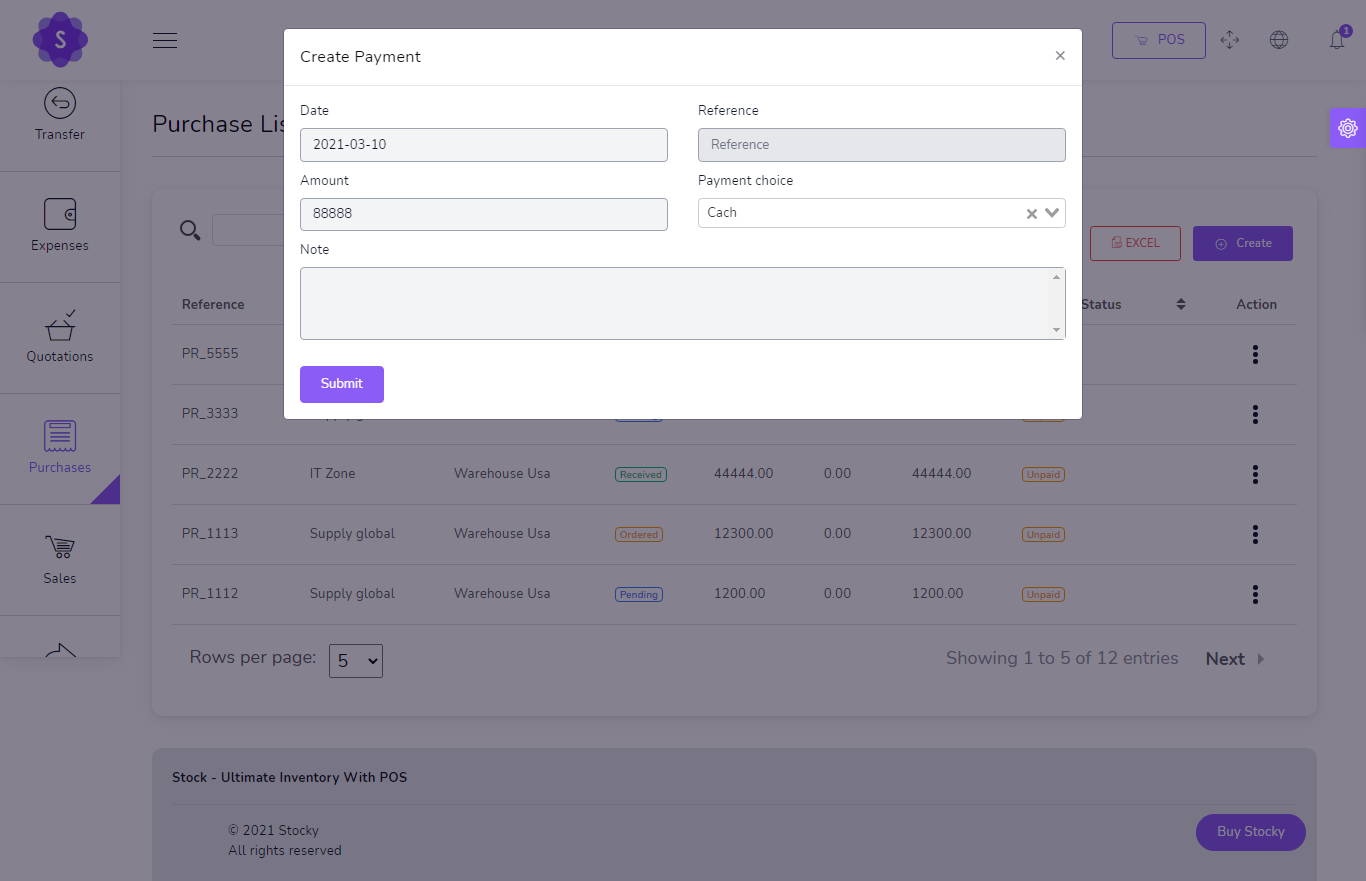
Show Payment

Add Payment
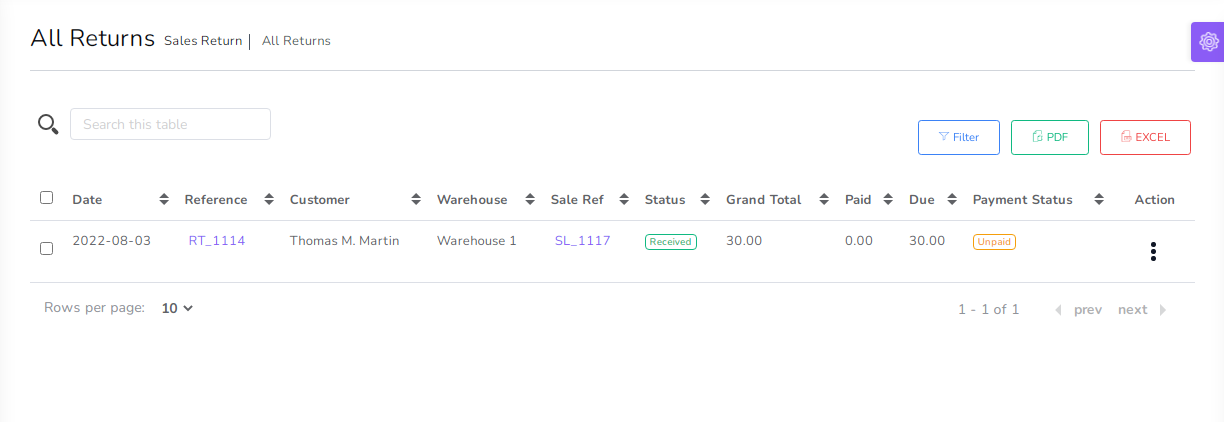
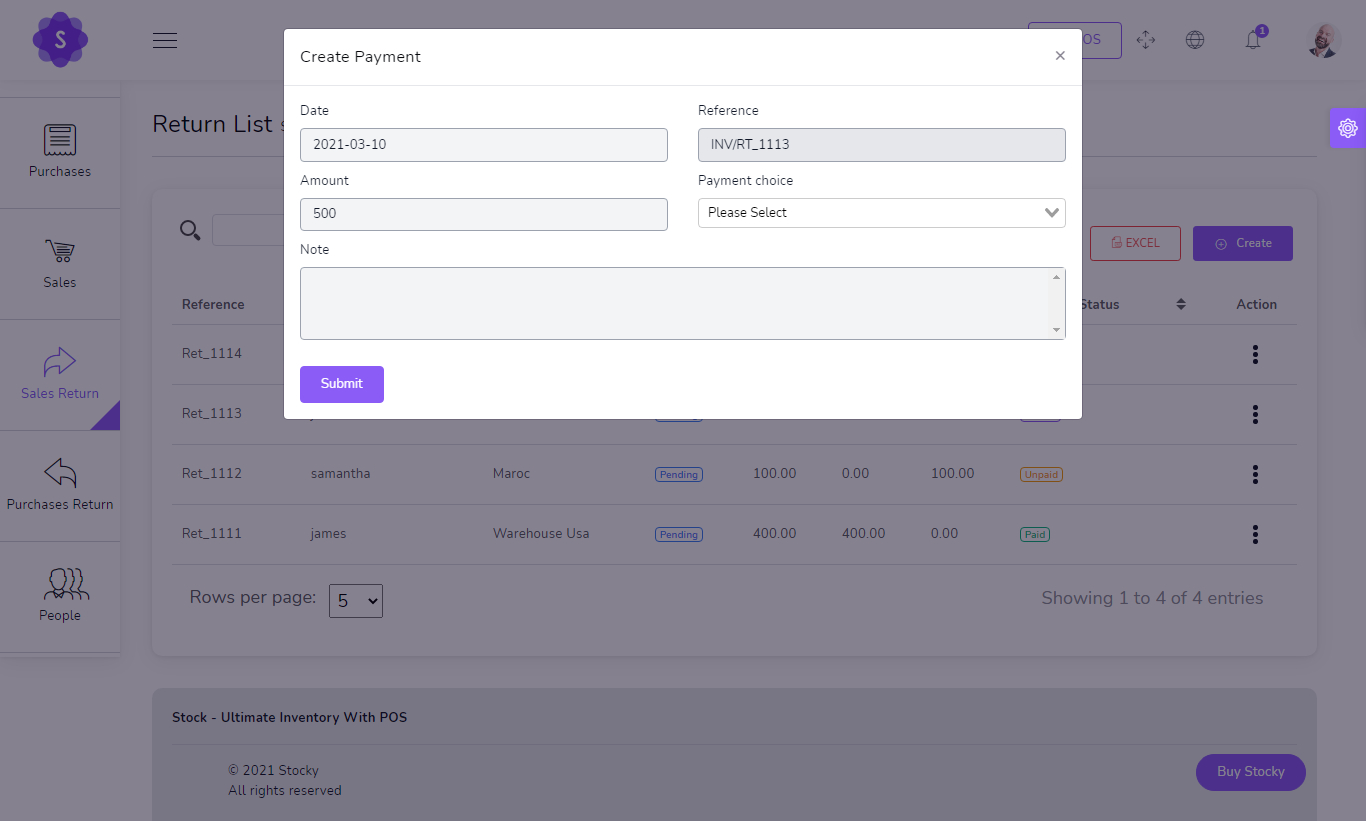
Sale Returns
to create a new Sale Return it's very easy
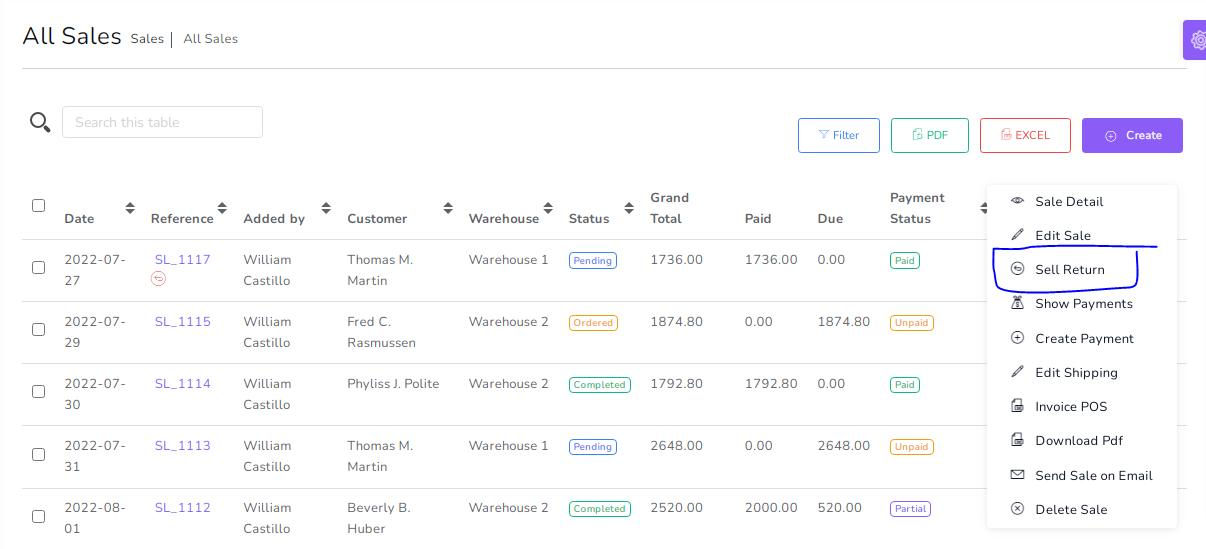
You can manage Sale Return list
- Edit Sale Return
- View Details Sale Return
- Delete Sale Return
- Send Sale Return on email
- Generate Sale Return list in PDF
- Generate Sale Return list in Excel
- Filter Sale Return by Date, Reference , Customer , Warehouse , Status , Payment status
Show Payment
Add Payment
Purchase Returns
to create a new Purchase Return it's very easy
You can manage Purchase Return list
- Edit Purchase Return
- View Details Purchase Return
- Delete Purchase Return
- Send Purchase Return on email
- Generate Purchase Return list in PDF
- Generate Purchase Return list in Excel
- Filter Purchase Return by Date, Reference , Supplier , Warehouse , Status , Payment status
Show Payment
Add Payment
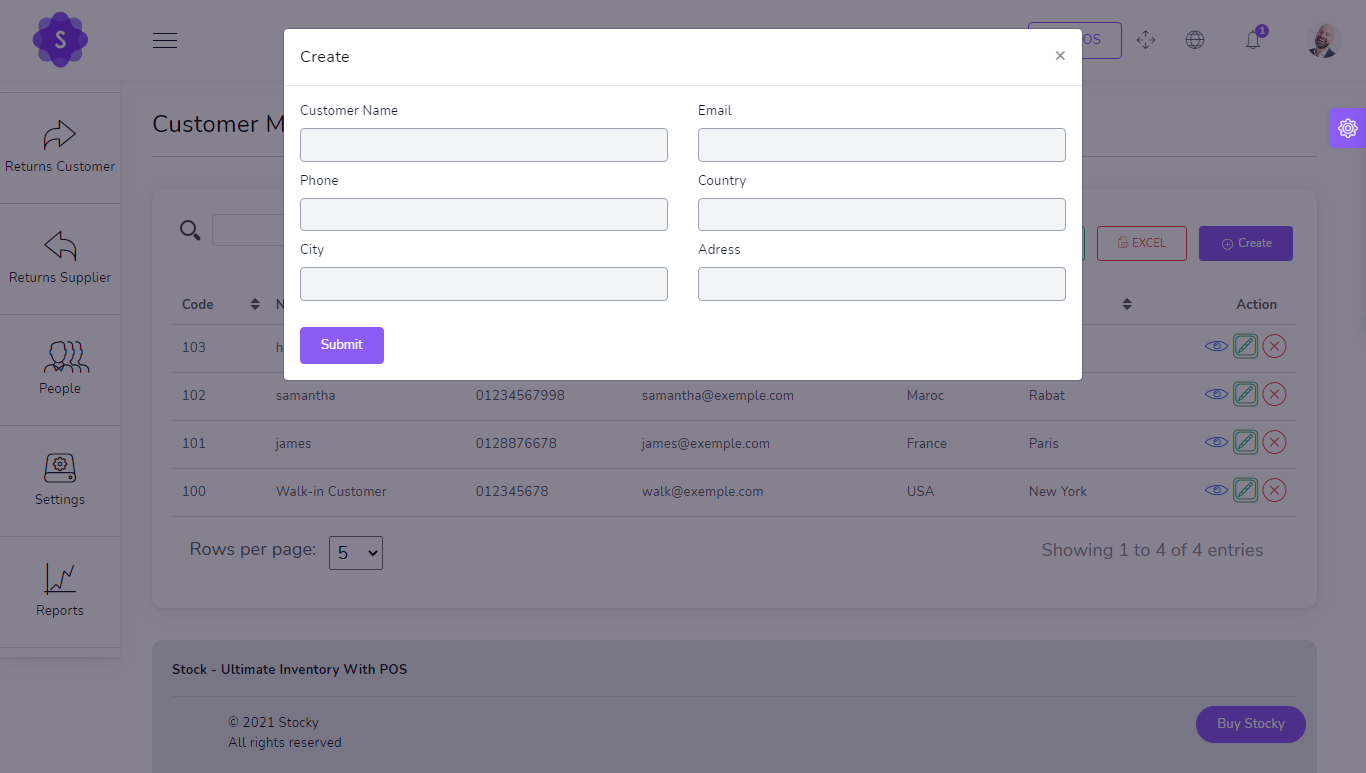
Customers
to create a new Customer it's very easy
- Name
(required) - Email
(required)
You can manage customer list
- Pay all sell due in single payment
- Pay all sell Return due in single payment
- Edit customer
- Delete customer
- Generate customer list in PDF
- Generate customer list in Excel
- Search customer
- Filter customer by Name ,Code , phone , Email
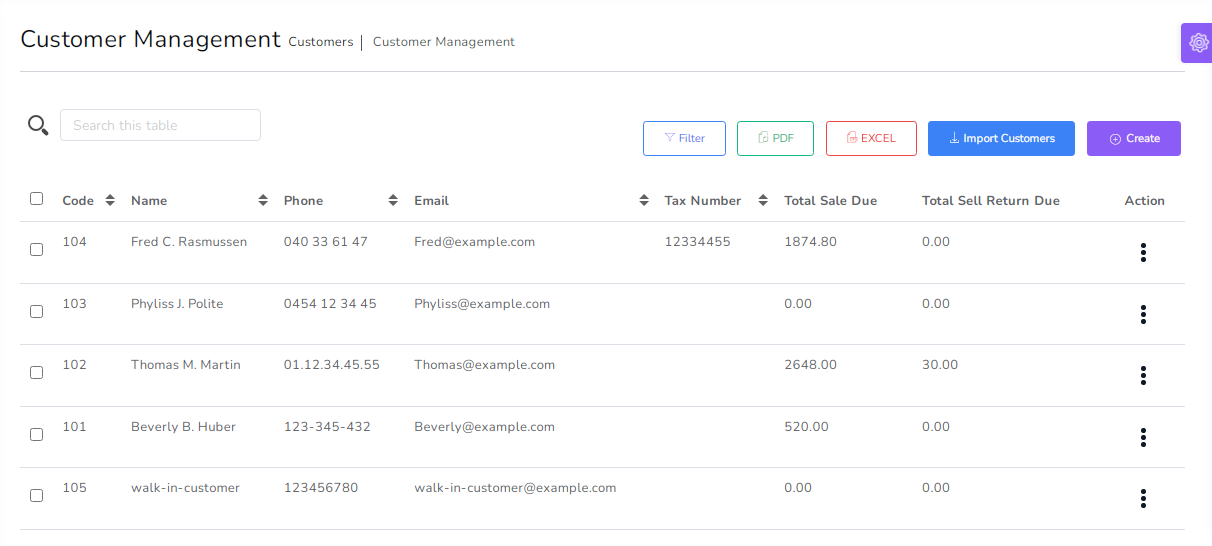
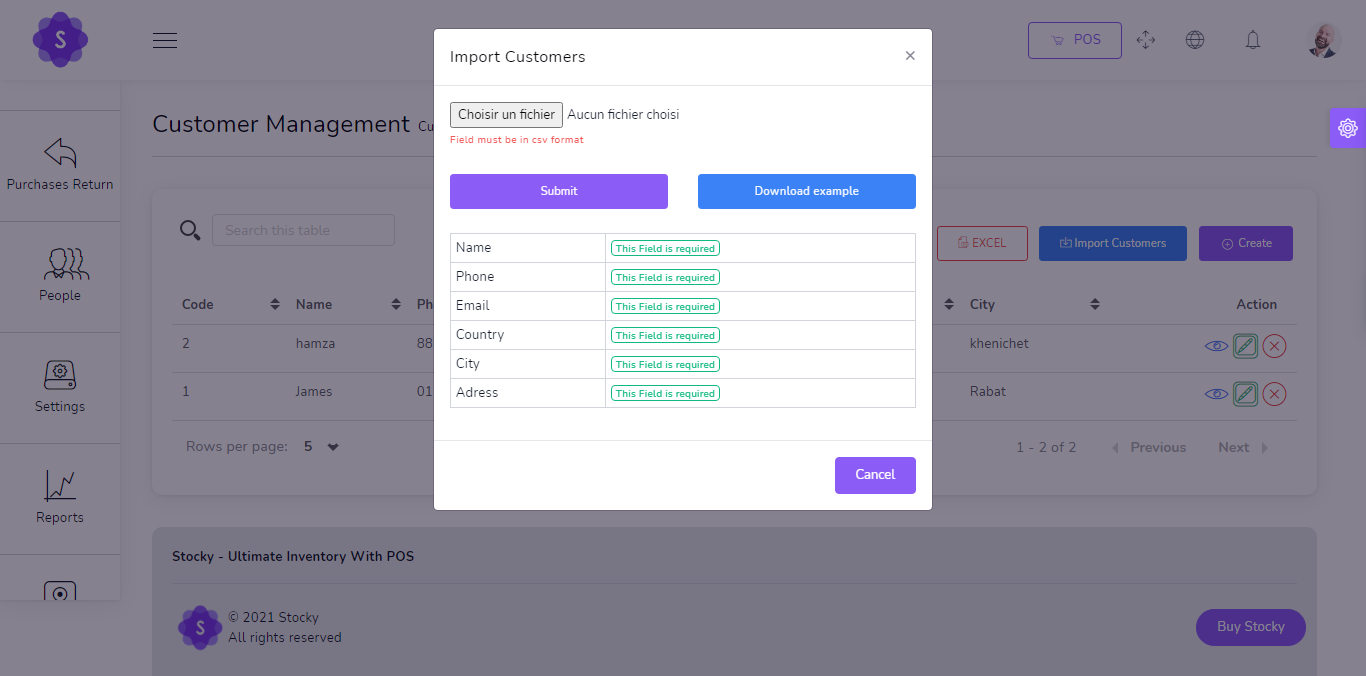
Import Customers by csv
Suppliers
to create a new Supplier it's very easy
- Name
(required) - Email
(required)
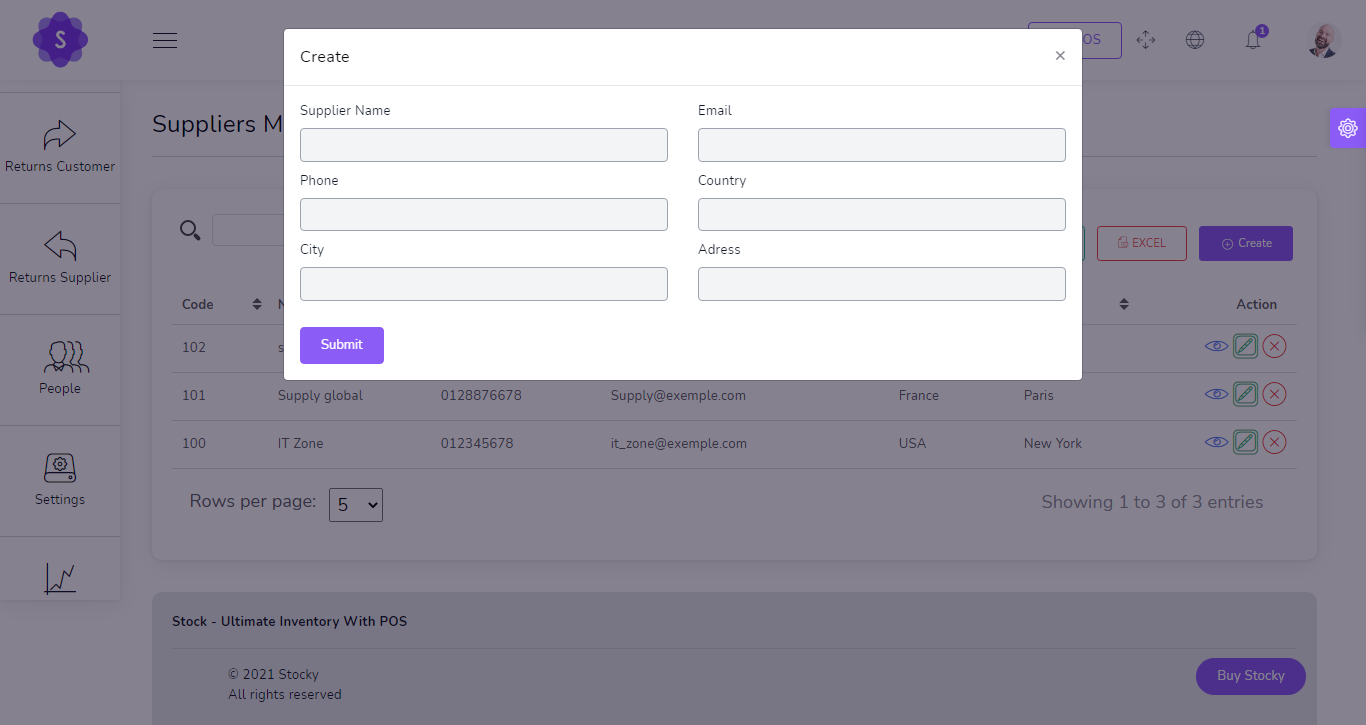
You can manage Supplier list
- Pay all Purchase due in single payment
- Pay all Purchase Return due in single payment
- Edit Supplier
- Delete Supplier
- Generate Supplier list in PDF
- Generate Supplier list in Excel
- Search Supplier
- Filter customer by Name ,Code , phone , Email
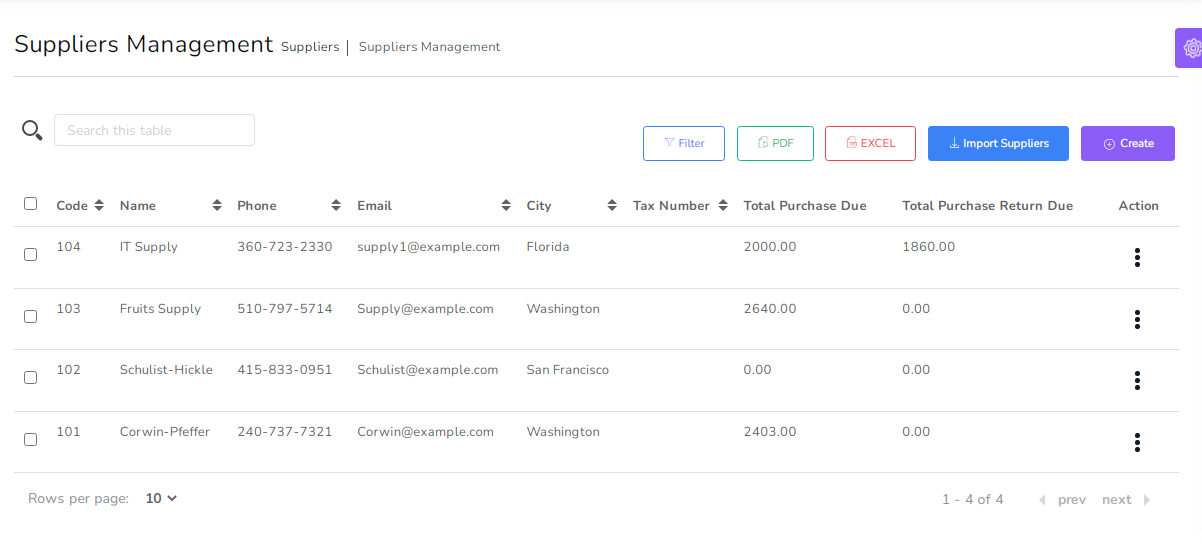
Import Suppliers by csv

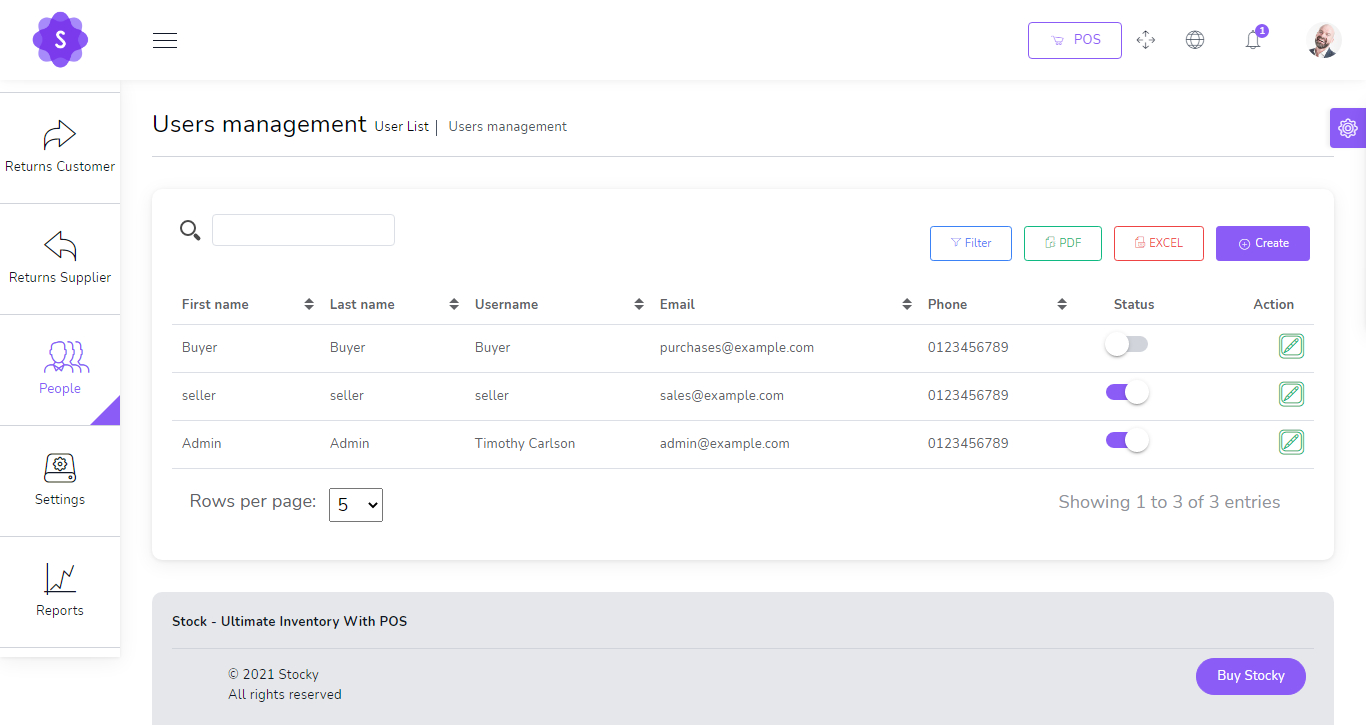
Users
to create a new User it's very easy
- First Name
(required) - Last Name
(required) - Username
(required) - Phone
(required) - Email
(required) - Password
(required) - Role
(required) - Avatar
(Optional)
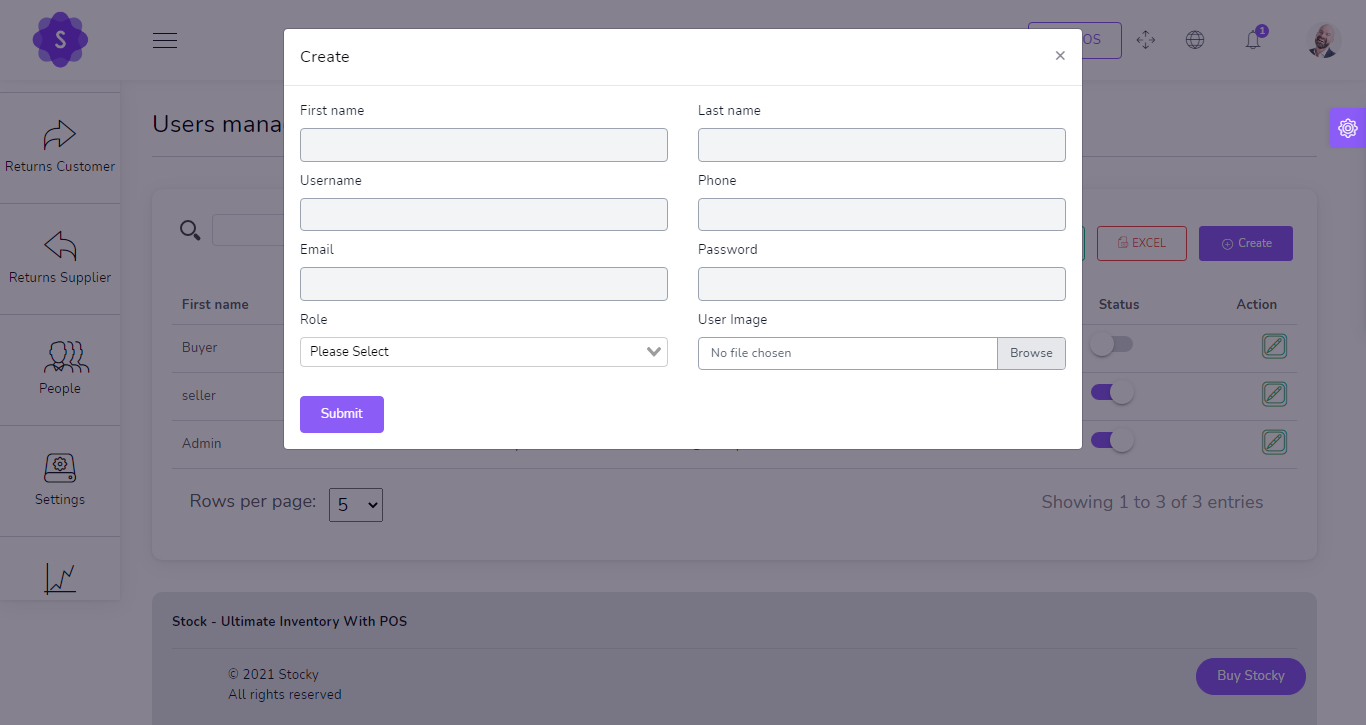
You can manage User list
- Change Status User
- Edit User
- Generate User list in PDF
- Generate User list in Excel
- Search User
- Filter User by username , phone , Email , Status
📁 Project List
This section displays an overview of all the projects in the system, including their current status.

- ✅ Completed: Number of finished projects.
- ⏸️ Not Started: Projects created but not yet started.
- 🔄 In Progress: Projects that are currently active.
- ❌ Cancelled: Projects that have been cancelled.
Additional Features:
- 🔍 Search projects by title, customer, or company.
- 📤 Export project list to PDF or Excel.
- ➕ Click Create to add a new project.
📝 Create Project
This form allows users to register a new project with complete details.

- Title*: Enter the name of the project.
- Start Date*: Set when the project begins.
- Finish Date*: Set when the project should be completed.
- Customer*: Choose the client or project owner.
- Company*: Select the company responsible for the project.
- Assigned Employees: Assign a team to work on the project.
- Status*: Set the current status of the project.
- Details: Add any relevant notes or information.
🗂️ Task List
This section provides an overview of all tasks associated with various projects.

- ✅ Completed: Tasks that have been marked as done.
- ⏸️ Not Started: Tasks that are created but not yet started.
- 🔄 In Progress: Tasks currently being worked on.
- ❌ Cancelled: Tasks that were canceled or no longer required.
Other Features:
- 🔍 Search tasks by title, project, or company.
- 📤 Export task list to PDF or Excel format.
- ➕ Use the Create button to add a new task.
📝 Create Task
This form allows you to create a new task and assign it to a project and team.

- Title*: Task title or short description.
- Start Date*: The date work on the task should begin.
- Finish Date*: The date the task is expected to be completed.
- Project*: Select the related project this task belongs to.
- Company*: Company responsible for the task execution.
- Assigned Employees: Select which team members will perform this task.
- Status*: Choose the current state of the task (e.g. Not Started, In Progress).
- Details: Additional information or notes regarding the task.
🔁 Subscriptions List
This page allows you to view and manage all recurring subscriptions.

The table includes the following columns:
- Client: The customer subscribed to the product.
- Product: The item or service being billed.
- Warehouse: The stock location assigned for the product.
- Billing Cycle: Frequency of billing (e.g., monthly, weekly).
- Total Cycle: Number of cycles set (e.g., 12 monthly).
- Remaining Cycles: Number of invoices left to generate.
- Next Billing Date: When the next invoice is scheduled.
- Status: Active/Inactive toggle.
- Action: View, Edit, or Delete subscription.
📝 Create Subscription
This form allows you to set up a recurring product or service subscription for a customer.

- Date*: The subscription start date.
- Client*: Select the customer subscribing to the product.
- Warehouse*: Assign a stock location.
- Product*: The subscribed product or service.
- Total Cycles*: Total number of times the customer will be billed (e.g., 12 Months).
- Billing Cycle*: Choose how often the invoice is created (Monthly, Weekly, etc.).
- Price Per Cycle*: The total cost for one cycle.
- Quantity*: Number of units included per billing.
- Price Per Unit*: Individual item price, used for detailed breakdowns.
- Next Billing Date*: Date when the first (or next) invoice will be created.
- Status*: Set as Active or Inactive.
⏱️ Subscription Automation
Once a subscription is created, the system uses scheduled commands (cron jobs) to handle billing automatically.
1️⃣ Generate Invoices Automatically
php artisan subscriptions:generate-invoicesThis command will automatically create a new sale (invoice) for each active subscription based on its billing cycle (daily, weekly, monthly, yearly).
2️⃣ Send SMS Reminders
php artisan subscriptions:send-sms-remindersThis command sends reminder messages to clients for upcoming or due payments via SMS.
📌 Make sure to schedule these commands in Your Cron Job in your Cpanel to run daily or as needed.
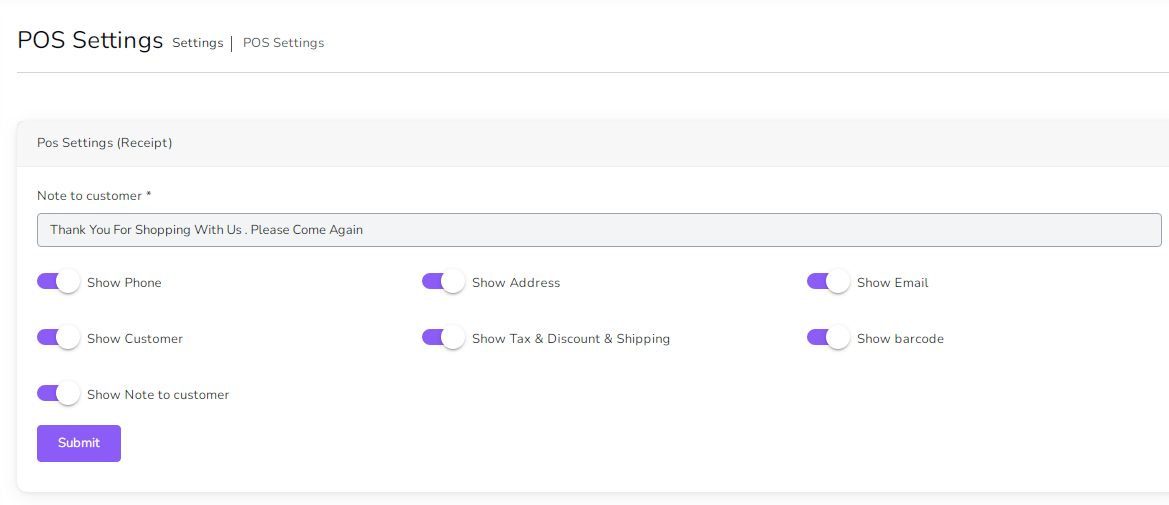
System Settings
Payment Settings
SMS Settings
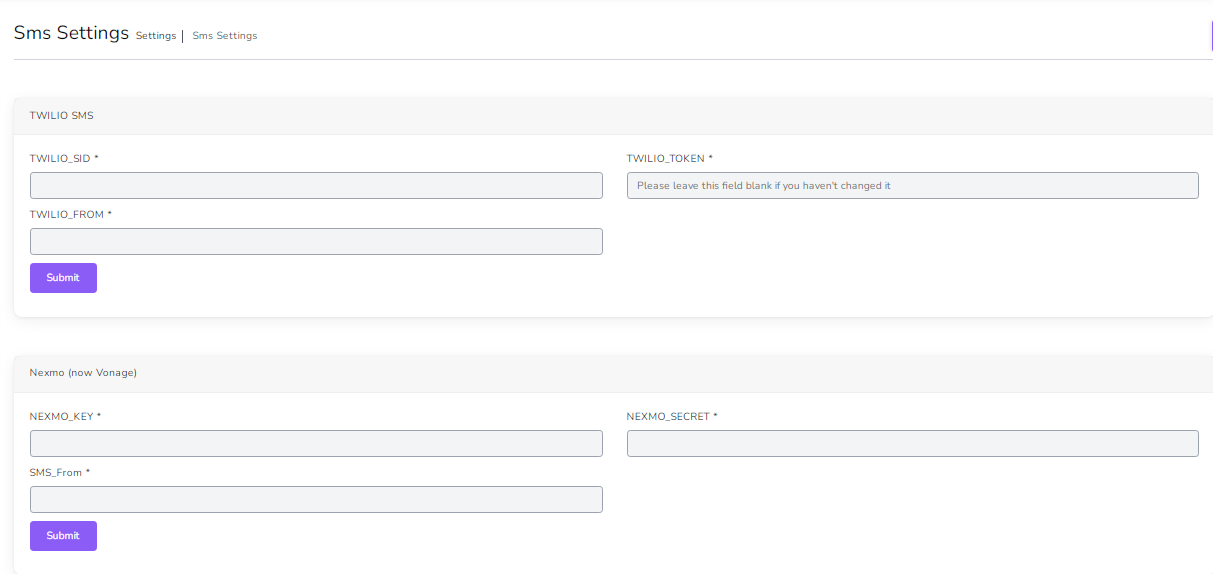
POS Settings
Mail Settings
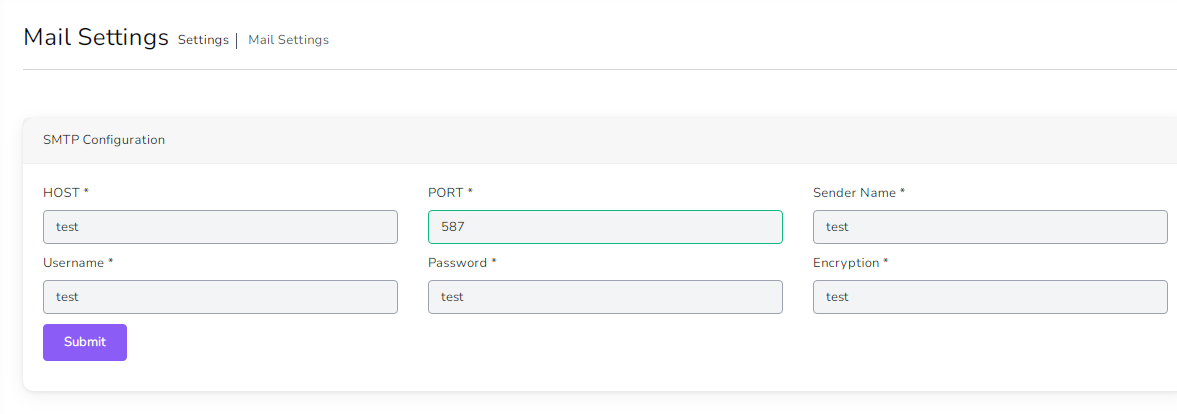
- Host : Host smtp mail server
- Port : 25 or 587 or 465 or 2525)
- Sender Name : From Name
- username : your username smtp mail server
- password : your password smtp mail server
- Encryption : tls or ssl
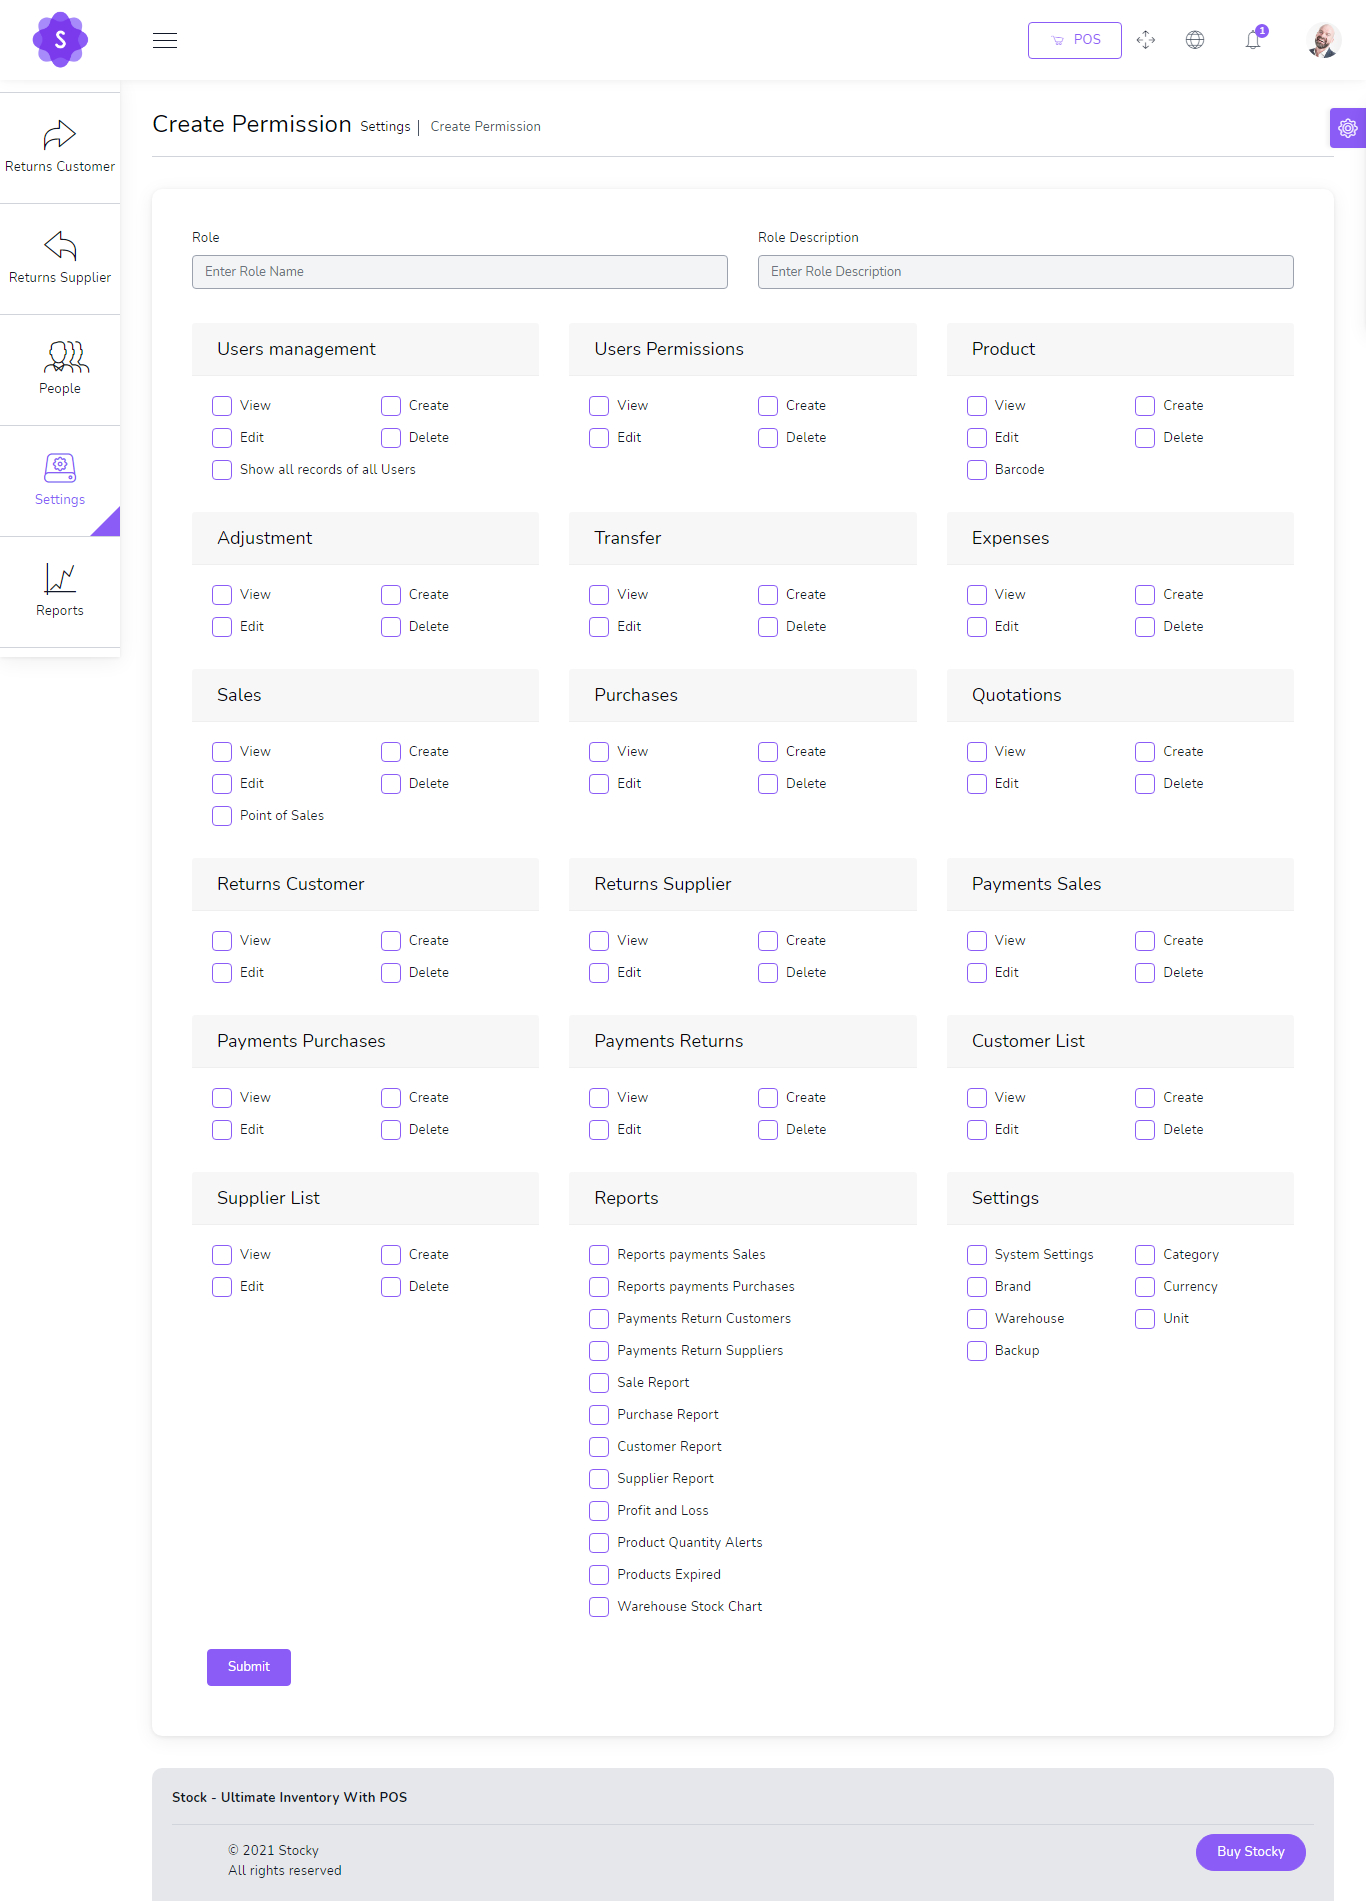
More Than 110 Permissions
if you want show all records of all users , Check Show all records of all users
Create new Warehouse
- Name
(required) - Phone
(optional) - Country
(optional) - City
(optional) - Email
(optional) - Zip code
(optional)
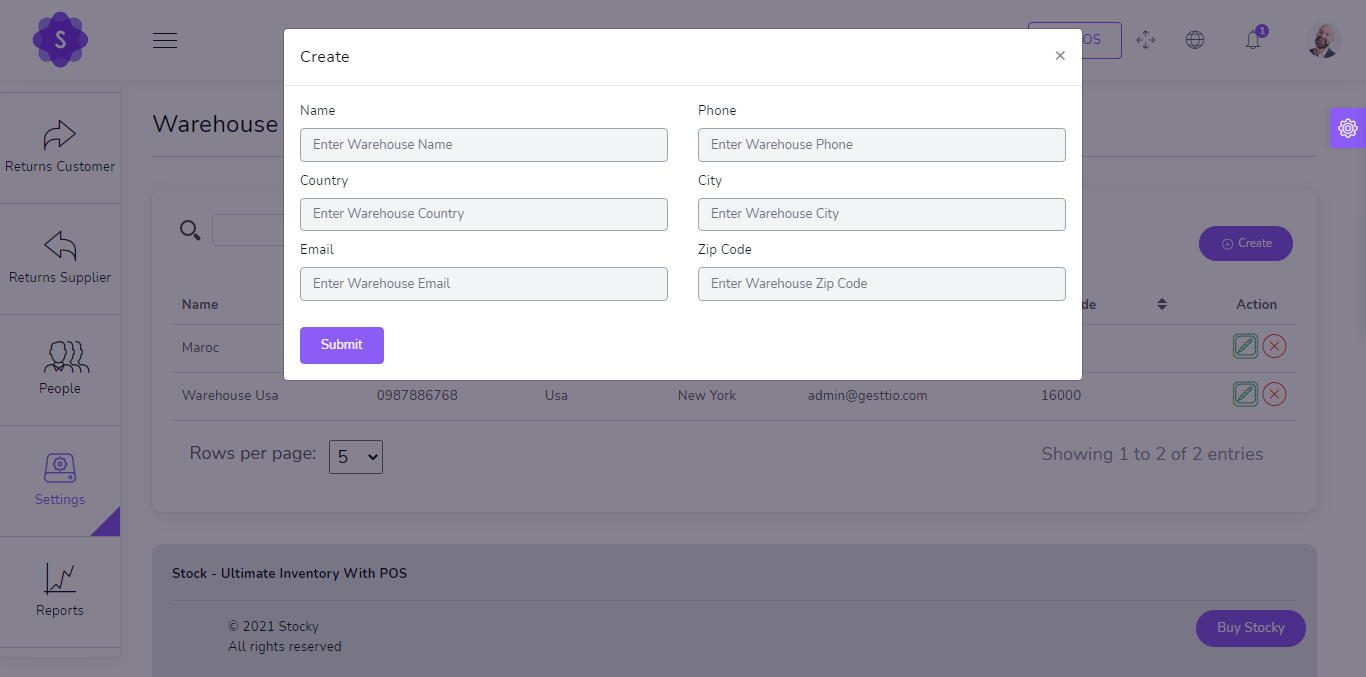
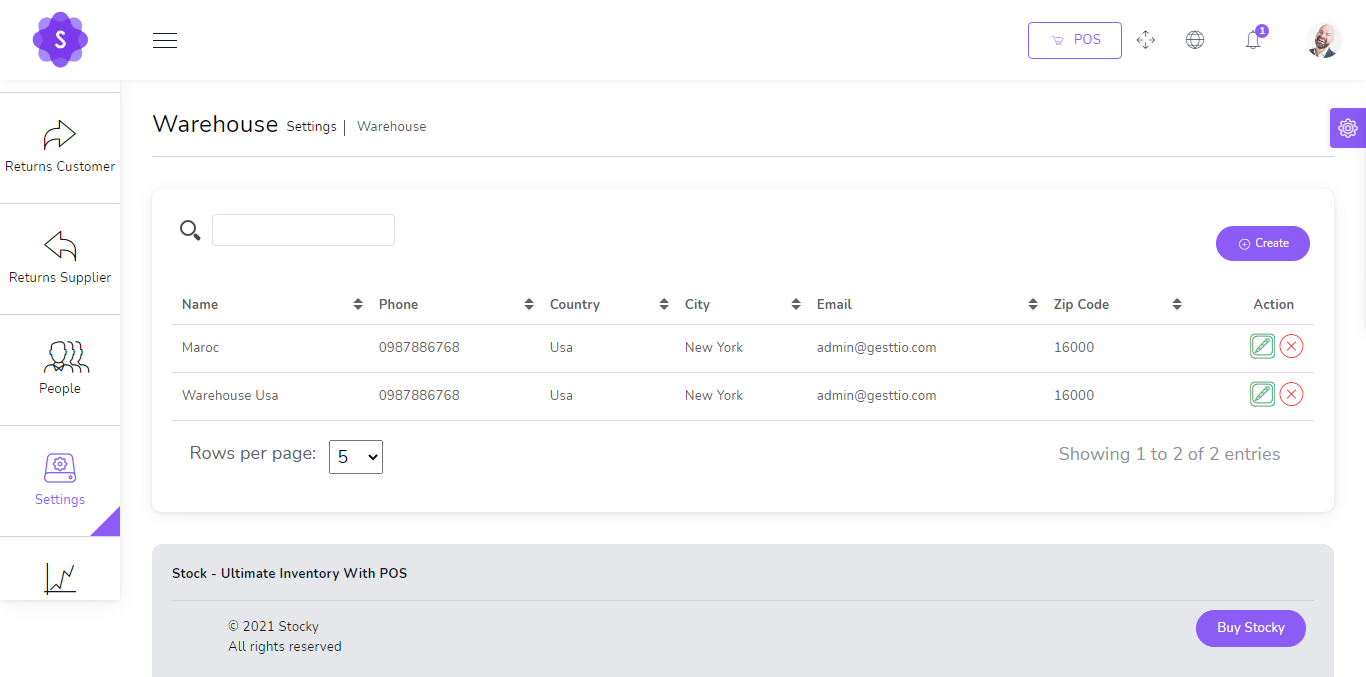
You can manage Warehouse list
- Edit Warehouse
- Delete Warehouse
- Search Warehouse
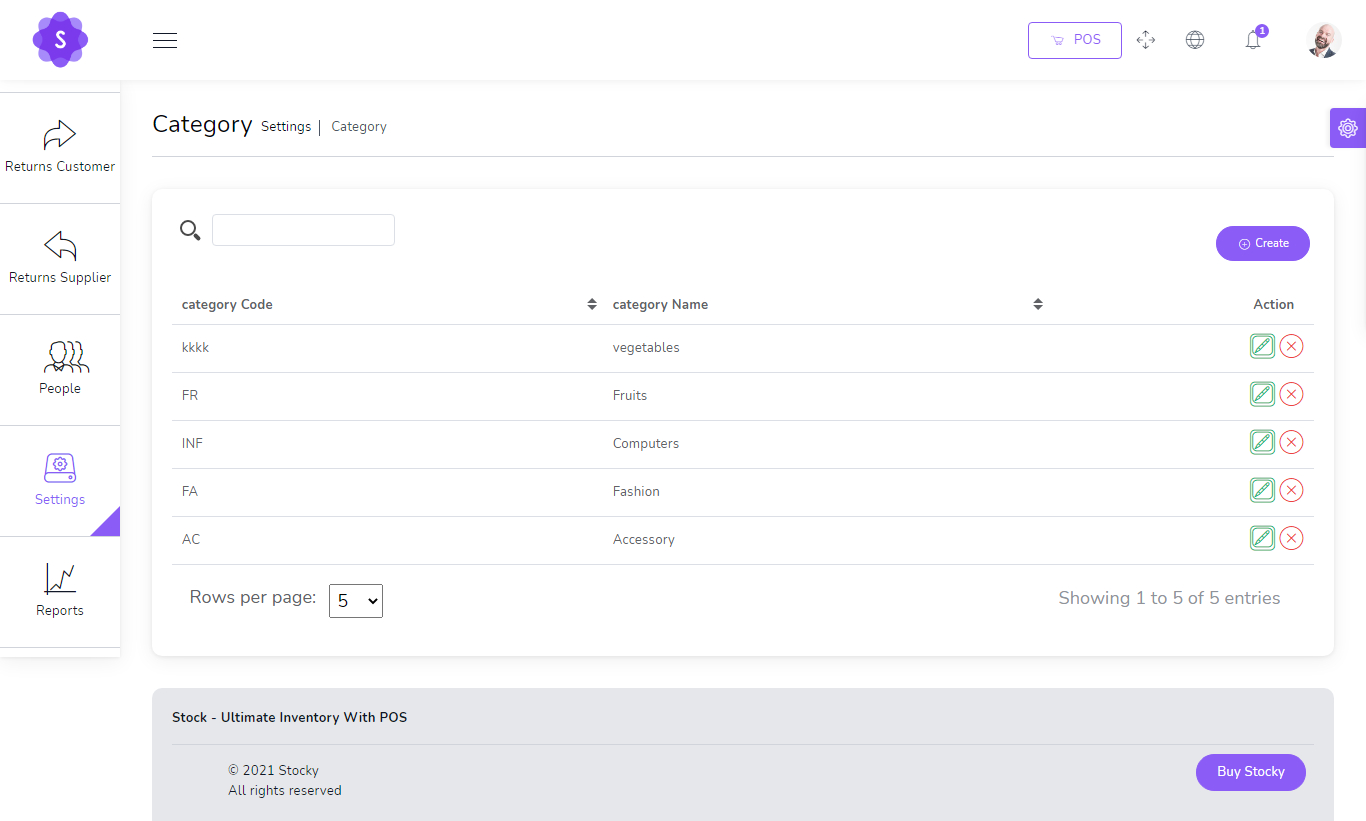
You can manage Category list
- Edit Category
- Delete Category
- Search Category
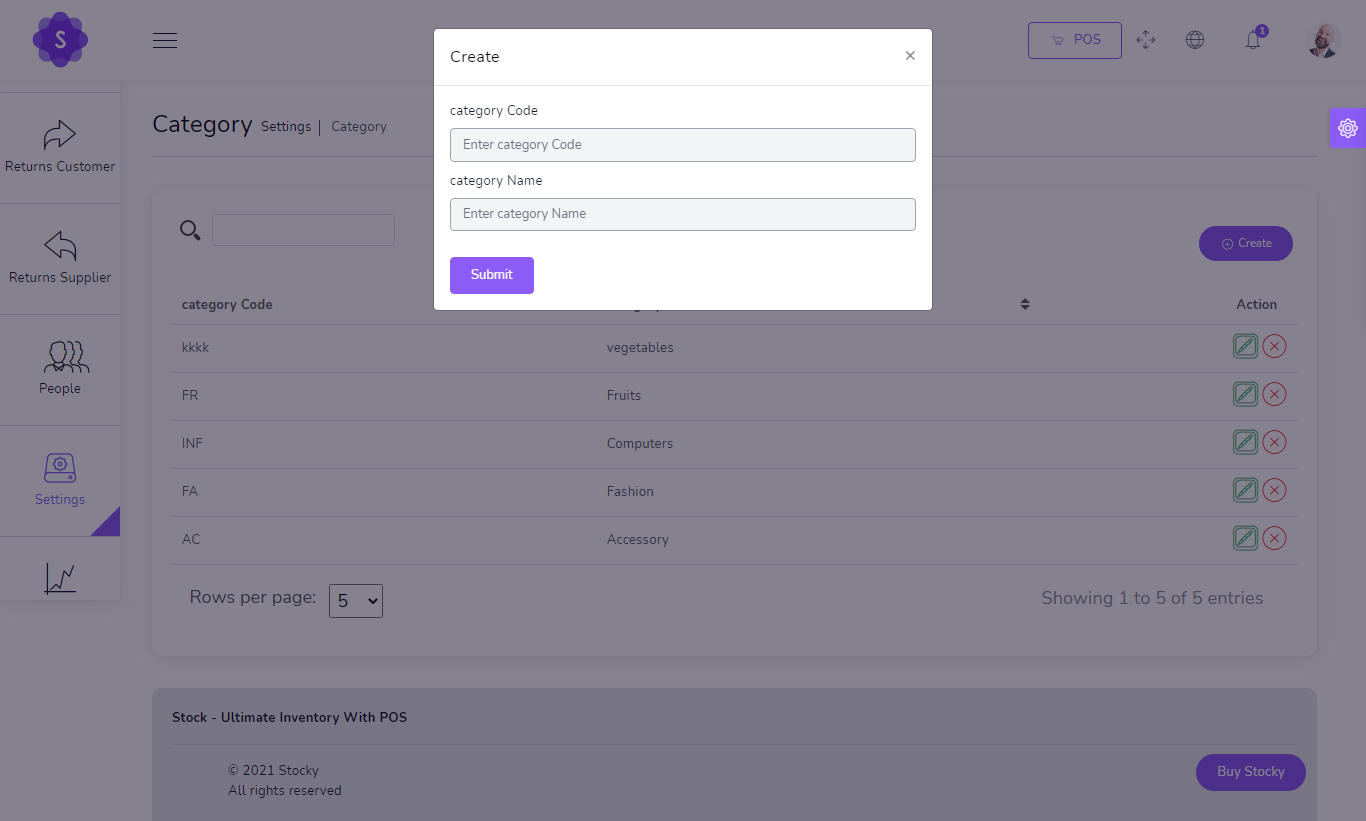
Create new Category
- Name
(required) - Code
(required)
You can manage Brand list
- Edit Brand
- Delete Brand
- Search Brand
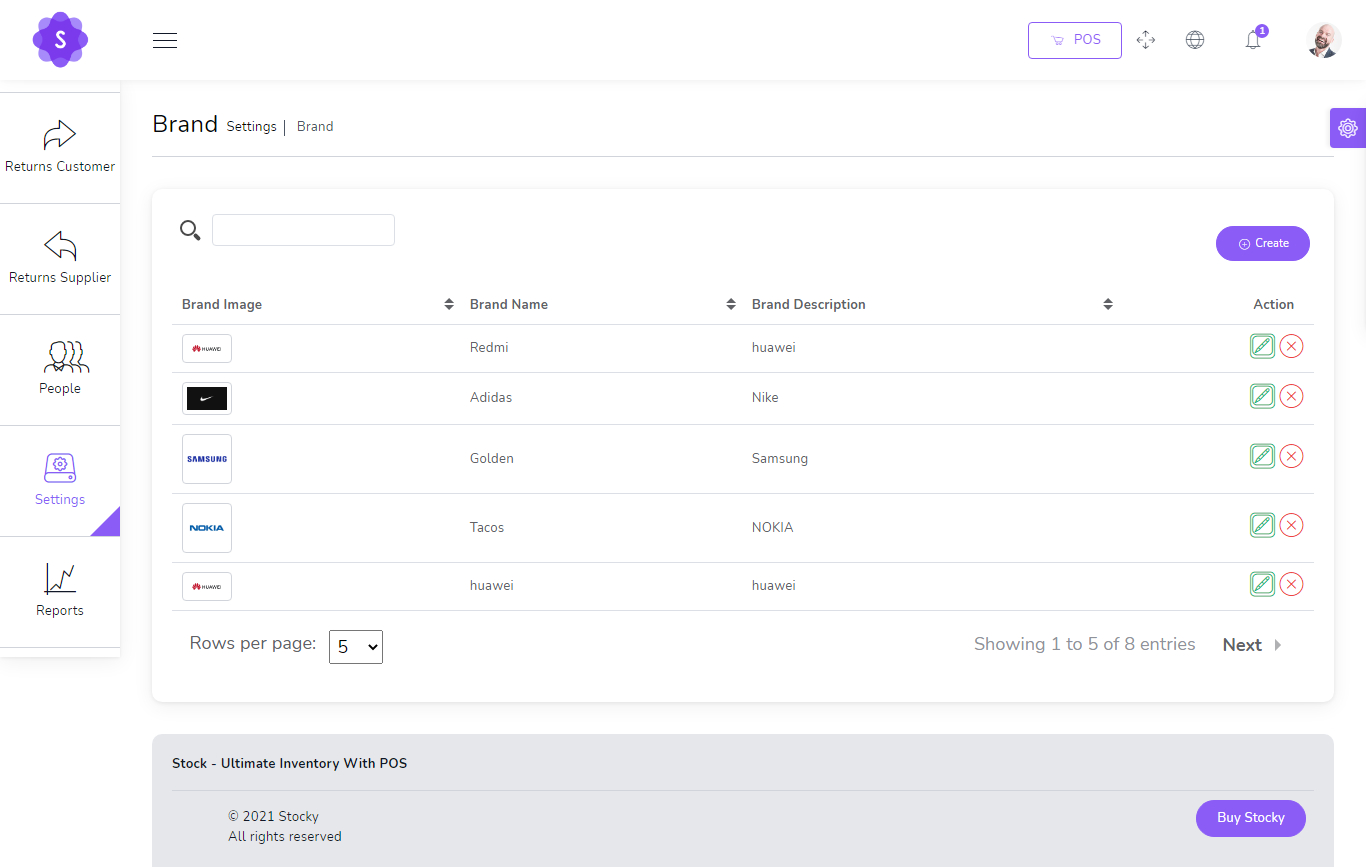
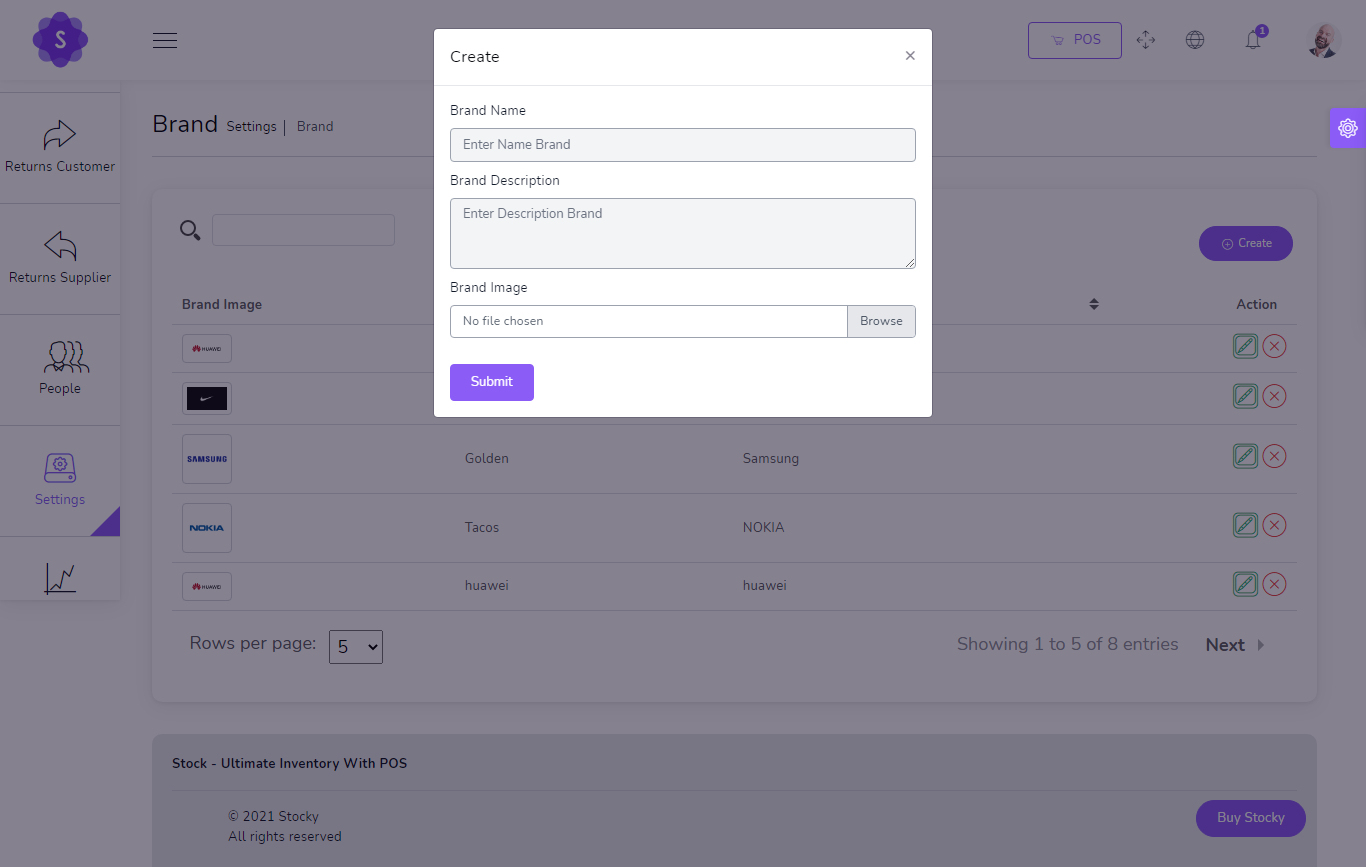
Create new Brand
- Name
(required) - Description
(optional) - Image
(optional)
You can manage Currency list
- Edit Currency
- Delete Currency
- Search Currency
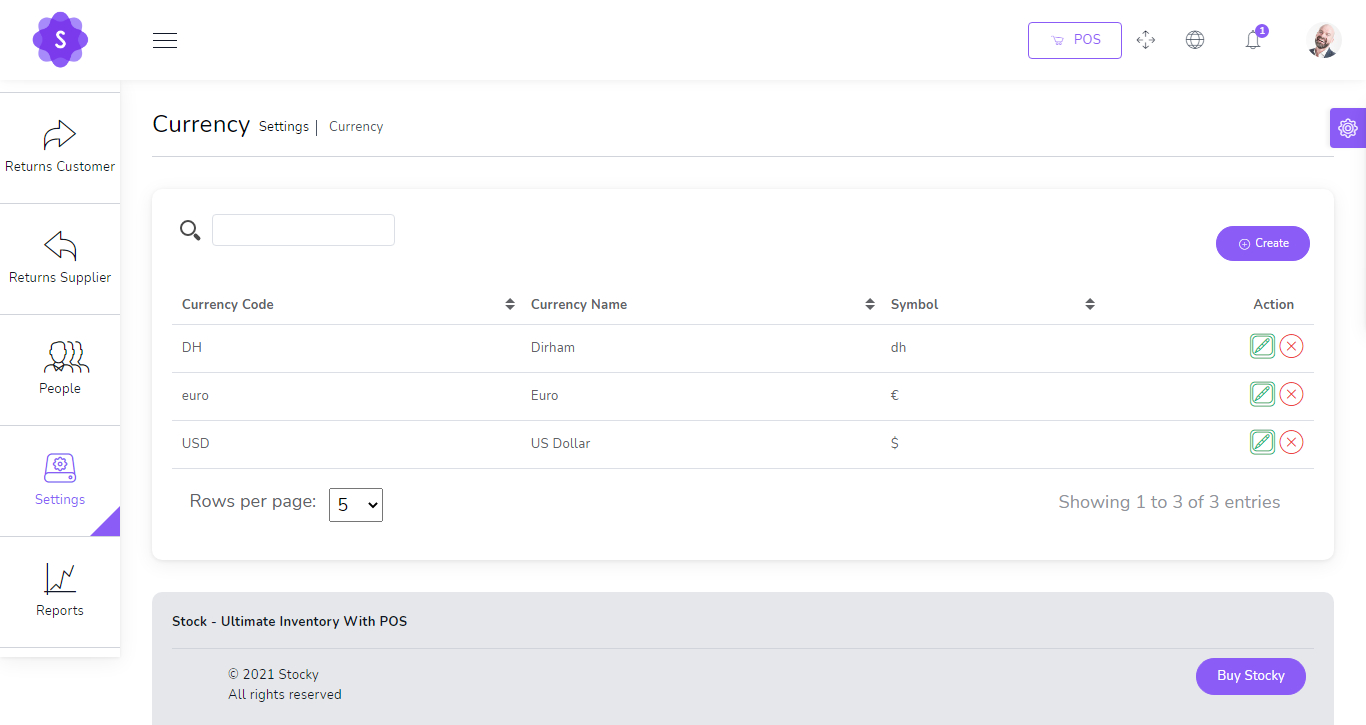
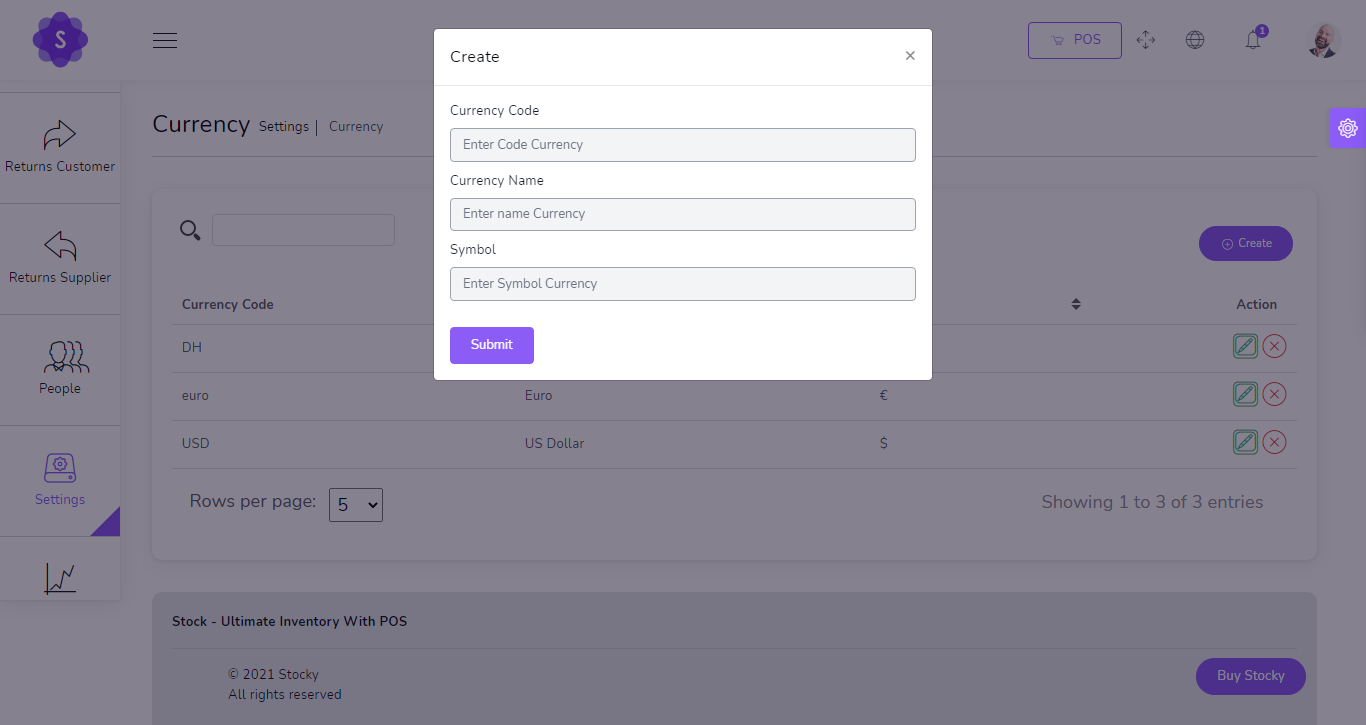
Create new Currency
No Live Exchange Just Symbol
- Code
(required) - Name
(required) - Symbol
(required)
You can manage Unit list
- Edit Unit
- Delete Unit
- Search Unit
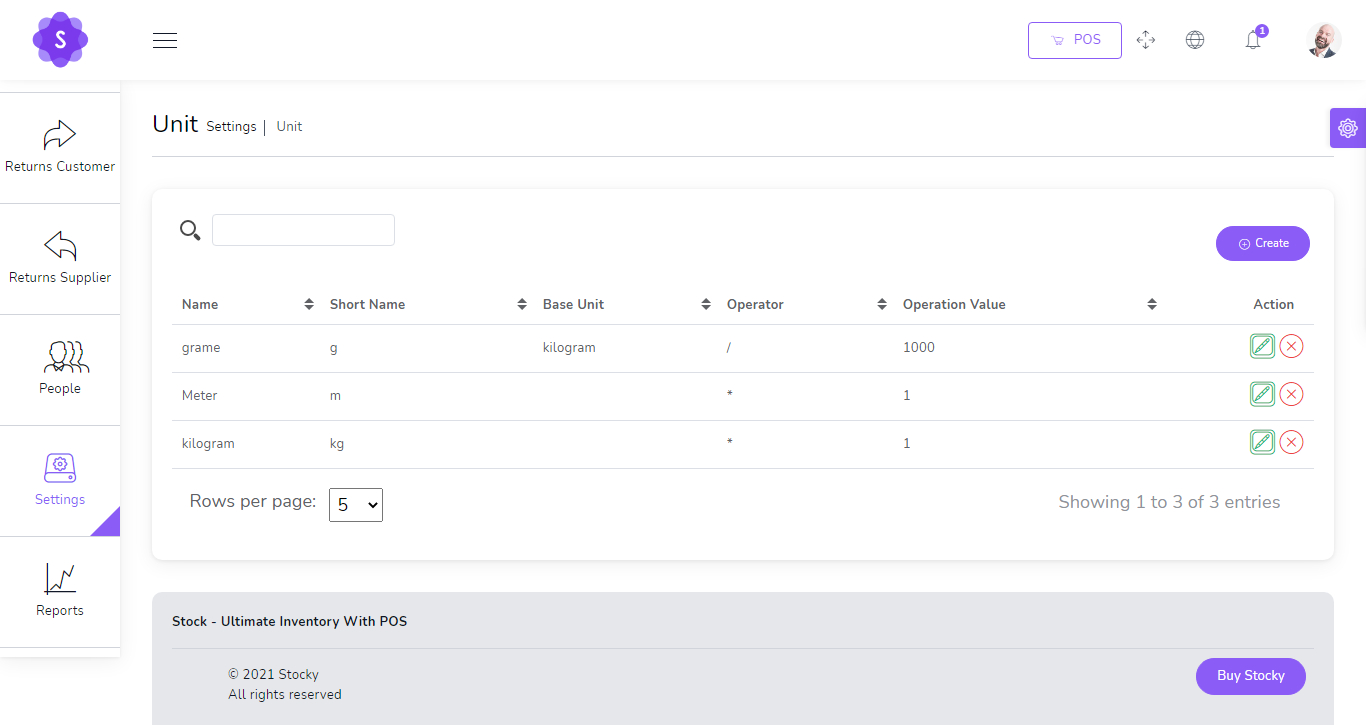
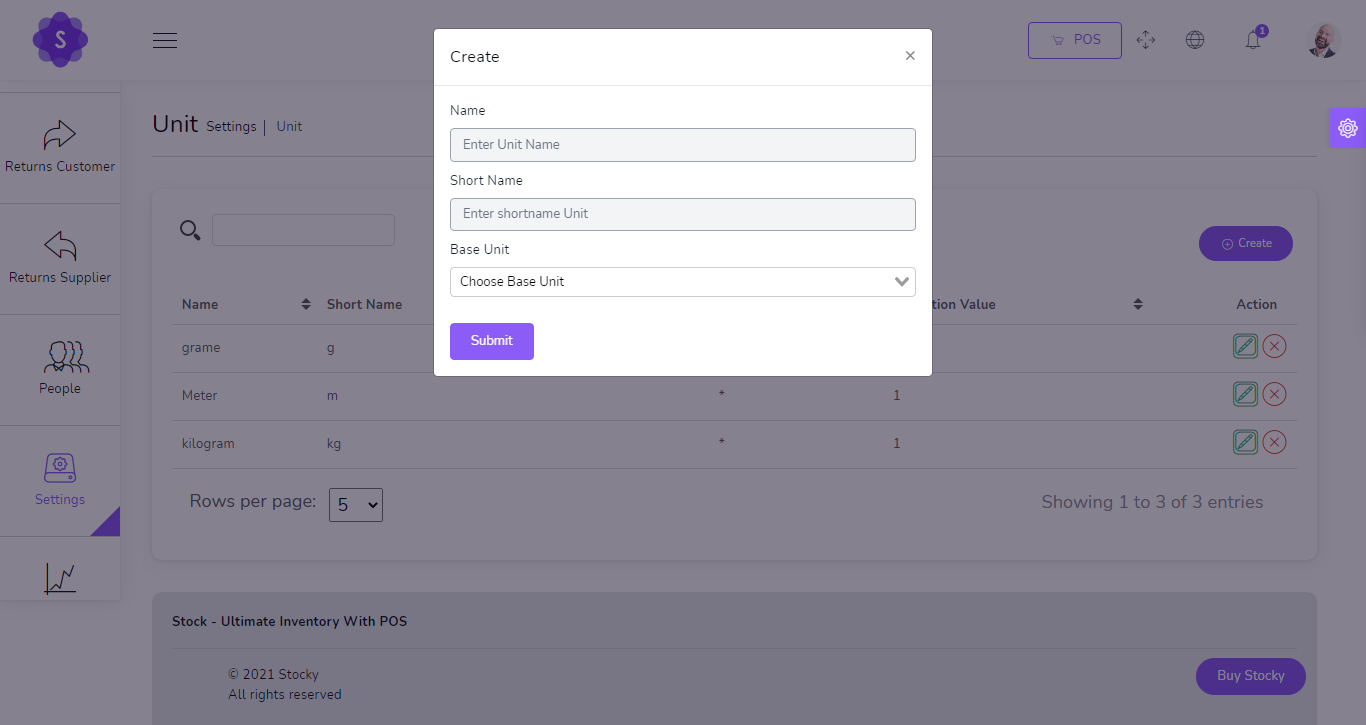
Create new Unit
- Name
(required) - Short Name
(required) - Base Unit
(optional)
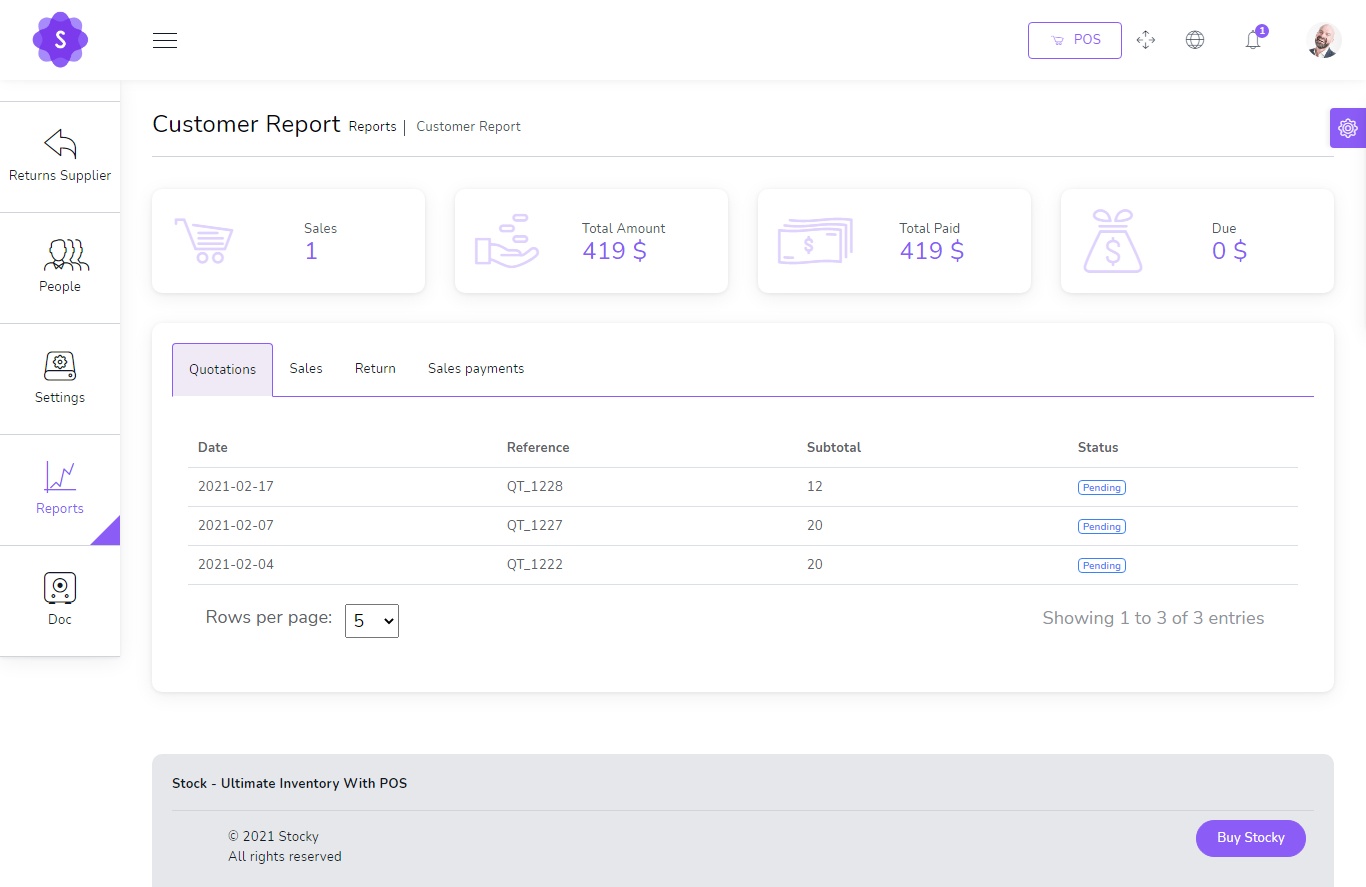
Reports
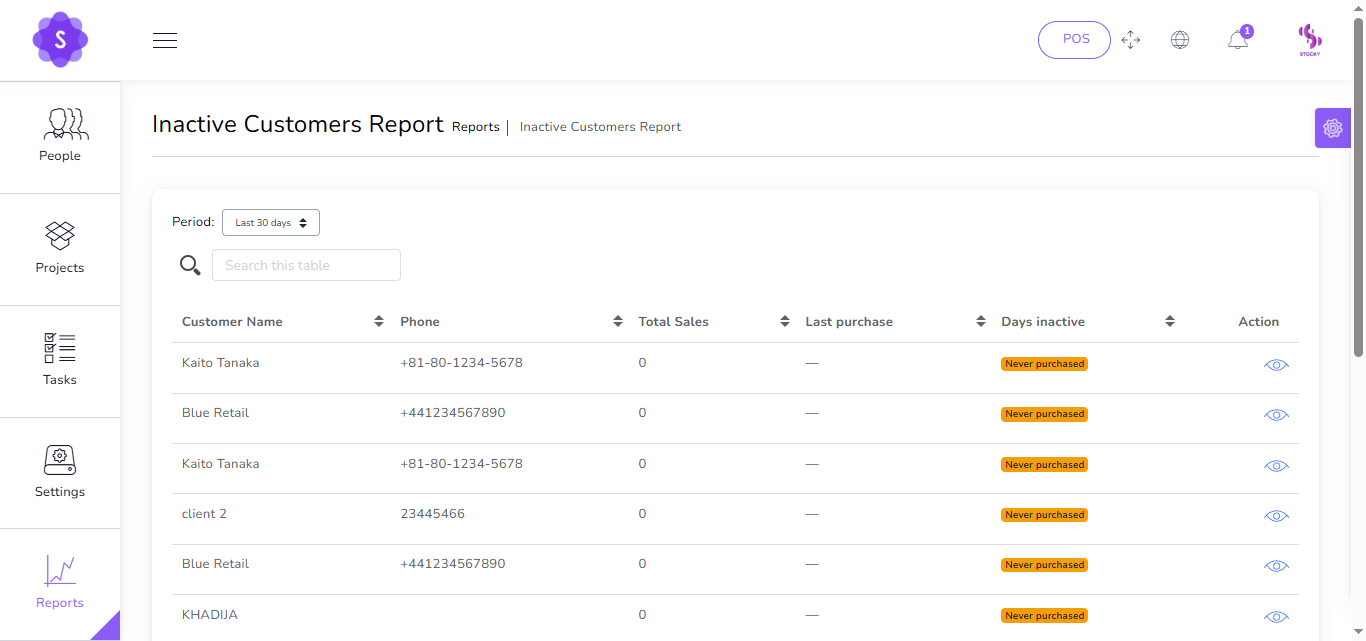
Inactive Customers Report
Identify clients with no purchases in the last 30, 60, or 90 days.
Zero Sales Products Report
Products that haven’t sold at all within a selected timeframe.

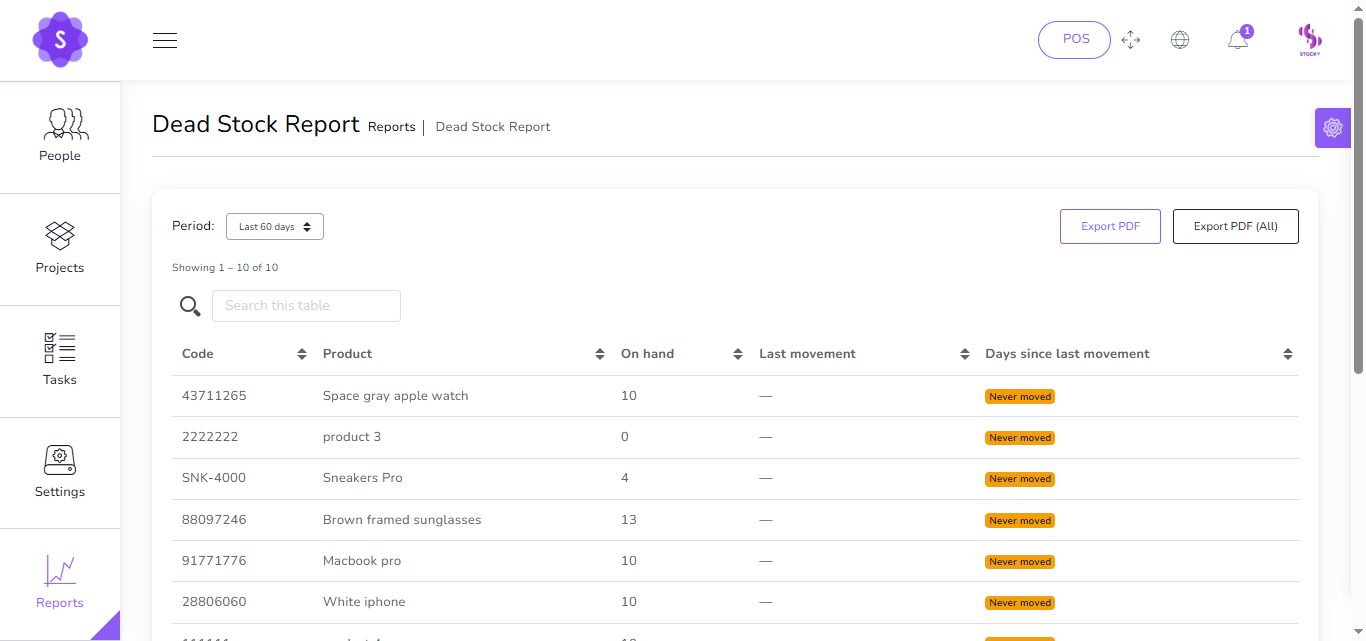
Dead Stock Report
Products with no movement or sales within a set period.
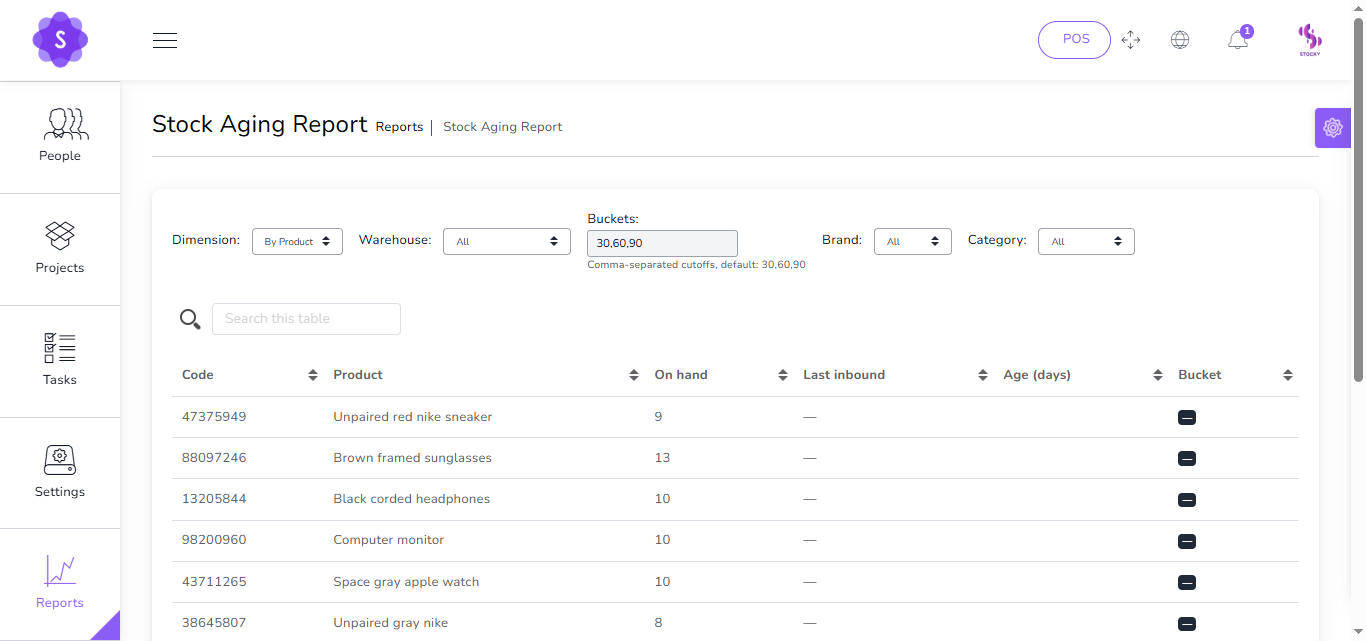
Stock Aging Report
Shows how long items have stayed in inventory, grouped by aging buckets (e.g., 0–30, 31–60, 61–90, 90+ days).
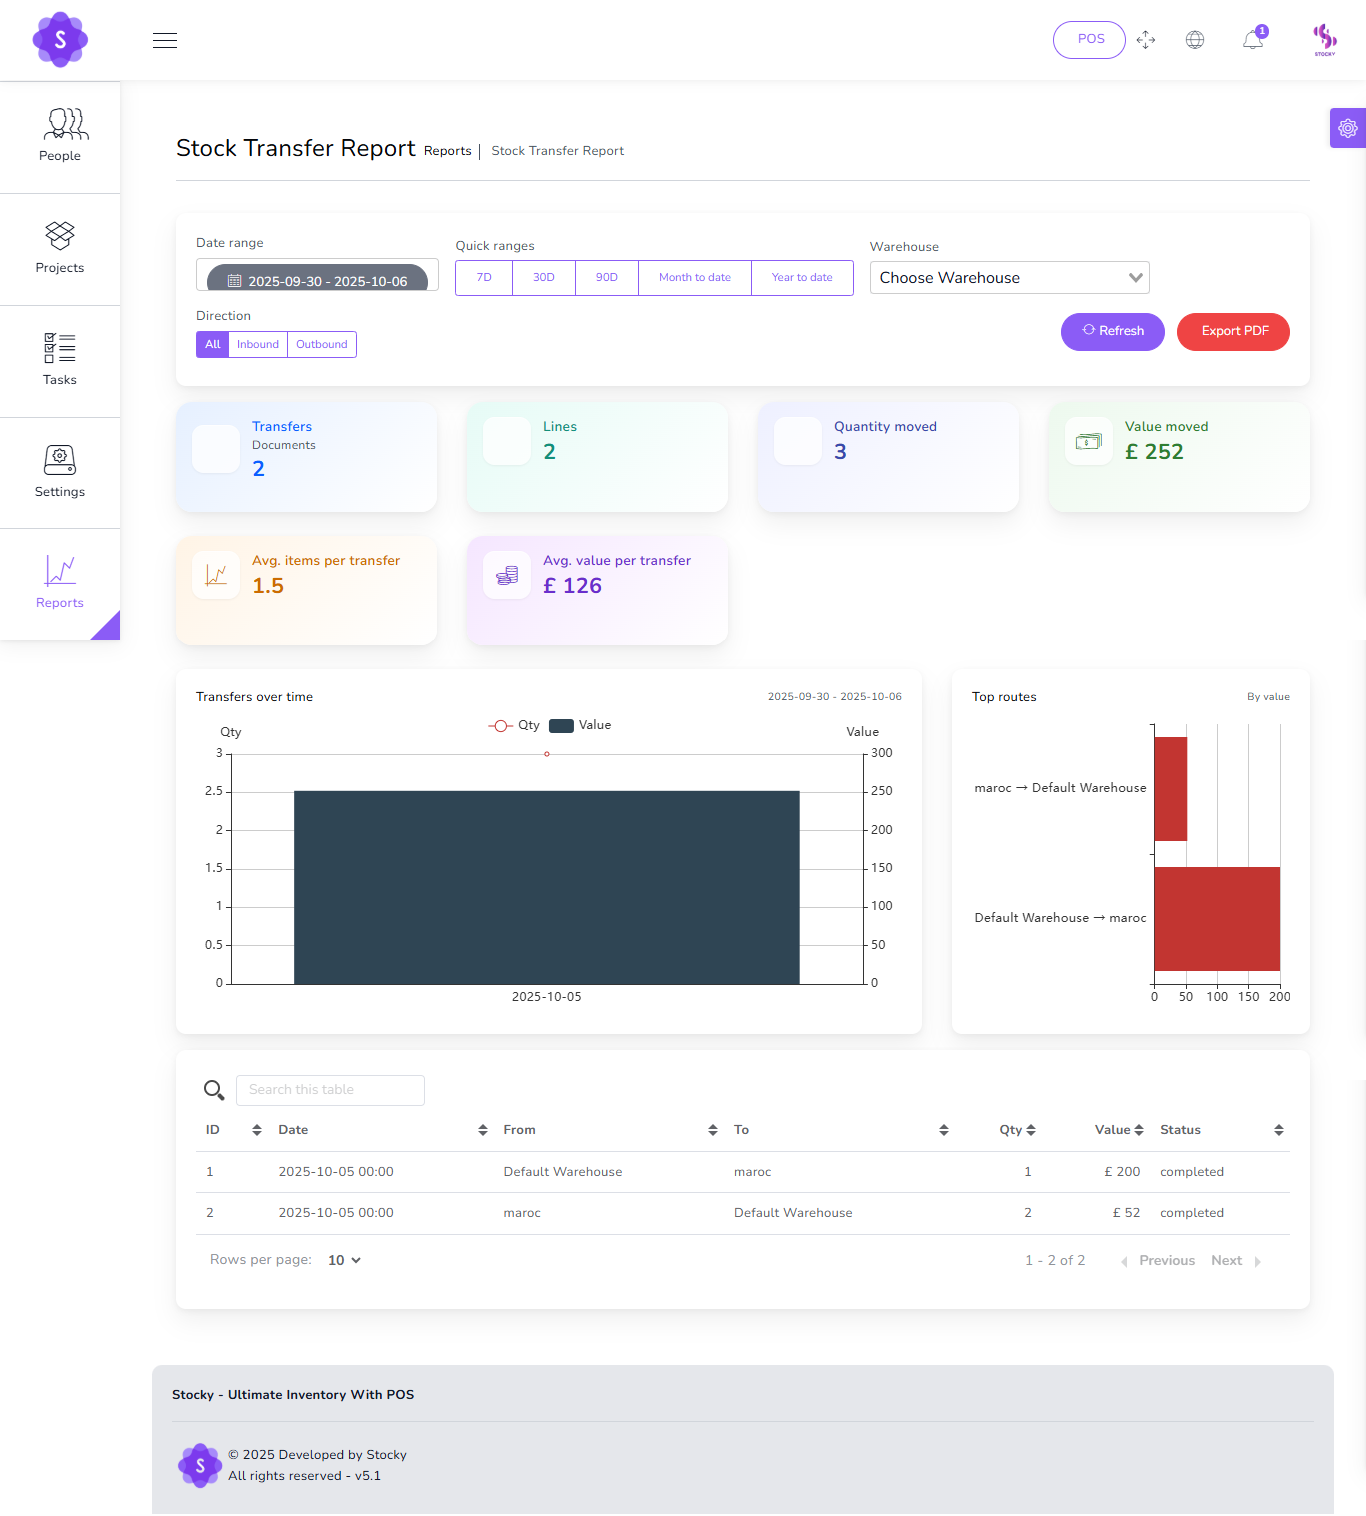
Stock Transfer Report
Analyze and visualize all stock movements between warehouses with KPIs, charts, and detailed tables.
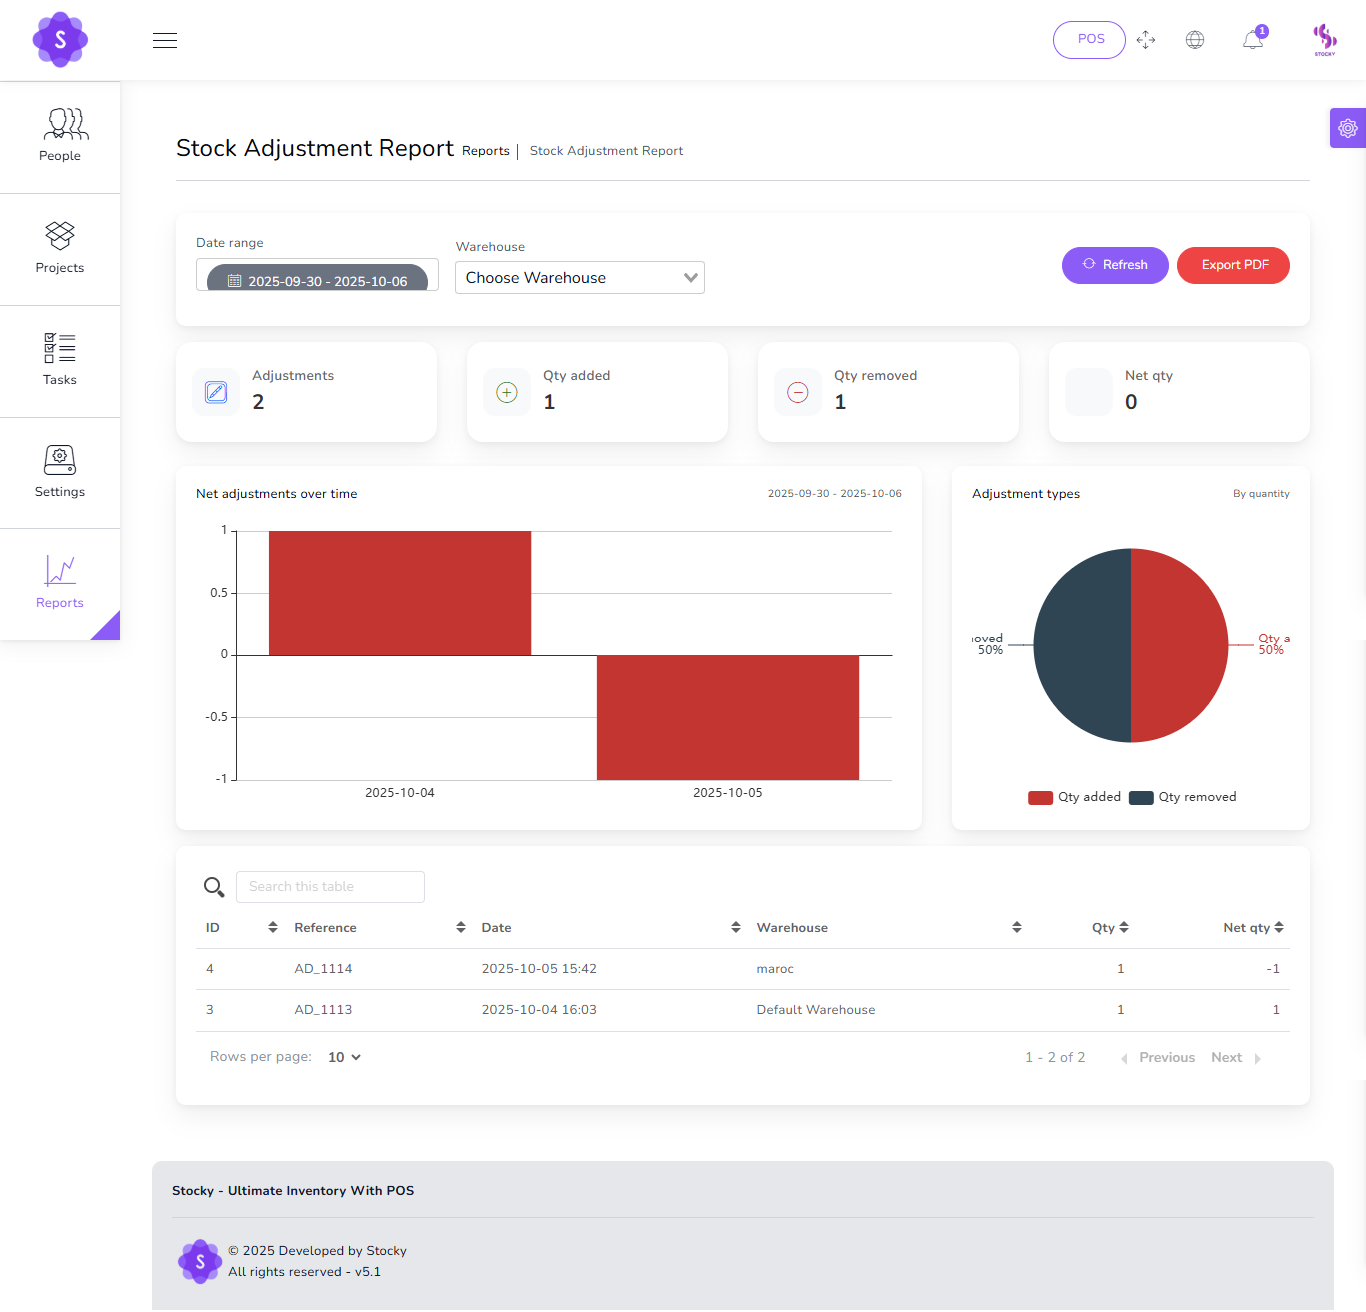
Stock Adjustment Report
Track and analyze all inventory corrections (additions and removals) with detailed KPIs, charts, and tables.
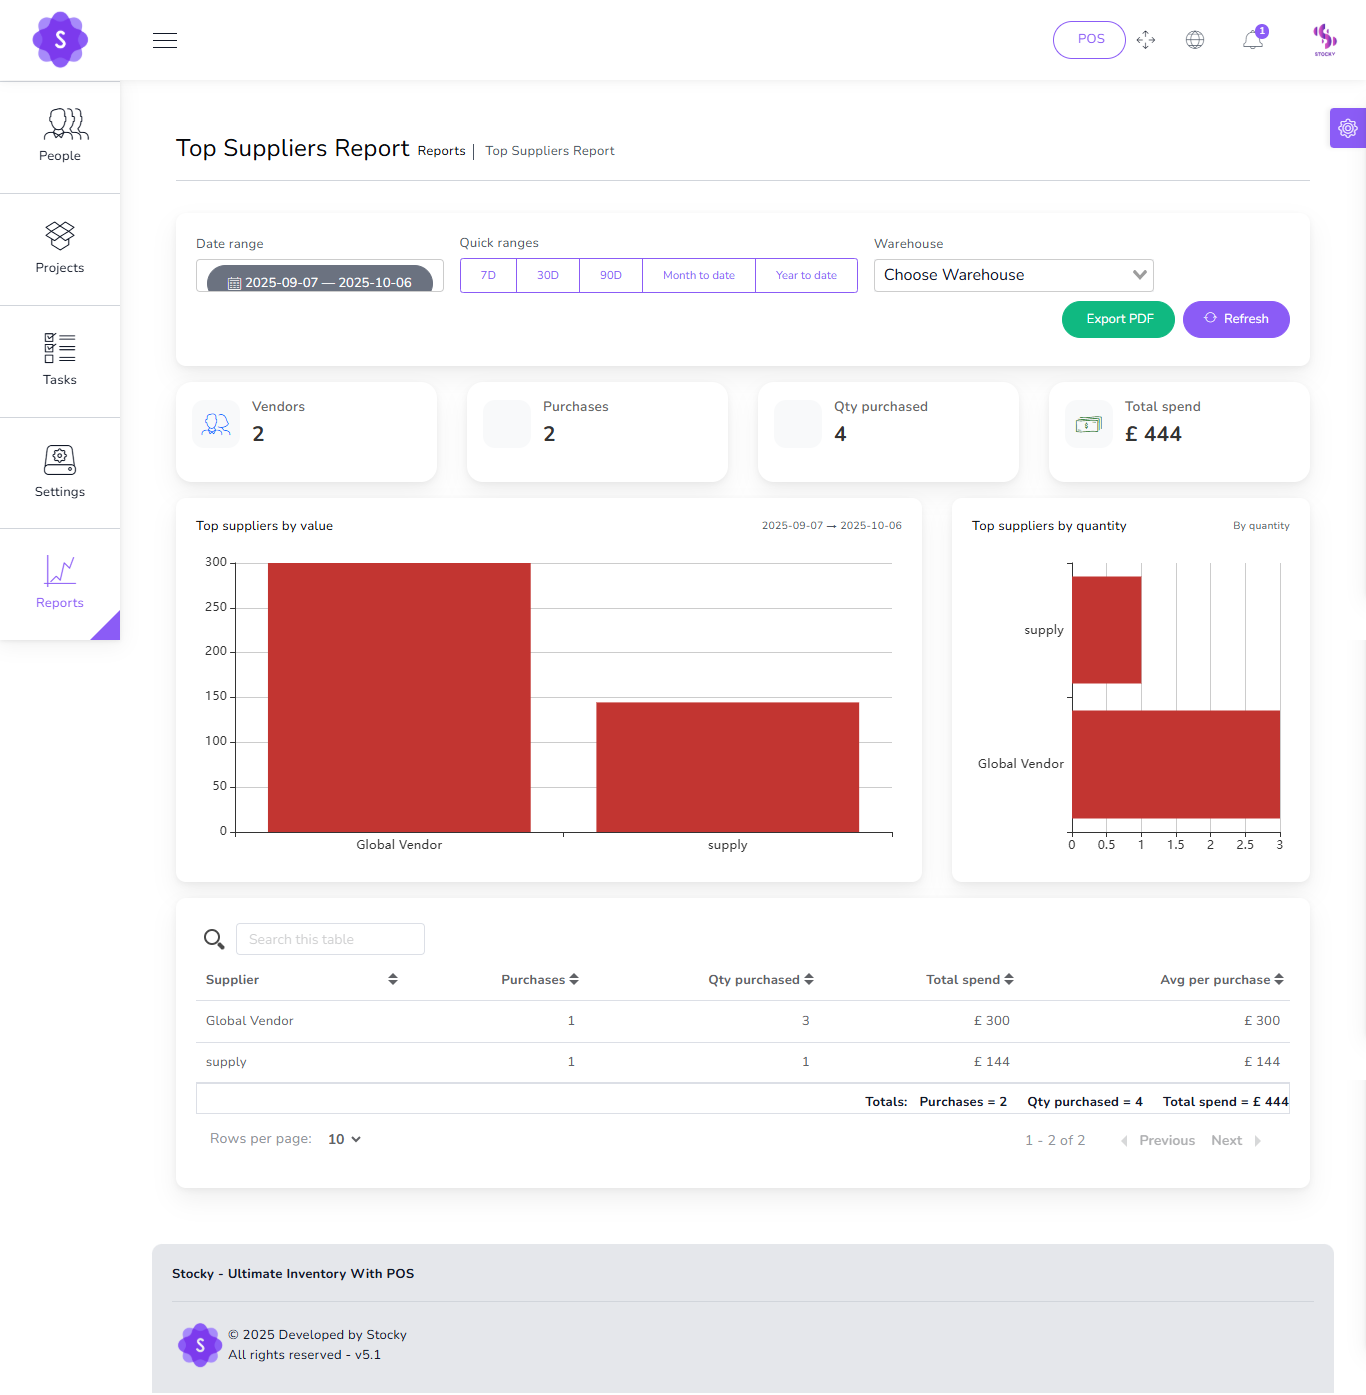
Top Suppliers Report
Purchases value & volume by vendor.
Draft Invoices Report
View invoices that were created but never finalized or sent.

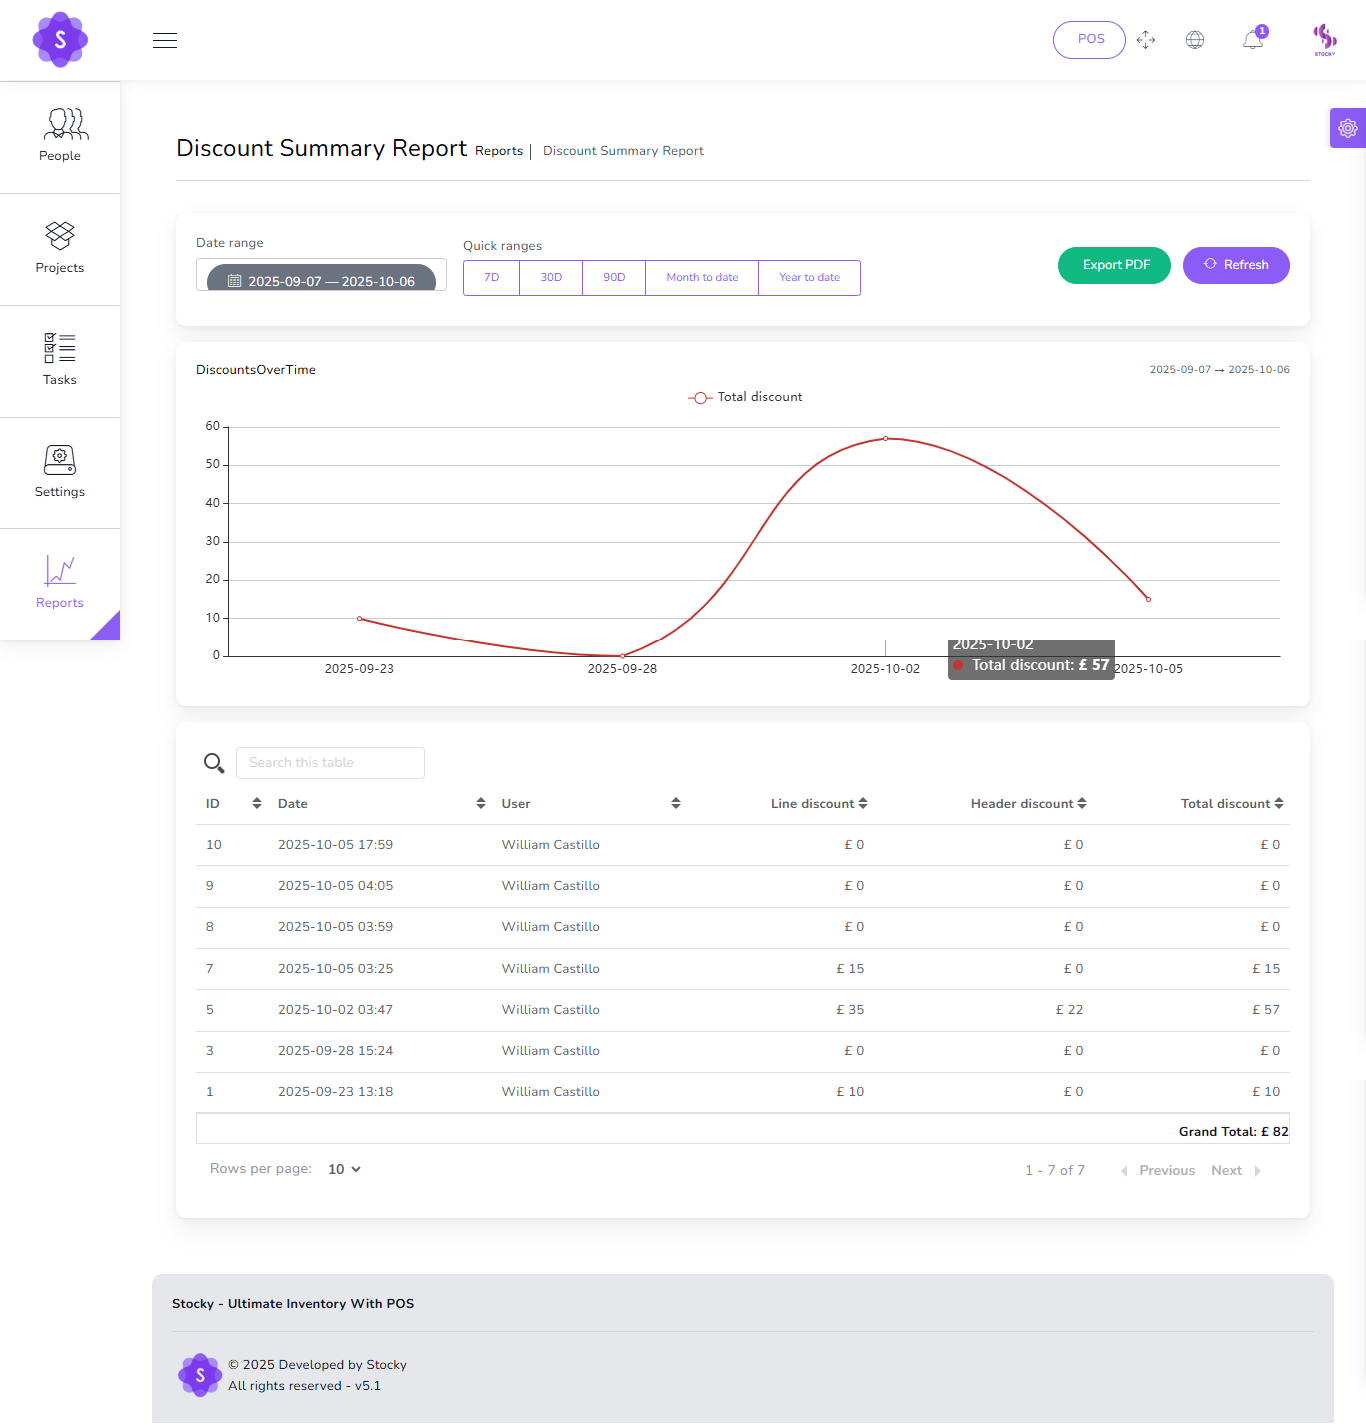
Discount Summary Report
Overview of total discount value given by date range
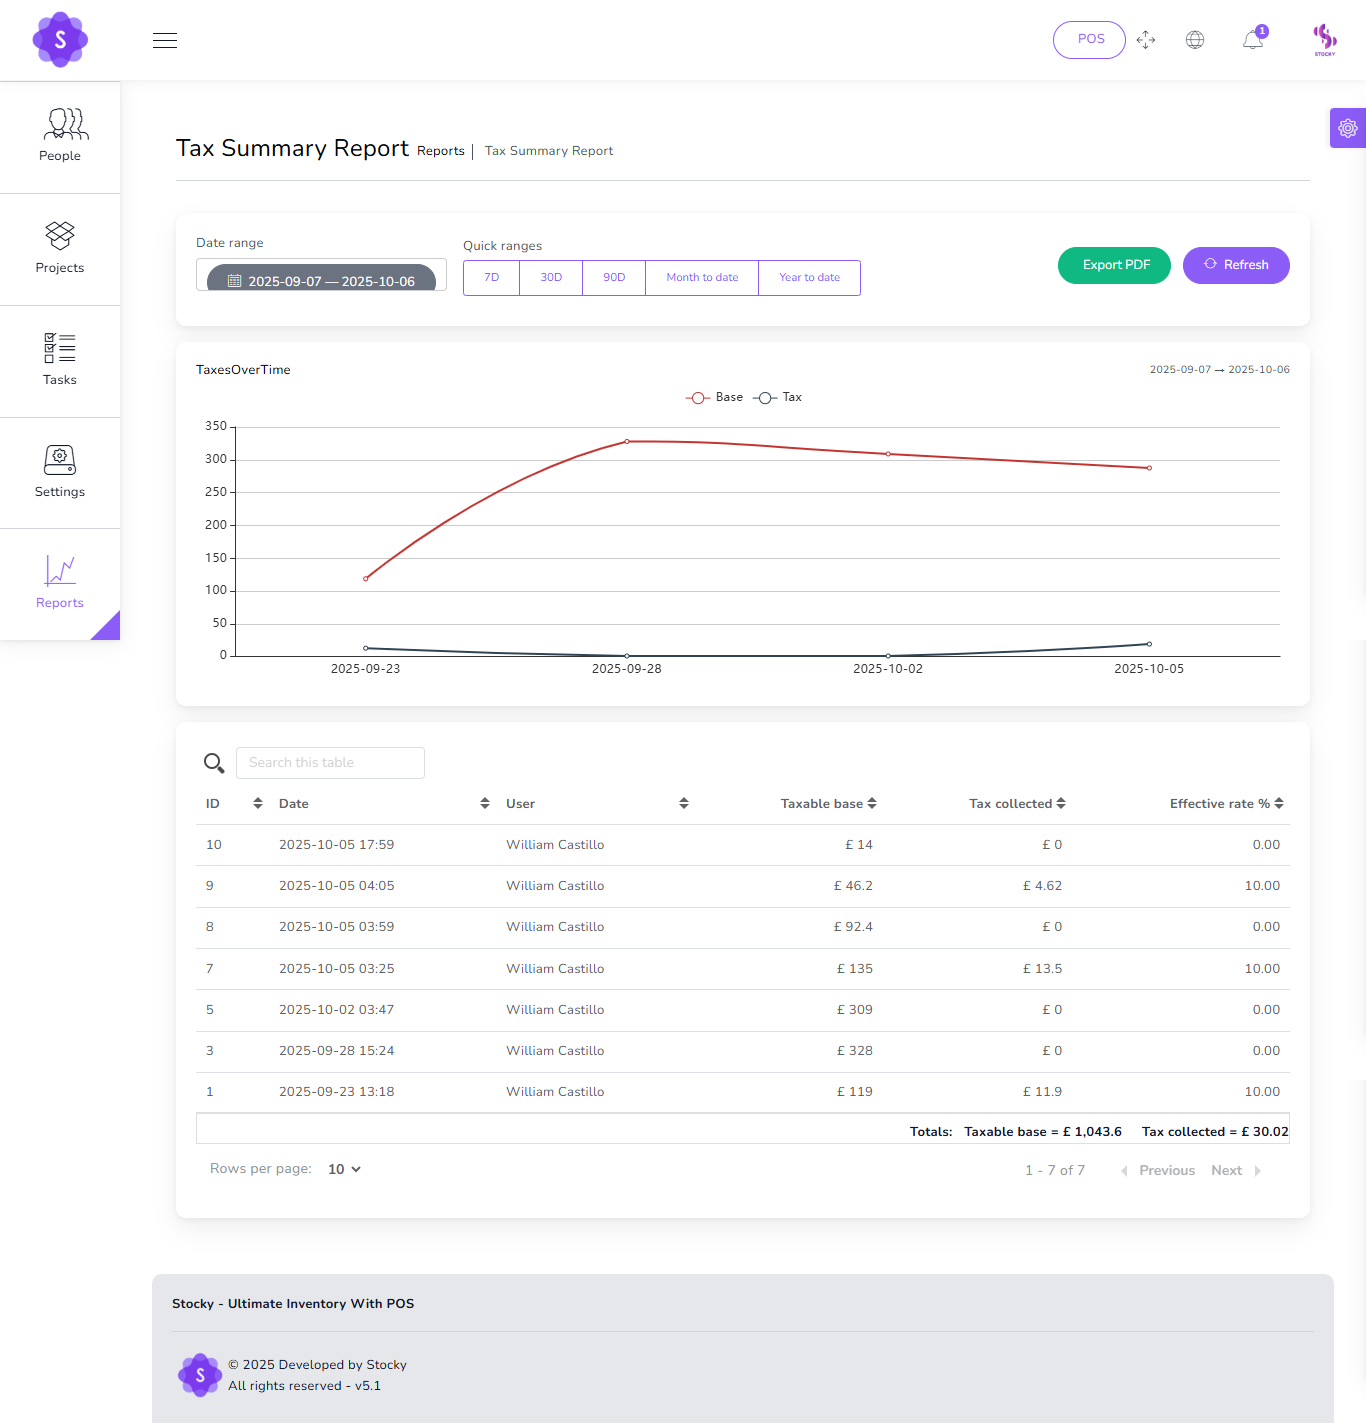
Tax Summary Report
Overview of total taxable base and tax collected using the date range picker.
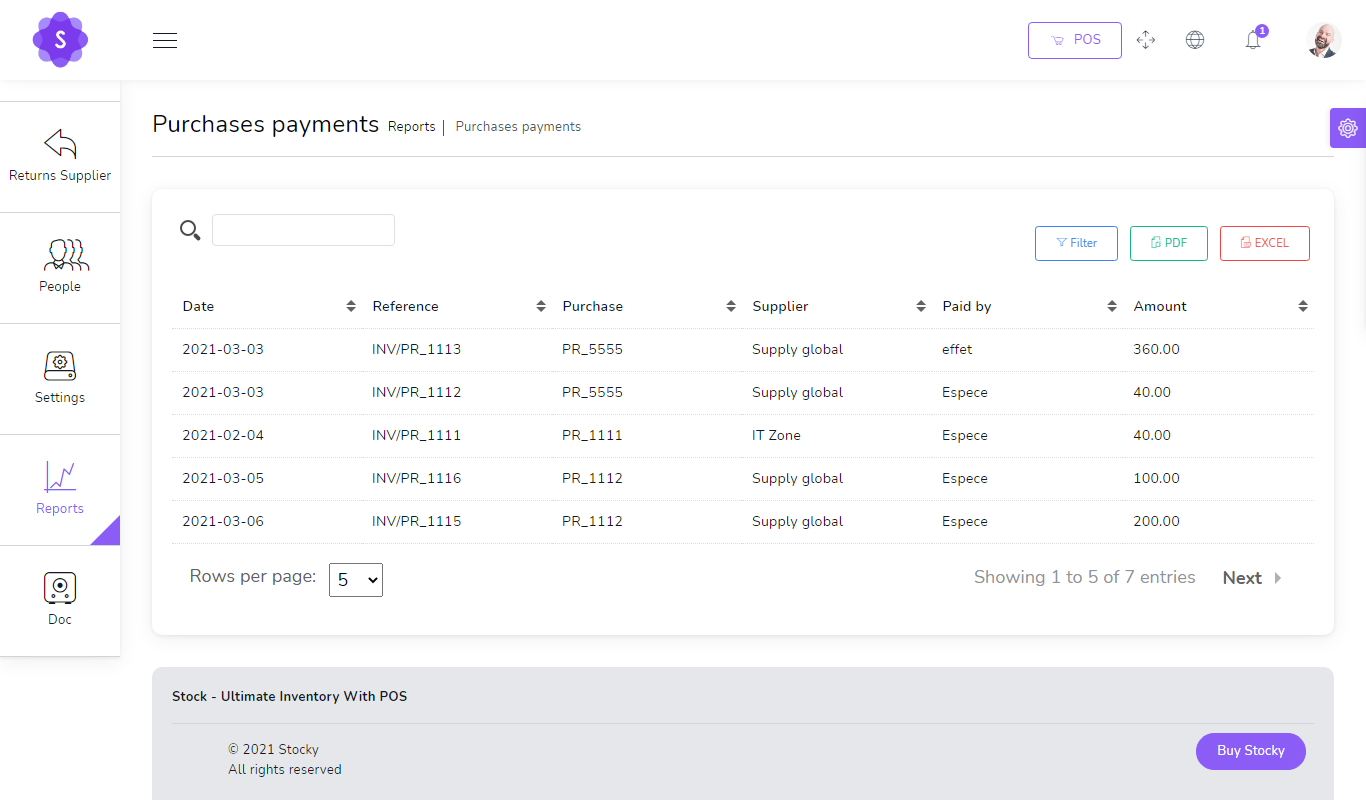
Payments Purchases
Payments Sales

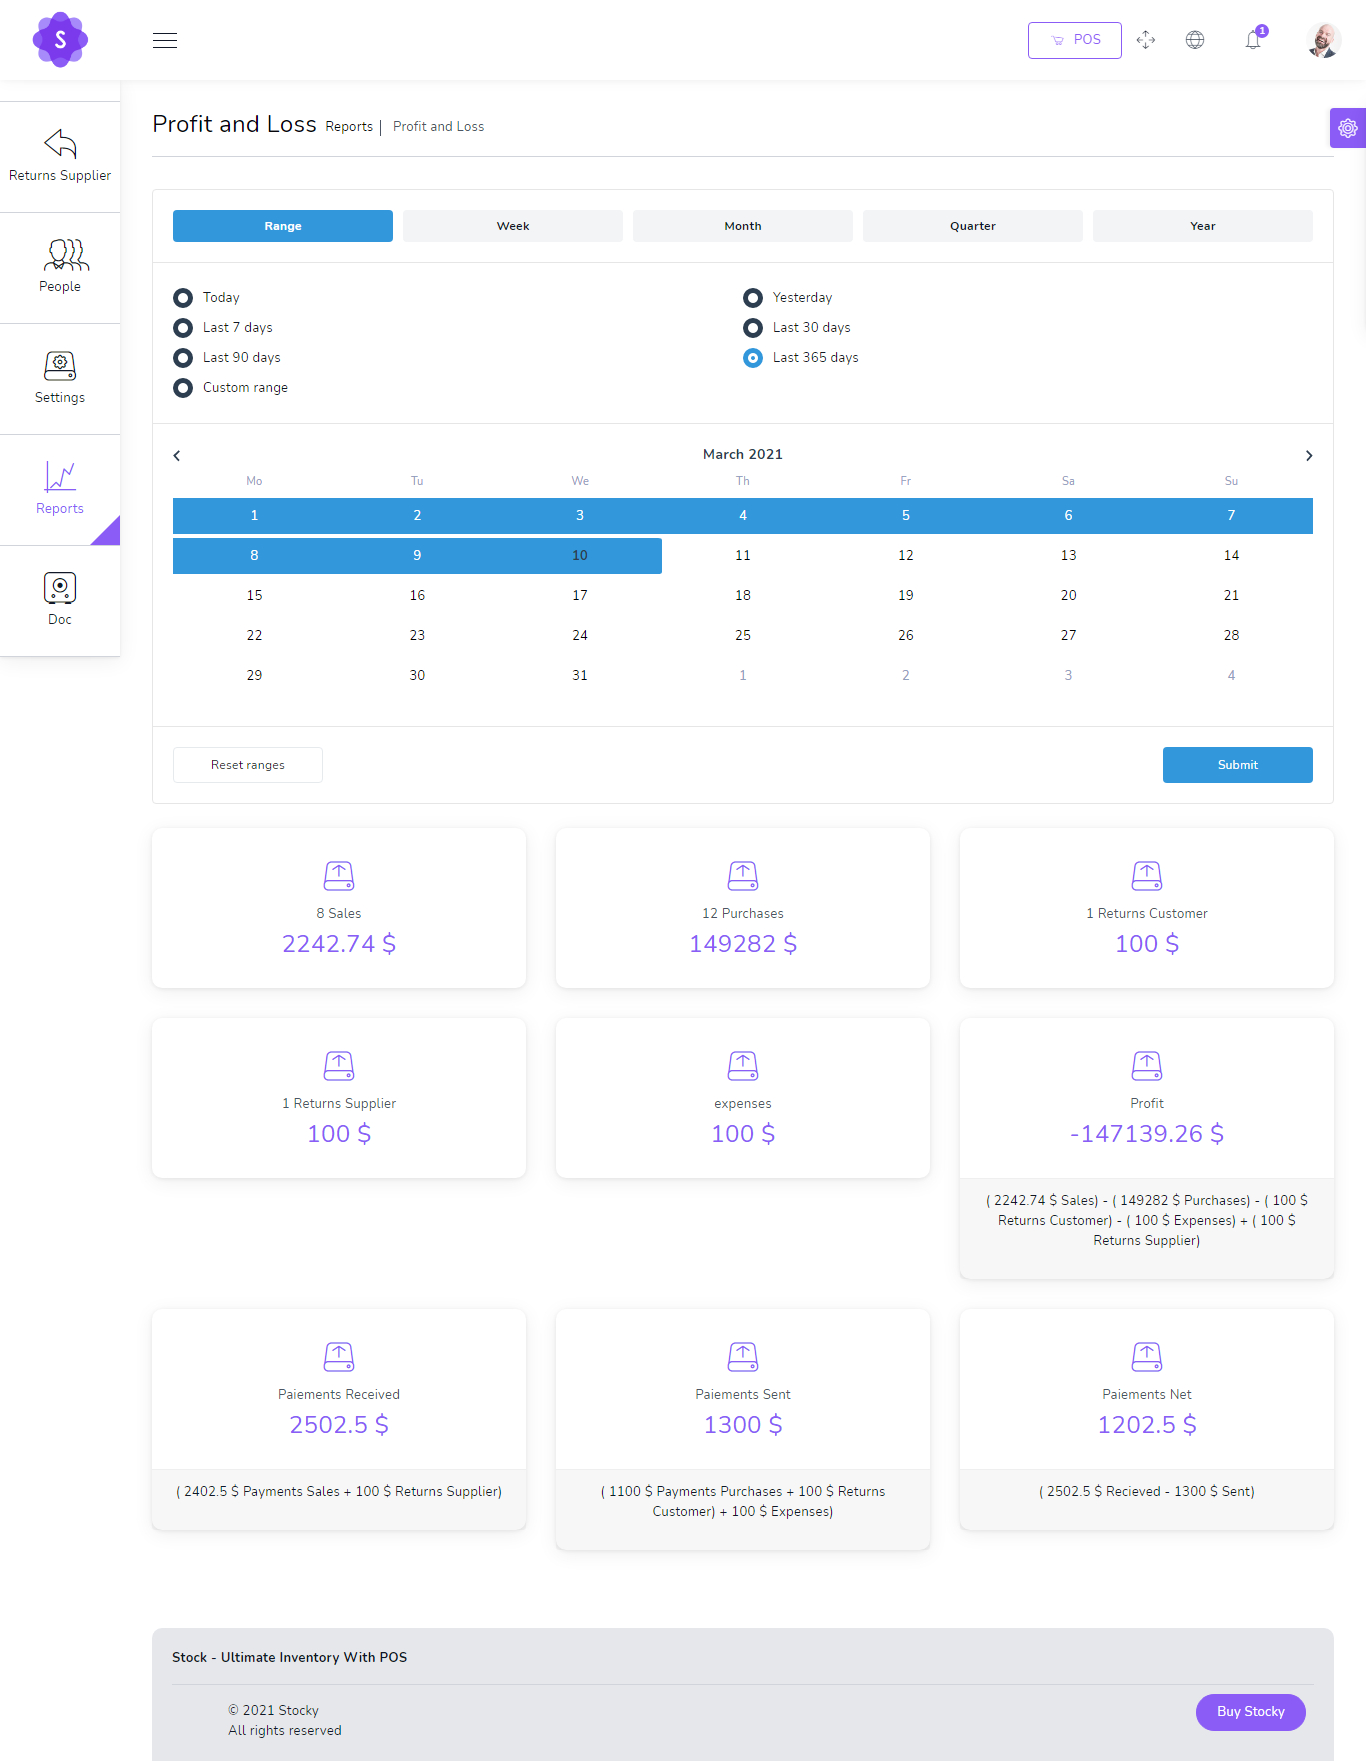
Profit & Loss
Inventory Valuation

Expenses Report

Deposits Report

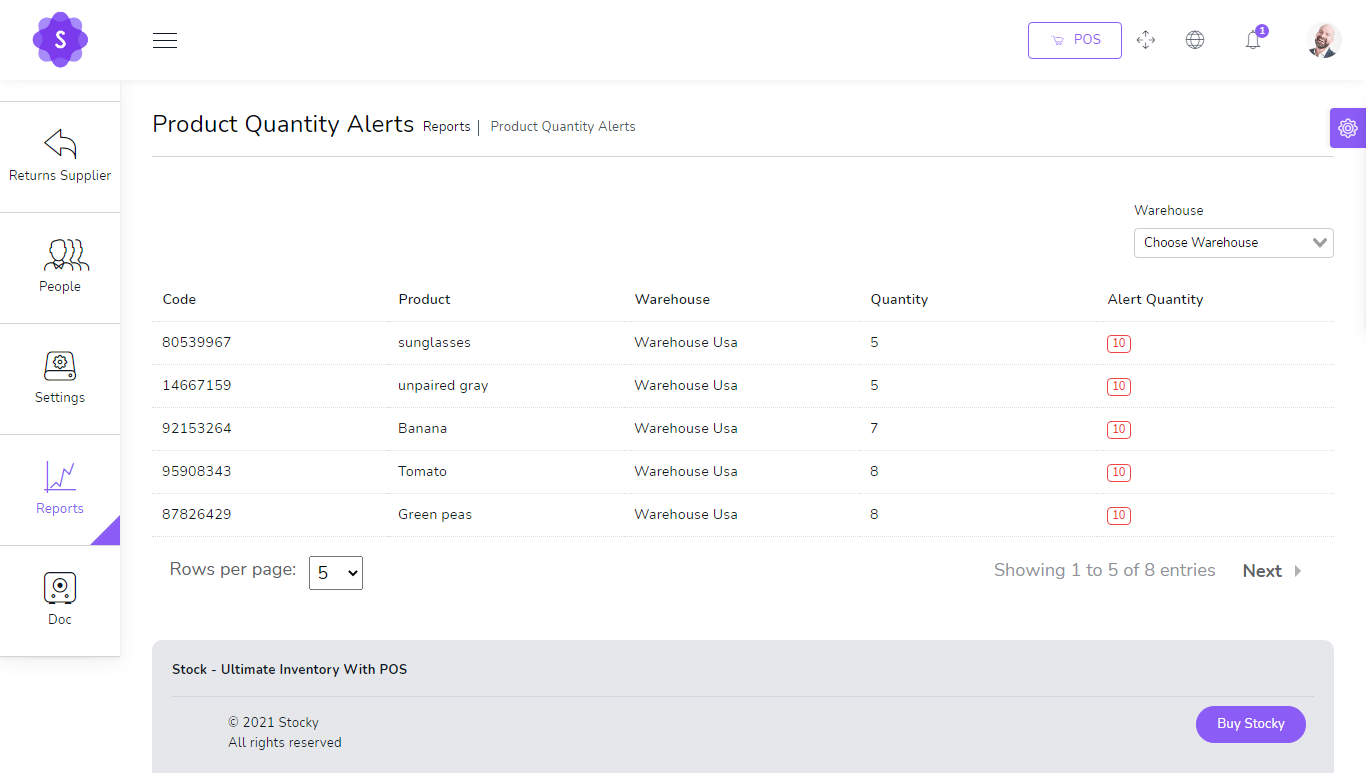
Product Alert
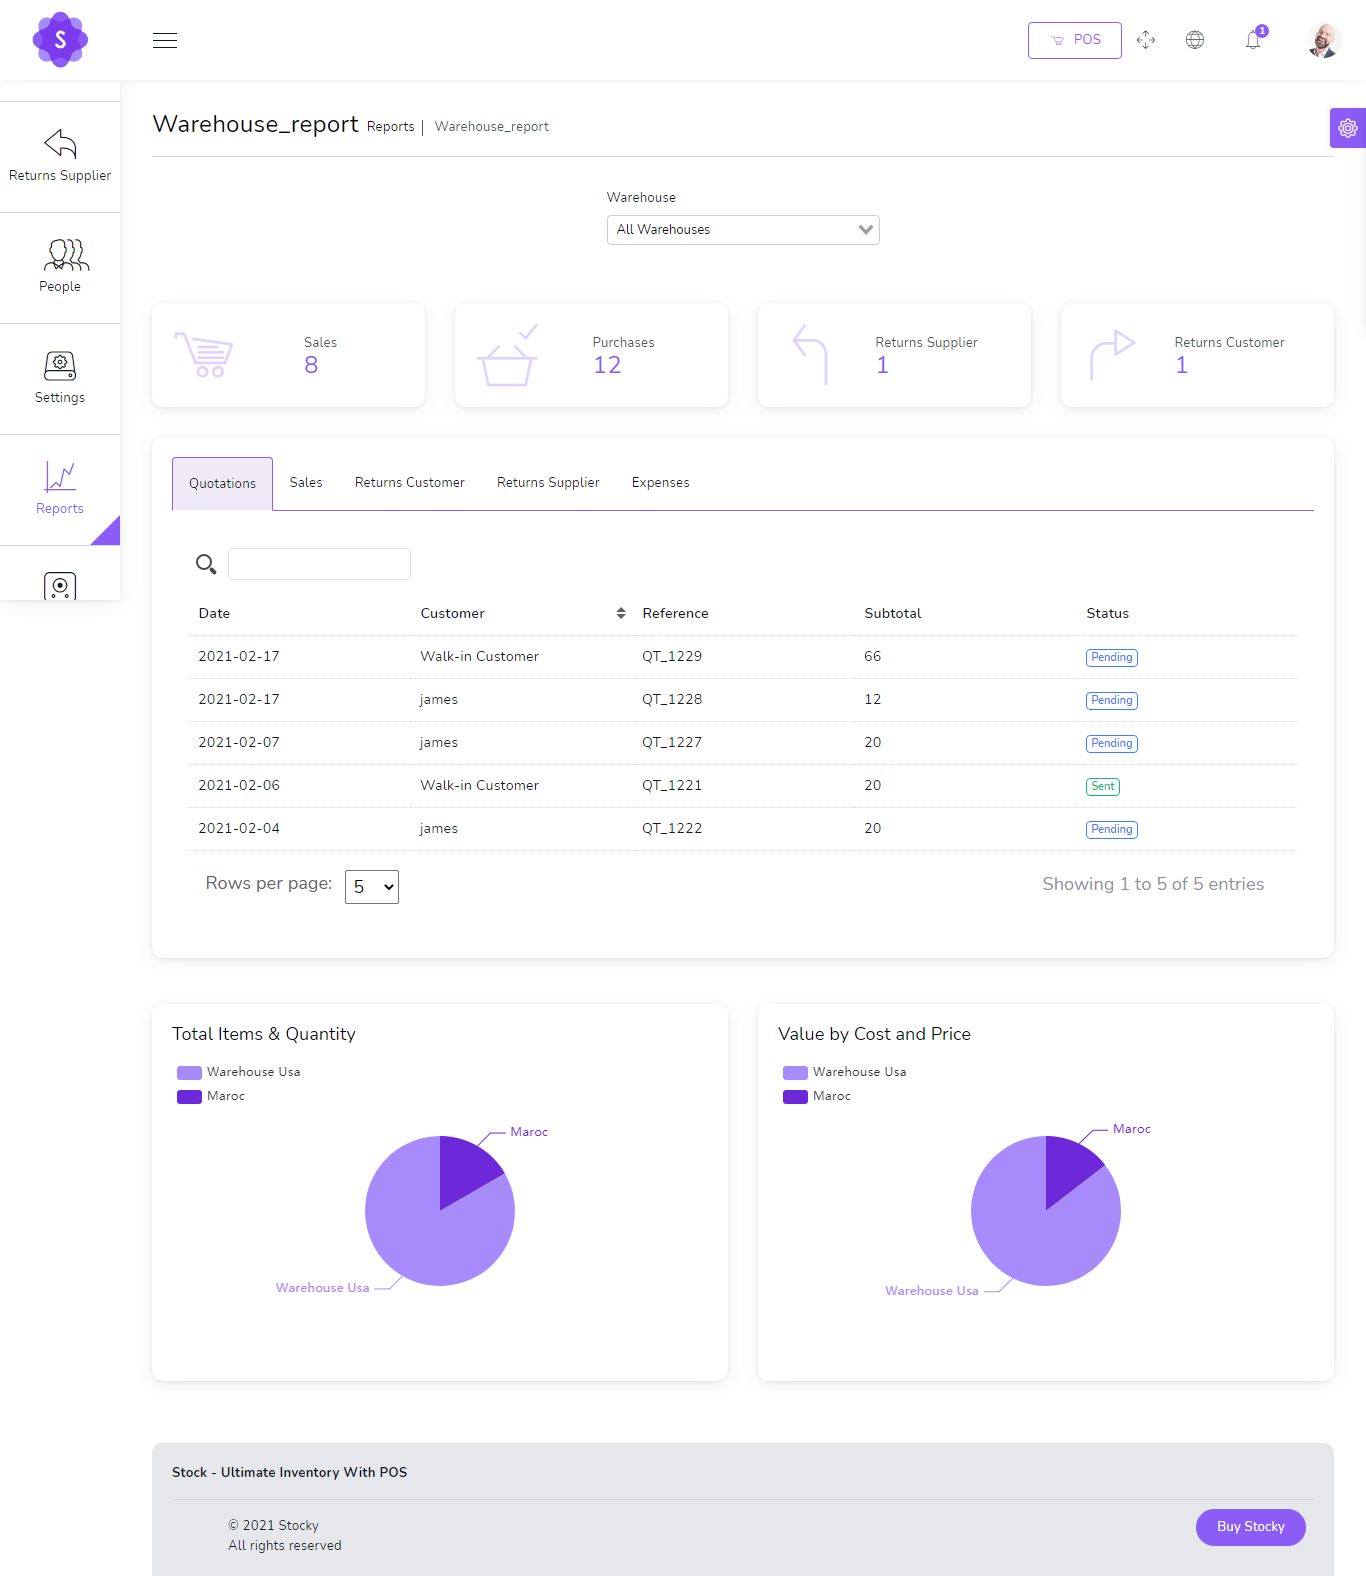
Warehouse report
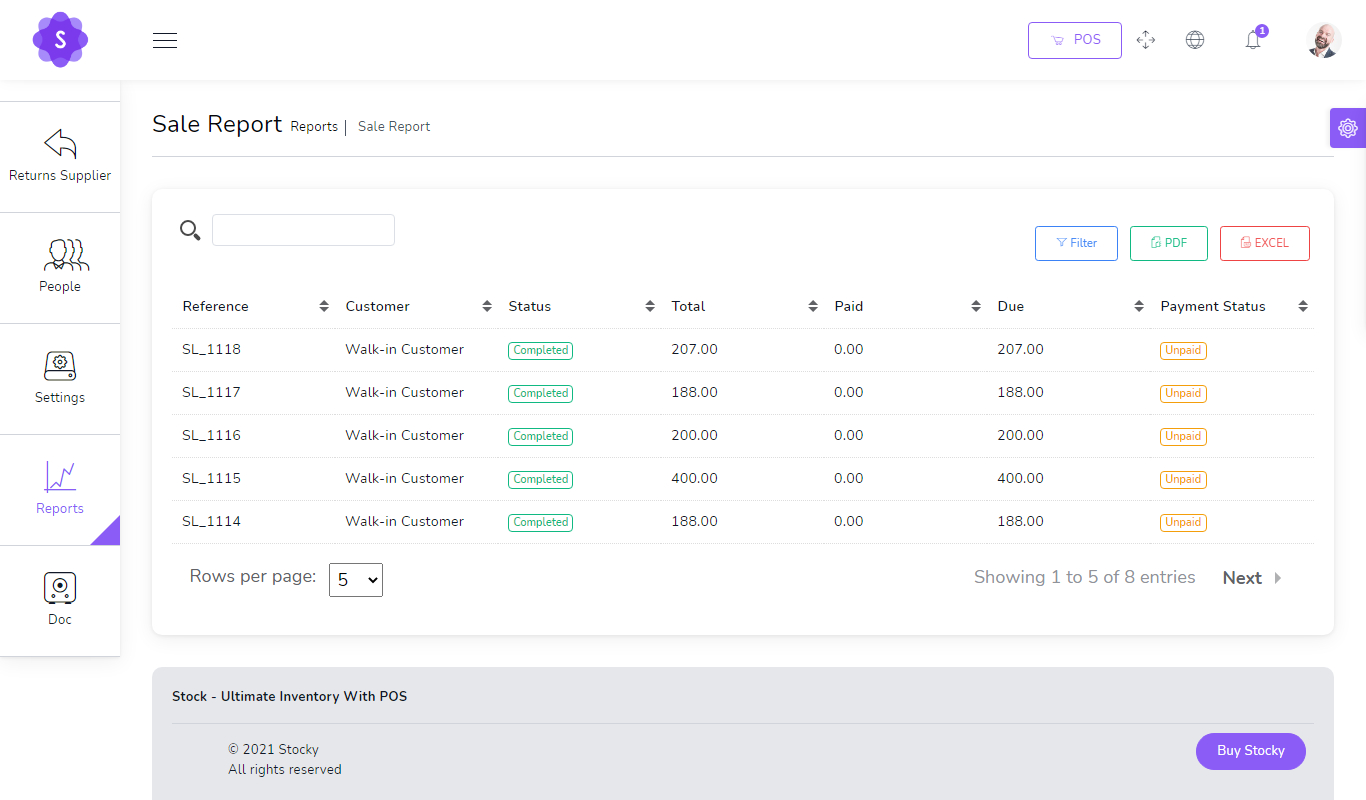
Sales report
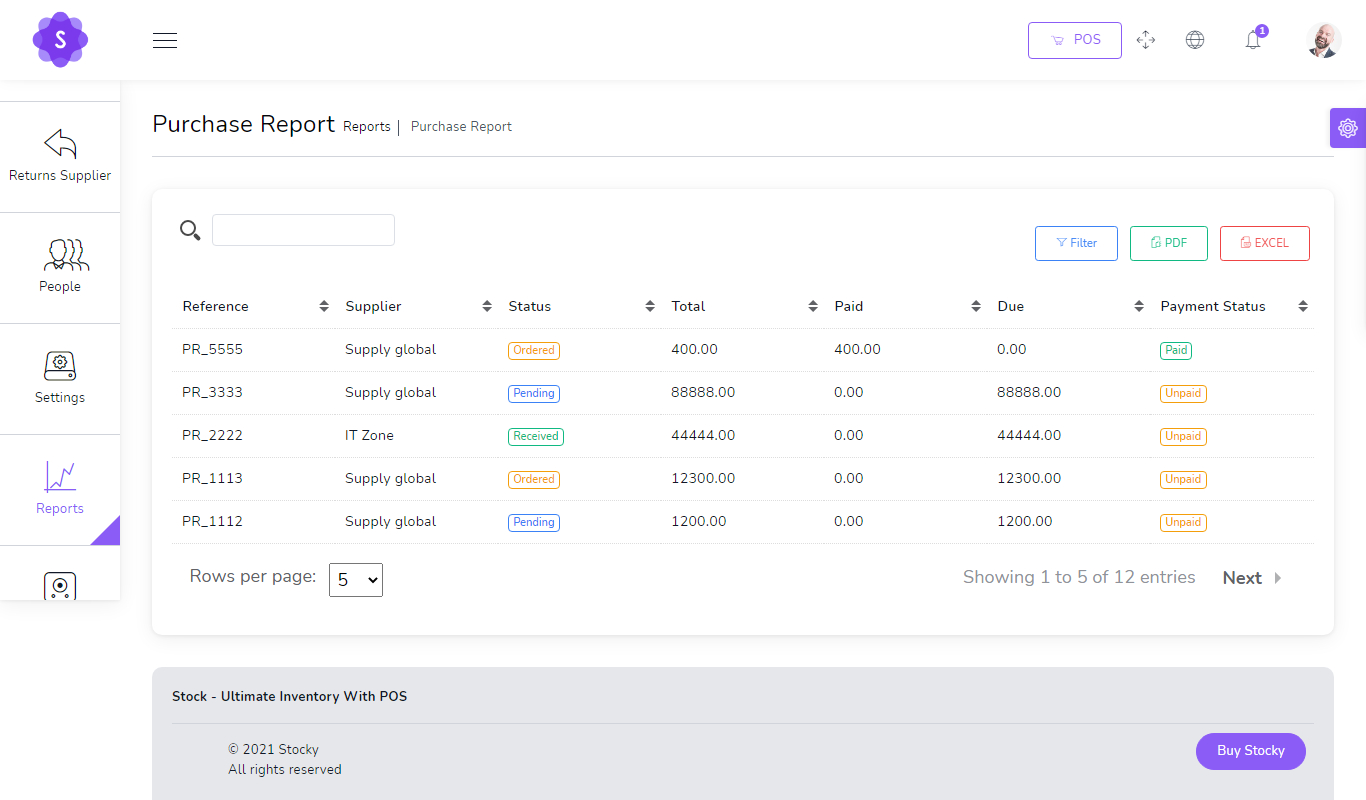
Purchases report
Customers report
Suppliers report
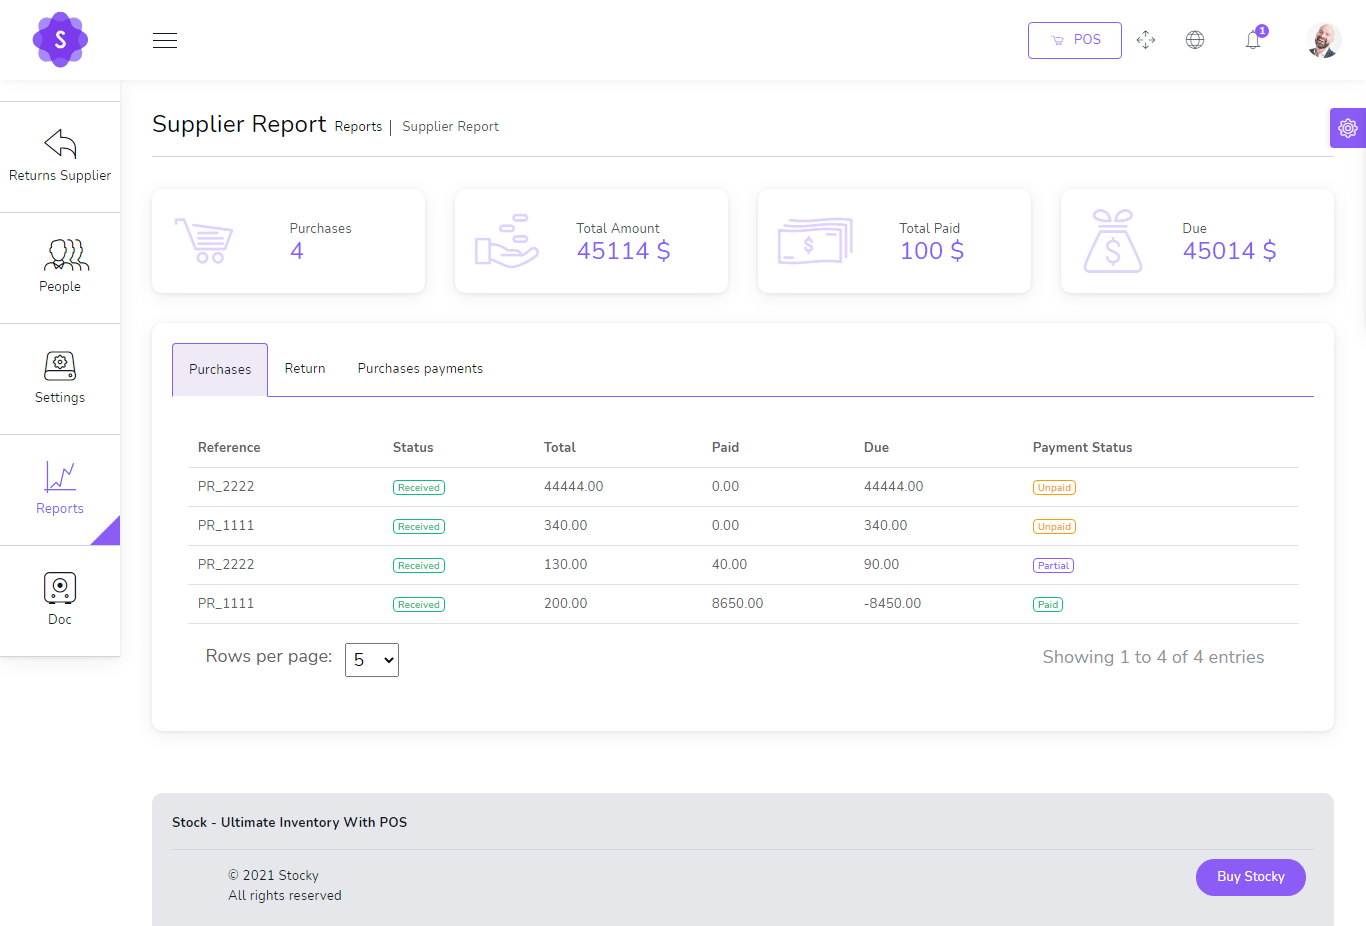
Top selling products report
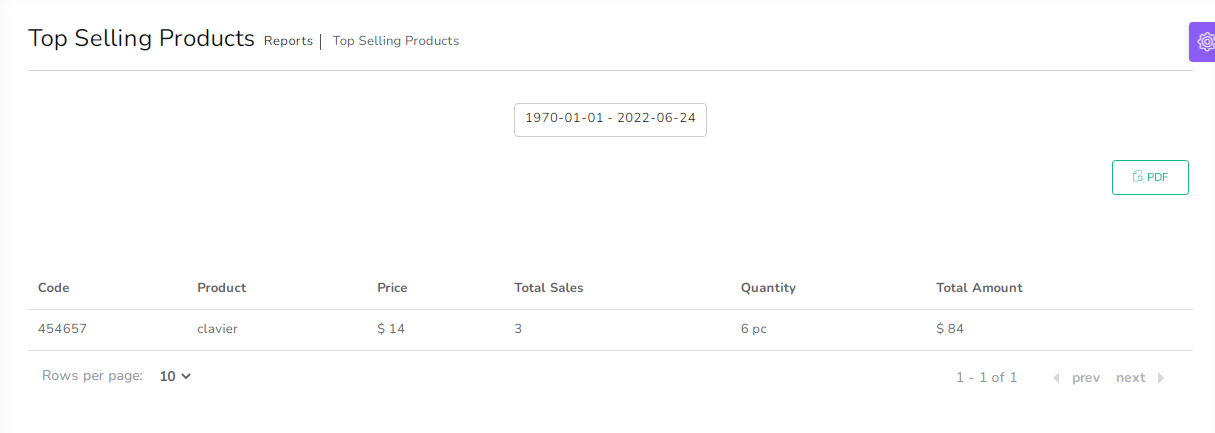
Best Customers report
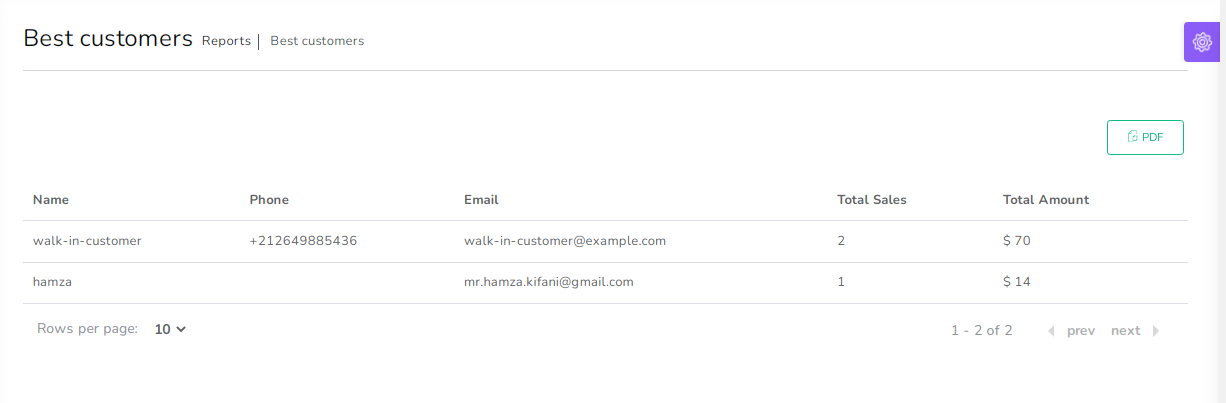
Users report
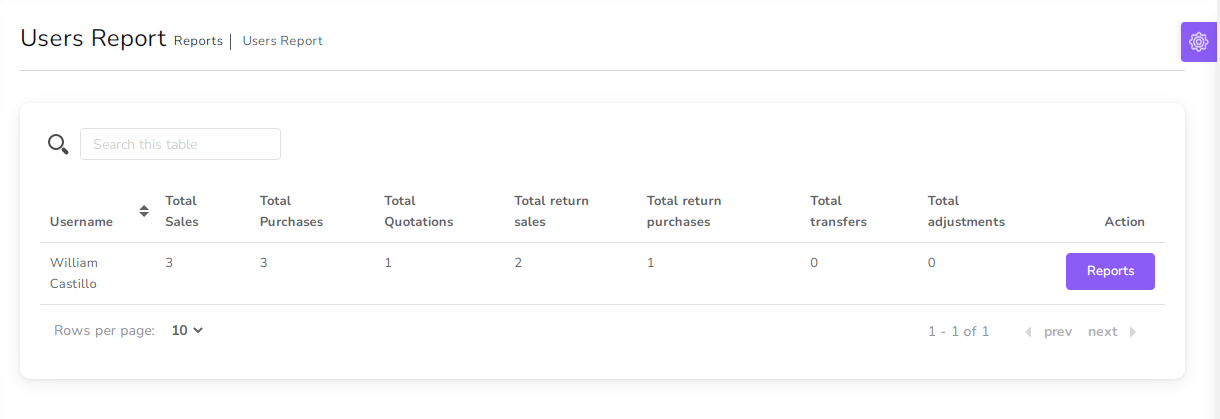
Ratings & review